
In this blog, we’ll give an introduction to the concept of Documentation as Code and the powerful Docusaurus framework.
This article is part of the “Mastering Documentation as Code” series, a comprehensive blog series designed to guide you through the process of building, hosting, and automating your documentation using Docusaurus, Azure, Terraform, and GitHub Actions. It’s broken down in the following parts:
- Part I: “Getting Started with Documentation as Code”. This part gives an introduction to Docusaurus and the concept of Documentation as Code.
- Part II: “Hosting Your Docs on Azure with Infrastructure as Code”. This part covers how to set up and configure Azure services for hosting your docs.
- Part III: “Automating Your Docs Build and Deployment with GitHub Actions”. This part contains a step-by-step guide for configuring GitHub Actions to automate your docs build and deployment.
- Part IV: “Adding a Custom Domain and SSL Certificate”. This part covers how to set up a custom domain and SSL certificate for your docs site using Azure services.
Documentation as Code
Documentation as Code is a relatively new approach to documentation that has been gaining popularity in recent years. Essentially, Documentation as Code involves treating documentation like code, using the same tools, processes, and best practices used in software development.
Traditionally, documentation has been viewed as a separate, standalone process that is created after the software has been developed. This approach, however, has a number of challenges, including outdated or inaccurate documentation, difficulty in keeping documentation up-to-date, and a lack of collaboration between developers and technical writers.
Documentation as Code seeks to address these challenges by bringing documentation into the development process. By treating documentation like code, it becomes an integral part of the development process, allowing for greater collaboration, version control, and automation.
One of the key benefits of Documentation as Code is that it enables continuous integration and deployment, just like software code. This means that documentation updates can be automatically built and deployed along with code changes, ensuring that documentation is always up-to-date and in sync with the latest software changes.
Docusaurus

Docusaurus is a widely-used open-source framework that simplifies the creation and maintenance of documentation websites. Developed by Facebook, Docusaurus streamlines the process of building documentation sites, making it easier for developers and technical writers to focus on creating high-quality content.
The Docusaurus framework is built on top of popular tools and frameworks such as React, Webpack, and Markdown, providing a familiar environment for developers and technical writers. With Docusaurus, users can easily create multiple versions of documentation and allow users to switch between them, simplifying the maintenance of backwards compatibility and keeping information up-to-date.
While Docusaurus is a popular choice for building documentation sites, there are other tools and frameworks that offer similar functionality. MkDocs, Docsify, and Gitbook are some popular alternatives to Docusaurus, each with their own strengths and weaknesses.
When choosing a tool or framework for building documentation sites, it’s important to consider your specific needs and preferences. However, if you’re looking for a flexible, powerful, and user-friendly framework for creating documentation sites, Docusaurus is a great option to explore.
Getting started with Documentation as Code
In the following steps, we will explore how to create, customize and build a Docusaurus site. We’ll cover all the necessary steps to help you get started on creating a professional-looking documentation site that suits your needs. From changing the site’s title and tagline, to adjusting the theme colors, favicon, and social image card, we’ll guide you through each step of the way. So, let’s dive right in and get started!
Prerequisites
Before you can start creating your Docusaurus site, there are some prerequisites to fulfill:
- NodeJS: You’ll need to have Node ≥= 16.4.0 installed on your machine. You can download it here.
- Visual Studio Code: You’ll need a code editor. Although any code editor will do and this is something of personal preference, Visual Studio Code is a good (and free) choice. You can download it here.
Creating a Docusaurus site
Step 1: Open your terminal of choice and navigate to the directory where you want to create your Docusaurus site.
Step 2: Run the following command to scaffold a skeleton Docusaurus website.
npx create-docusaurus@latest schutten-docs classic
You can also use the template’s TypeScript variant by passing the --typescript flag.
npx create-docusaurus@latest schutten-docs classic --typescript
Step 3: This will create a new directory called schutten-docs. Navigate into the new directory:
cd schutten-docs
Step 4: Run the command below to preview your site and changes to it as you start editing the files. This will run a local development server that will serve your website and reflect the latest changes.
npm run start
This will start a local development server that you can access by opening your browser and navigating to http://localhost:3000.
Making adjustments to your Docusaurus site
Now that you have successfully installed and run your Docusaurus site, it’s time to make some adjustments to personalize it to your liking. In the following steps, we will guide you through the steps of changing the title, tagline, theme colors, favicon, footer, and social image card of your Docusaurus site.
First, let’s take a look at the file structure of your Docusaurus website, which includes the following directories and files:
- /blog/: Contains the Markdown files for the blog. If you have disabled the blog plugin, you can delete this directory. The path option can also be changed. For more information, please refer to the blog guide on the official Docusaurus website.
- /docs/: Contains the Markdown files for the documentation. To customize the order of the sidebar in sidebars.js, you can edit this directory. If you have disabled the docs plugin, this directory can be deleted, or you can change its name after setting the path option. More details can be found in the docs guide on the official Docusaurus website.
- /src/: Non-documentation files like pages or custom React components are stored here. Although non-documentation files don’t have to be placed strictly in this directory, centralizing them here makes it easier to specify if linting or processing is required.
- /src/pages/: Any JSX/TSX/MDX file in this directory will be converted into a website page. Further information can be found in the pages guide on the official Docusaurus website.
- /static/: Contains a static directory. The contents inside here will be copied into the root of the final build directory.
- /docusaurus.config.js: A configuration file that contains the website configuration.
- /package.json: A Docusaurus website is a React app. As a result, you can install and use any npm packages you like in them.
- /sidebars.js: The documentation uses this file to specify the order of documents in the sidebar.
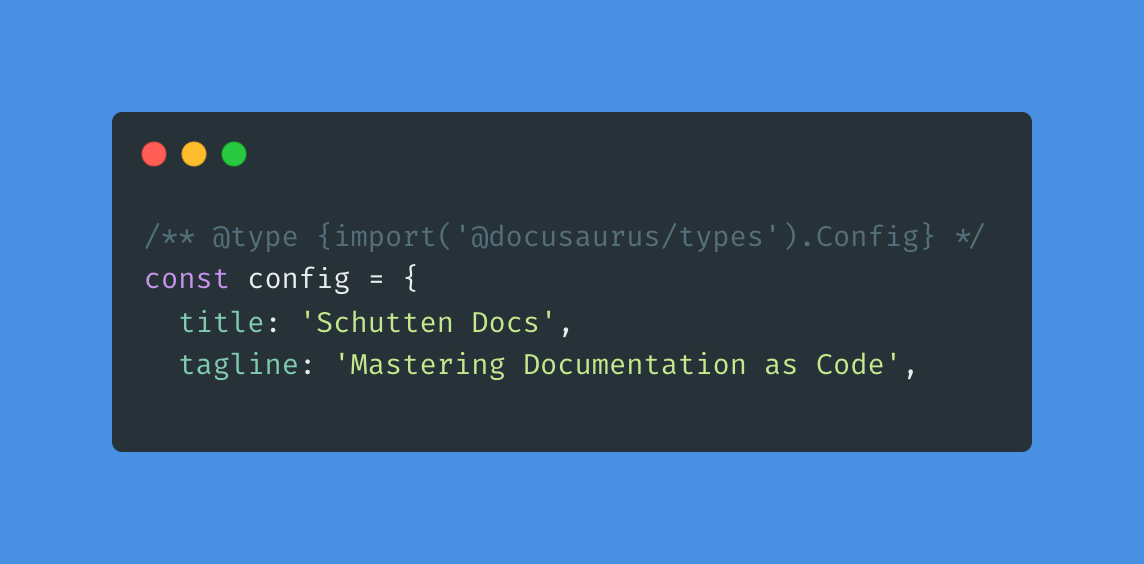
Step 5: To change the title and tagline of your Docusaurus site, navigate to the docusaurus.config.js file and open it in Visual Studio Code, or other code editor you’re using. Modify the title and tagline fields. For example, if you want to change the title to “Schutten Docs” and the tagline to “Mastering Documentation as Code” your code would look like this:
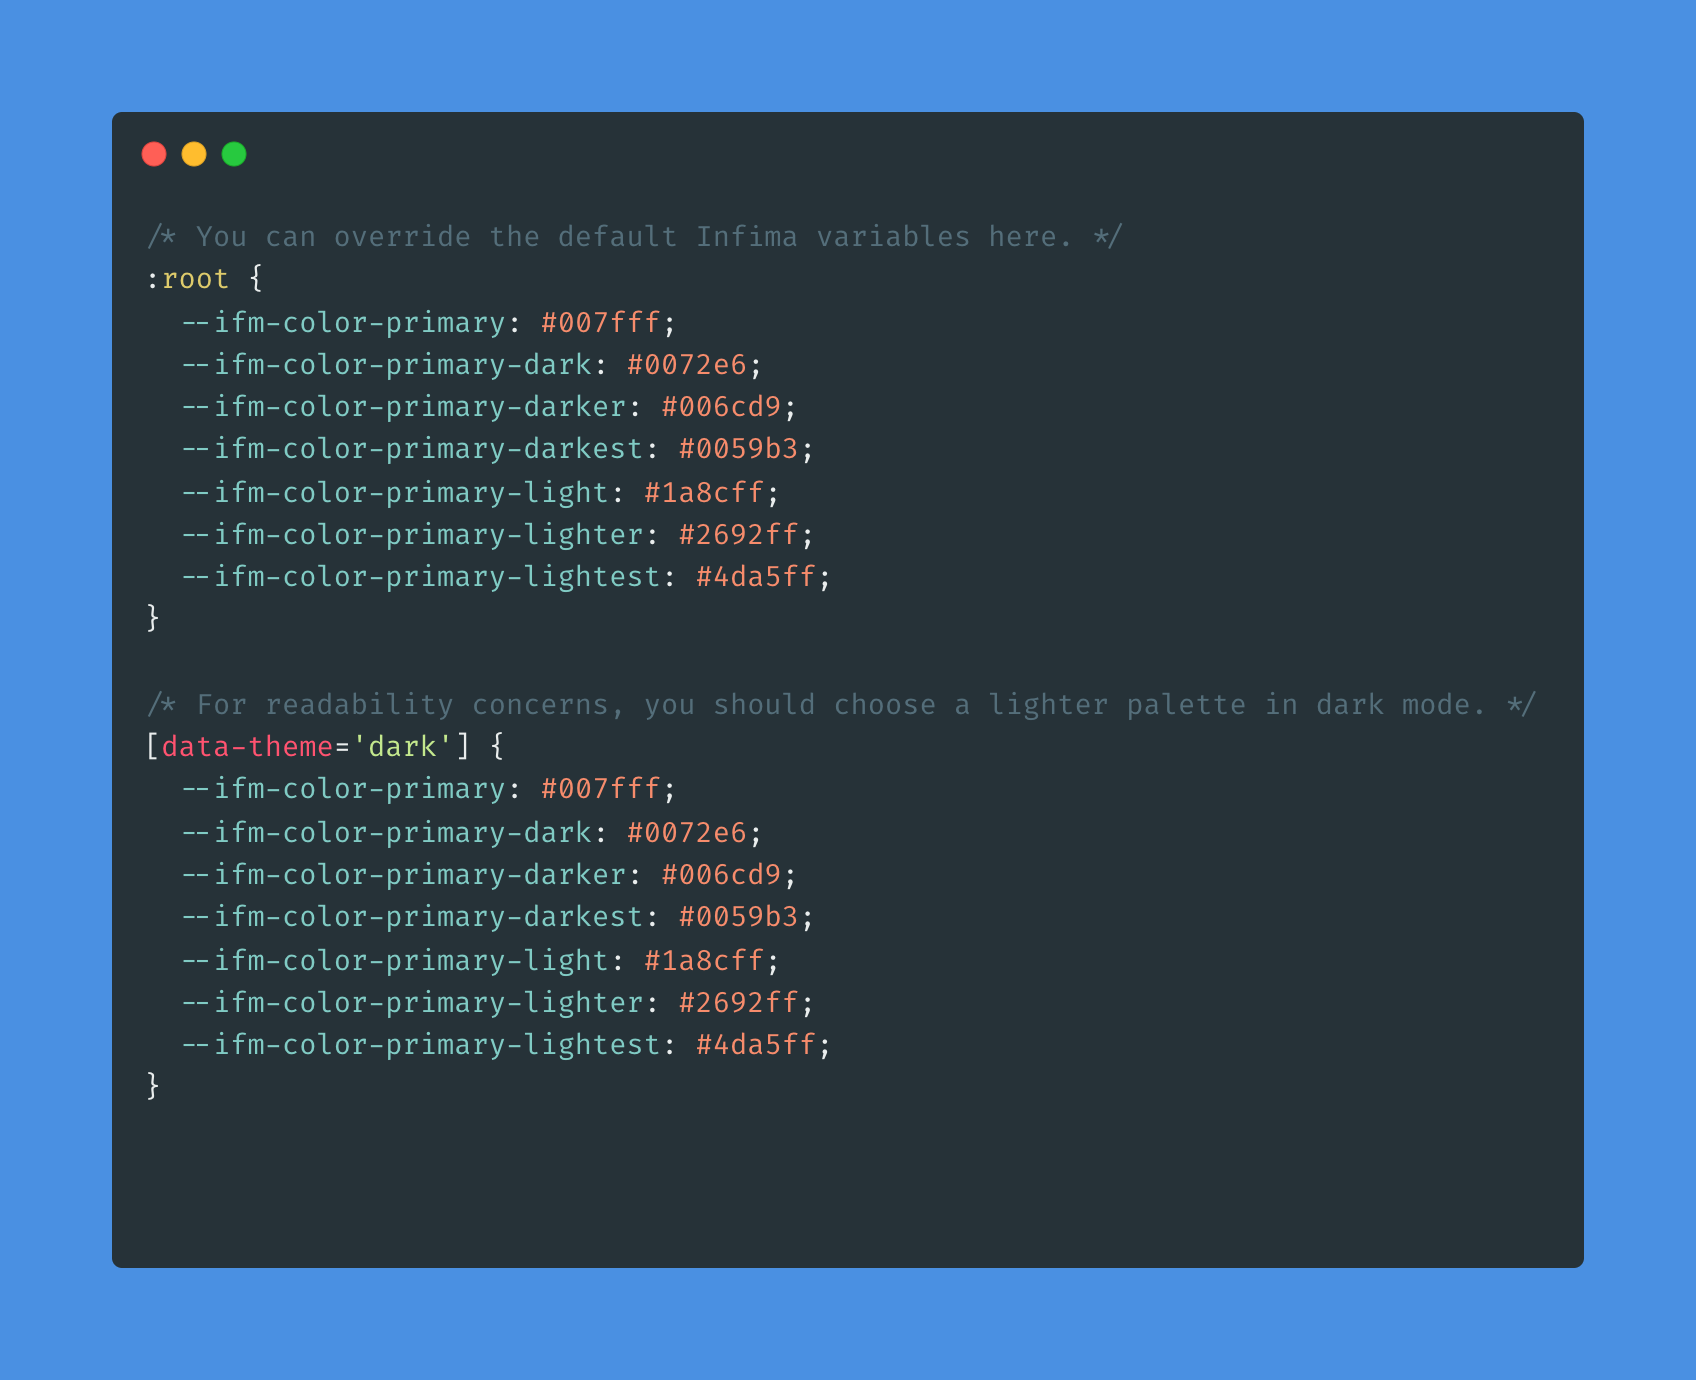
Step 6: Docusaurus comes with a default theme, which you can customize by modifying the colors defined in the /src/css/custom.css file. Docusaurus has provided a styling tool on their website to generate different shades for your website and copy the variables into this file. Navigate to [this website](https://docusaurus.io/docs/styling-layout#styling-your-site-with-infima], and create your desired color scheme. Replace the generated variables in your /src/css/custom.css file. For example, if you want to change the primary color to #007fff, your code would look like this:
Step 7: To change the favicon of your Docusaurus site, navigate to the /static/img directory and replace the favicon.ico file with your own favicon. You can create your own favicon using online tools such as Favicon.io or Canva.
Step 8: When you share your Docusaurus site on social media platforms such as Twitter, Facebook, or LinkedIn, a social image card is displayed along with the link. To customize this image, navigate to the /static/img directory and replace the docusaurus-social-card.jpg file with your own image. Keep in mind that the recommended dimensions for the image are 1200 x 630 pixels.
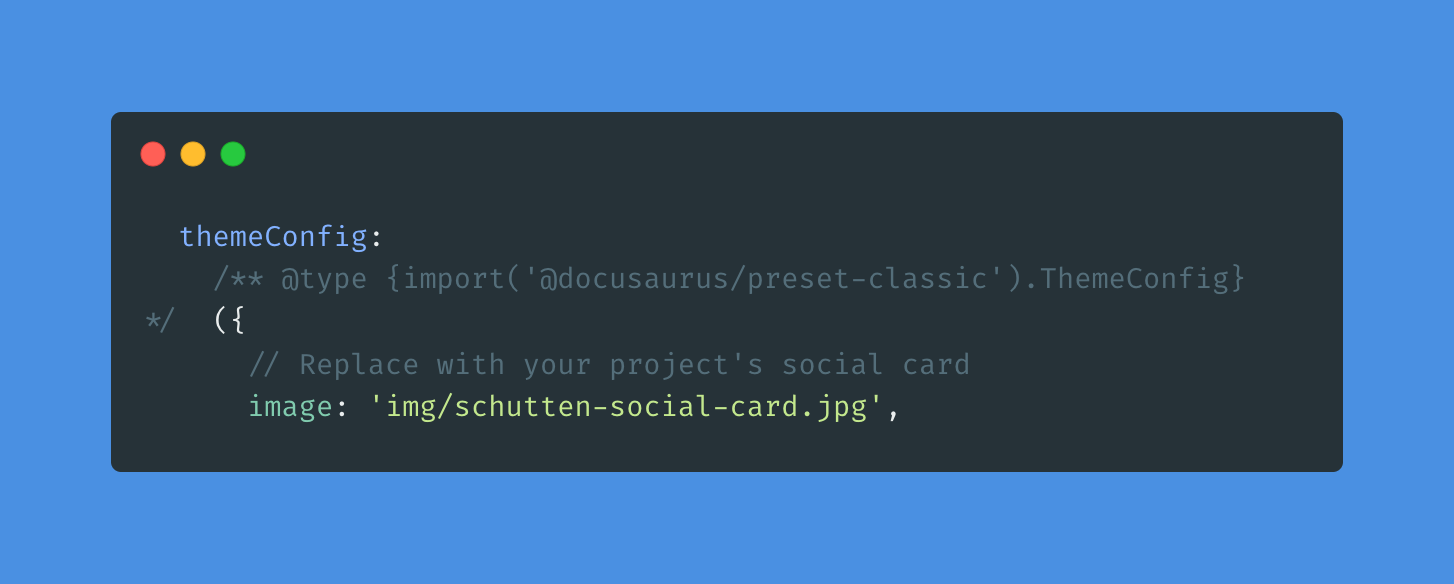
If you’d like to change the name of the social image card file, you’ll need to adjust the image field under the themeConfig within the docusaurus.config.js file. or example, if you want to change the name of the file to schutten-social-card.jpg, your code would look like this:
Step 9: Finally, it’s time to add your content. Adding new content to your Docusaurus site is as simple as adding new Markdown files. For blog posts, add a new Markdown file to the blog directory, and for docs pages, add a new Markdown file to the docs directory. To add new site pages, create a new Markdown file in the pages directory. Once you’ve added your Markdown file, it will automatically be converted into a page on your site. It’s that easy!
Building your Docusaurus site
Step 10: When you’re ready with editing your site and want to build it for deployment, run the following command:
npm run build
This will generate a production-ready build of your site in the build directory. Congratulations, your Docusaurus site is now ready to be deployed! In the next part, we will guide you through the steps of hosting your Docusaurus site on Azure with Infrastructure as Code.
Closing words
Creating a documentation website using Docusaurus can be a great solution for any project or organization. It enables you to easily create, customize and maintain your documentation in a user-friendly and organized way.
After reading this article, you should now have a good understanding of how to set up and adjust your Docusaurus site to your liking. With some practice and experimentation, you can further improve and personalize your site to meet your needs. To learn more about the topics that were covered in this blog article, refer to the links below:
Remember to keep your site up-to-date and accessible to your users, as good documentation can make all the difference in user experience and satisfaction.
Thank you for taking the time to go through this post and making it to the end. Stay tuned because we’ll keep continuing providing more content on topics like these in the future.