In this blog, we’ll cover the process of setting up and configuring Azure services for hosting your documentation site using Infrastructure as Code.
This article is part of the “Mastering Documentation as Code” series, a comprehensive blog series designed to guide you through the process of building, hosting, and automating your documentation using Docusaurus, Azure, Terraform, and GitHub Actions. It’s broken down in the following parts:
- Part I: “Getting Started with Documentation as Code”. This part gives an introduction to Docusaurus and the concept of Documentation as Code.
- Part II: “Hosting Your Docs on Azure with Infrastructure as Code”. This part covers how to set up and configure Azure services for hosting your docs.
- Part III: “Automating Your Docs Build and Deployment with GitHub Actions”. This part contains a step-by-step guide for configuring GitHub Actions to automate your docs build and deployment.
- Part IV: “Adding a Custom Domain and SSL Certificate”. This part covers how to set up a custom domain and SSL certificate for your docs site using Azure services.
In the previous part of this series, we learned how to set up a new Docusaurus site and explored the various files and directories that make up a Docusaurus project. We’ve created and build a basic website. In this part, we’ll take things a step further and we’ll be hosting the build output on Terraform-created Azure services. By the end of this part, you’ll have a fully functional Azure-hosted Docusaurus site.
Infrastructure as Code and Terraform
In the world of cloud computing, Infrastructure as Code (IaC) has become an essential practice for managing infrastructure in a more efficient, reliable, and scalable way. IaC allows developers to define and manage infrastructure resources using code, which can be versioned, tested, and automated.
Terraform is one of the popular IaC tools that enables developers to define and manage infrastructure resources in a declarative way. Terraform allows you to create, modify, and delete resources from various cloud providers, using a common configuration language. With Terraform, you can define your infrastructure as a set of resources and dependencies, and then use it to create, update, or delete resources as needed. This way, you can easily manage and scale your infrastructure, track changes, and ensure consistency across different environments. One of the main differences between Terraform and other IAC tools is that it allows for the use of multiple cloud providers and infrastructure types, including cloud infrastructure, on-premises infrastructure, and software as a service (SaaS) integrations. Terraform is also known for its modular design, which allows for code reuse and simplifies the management of large infrastructure deployments.
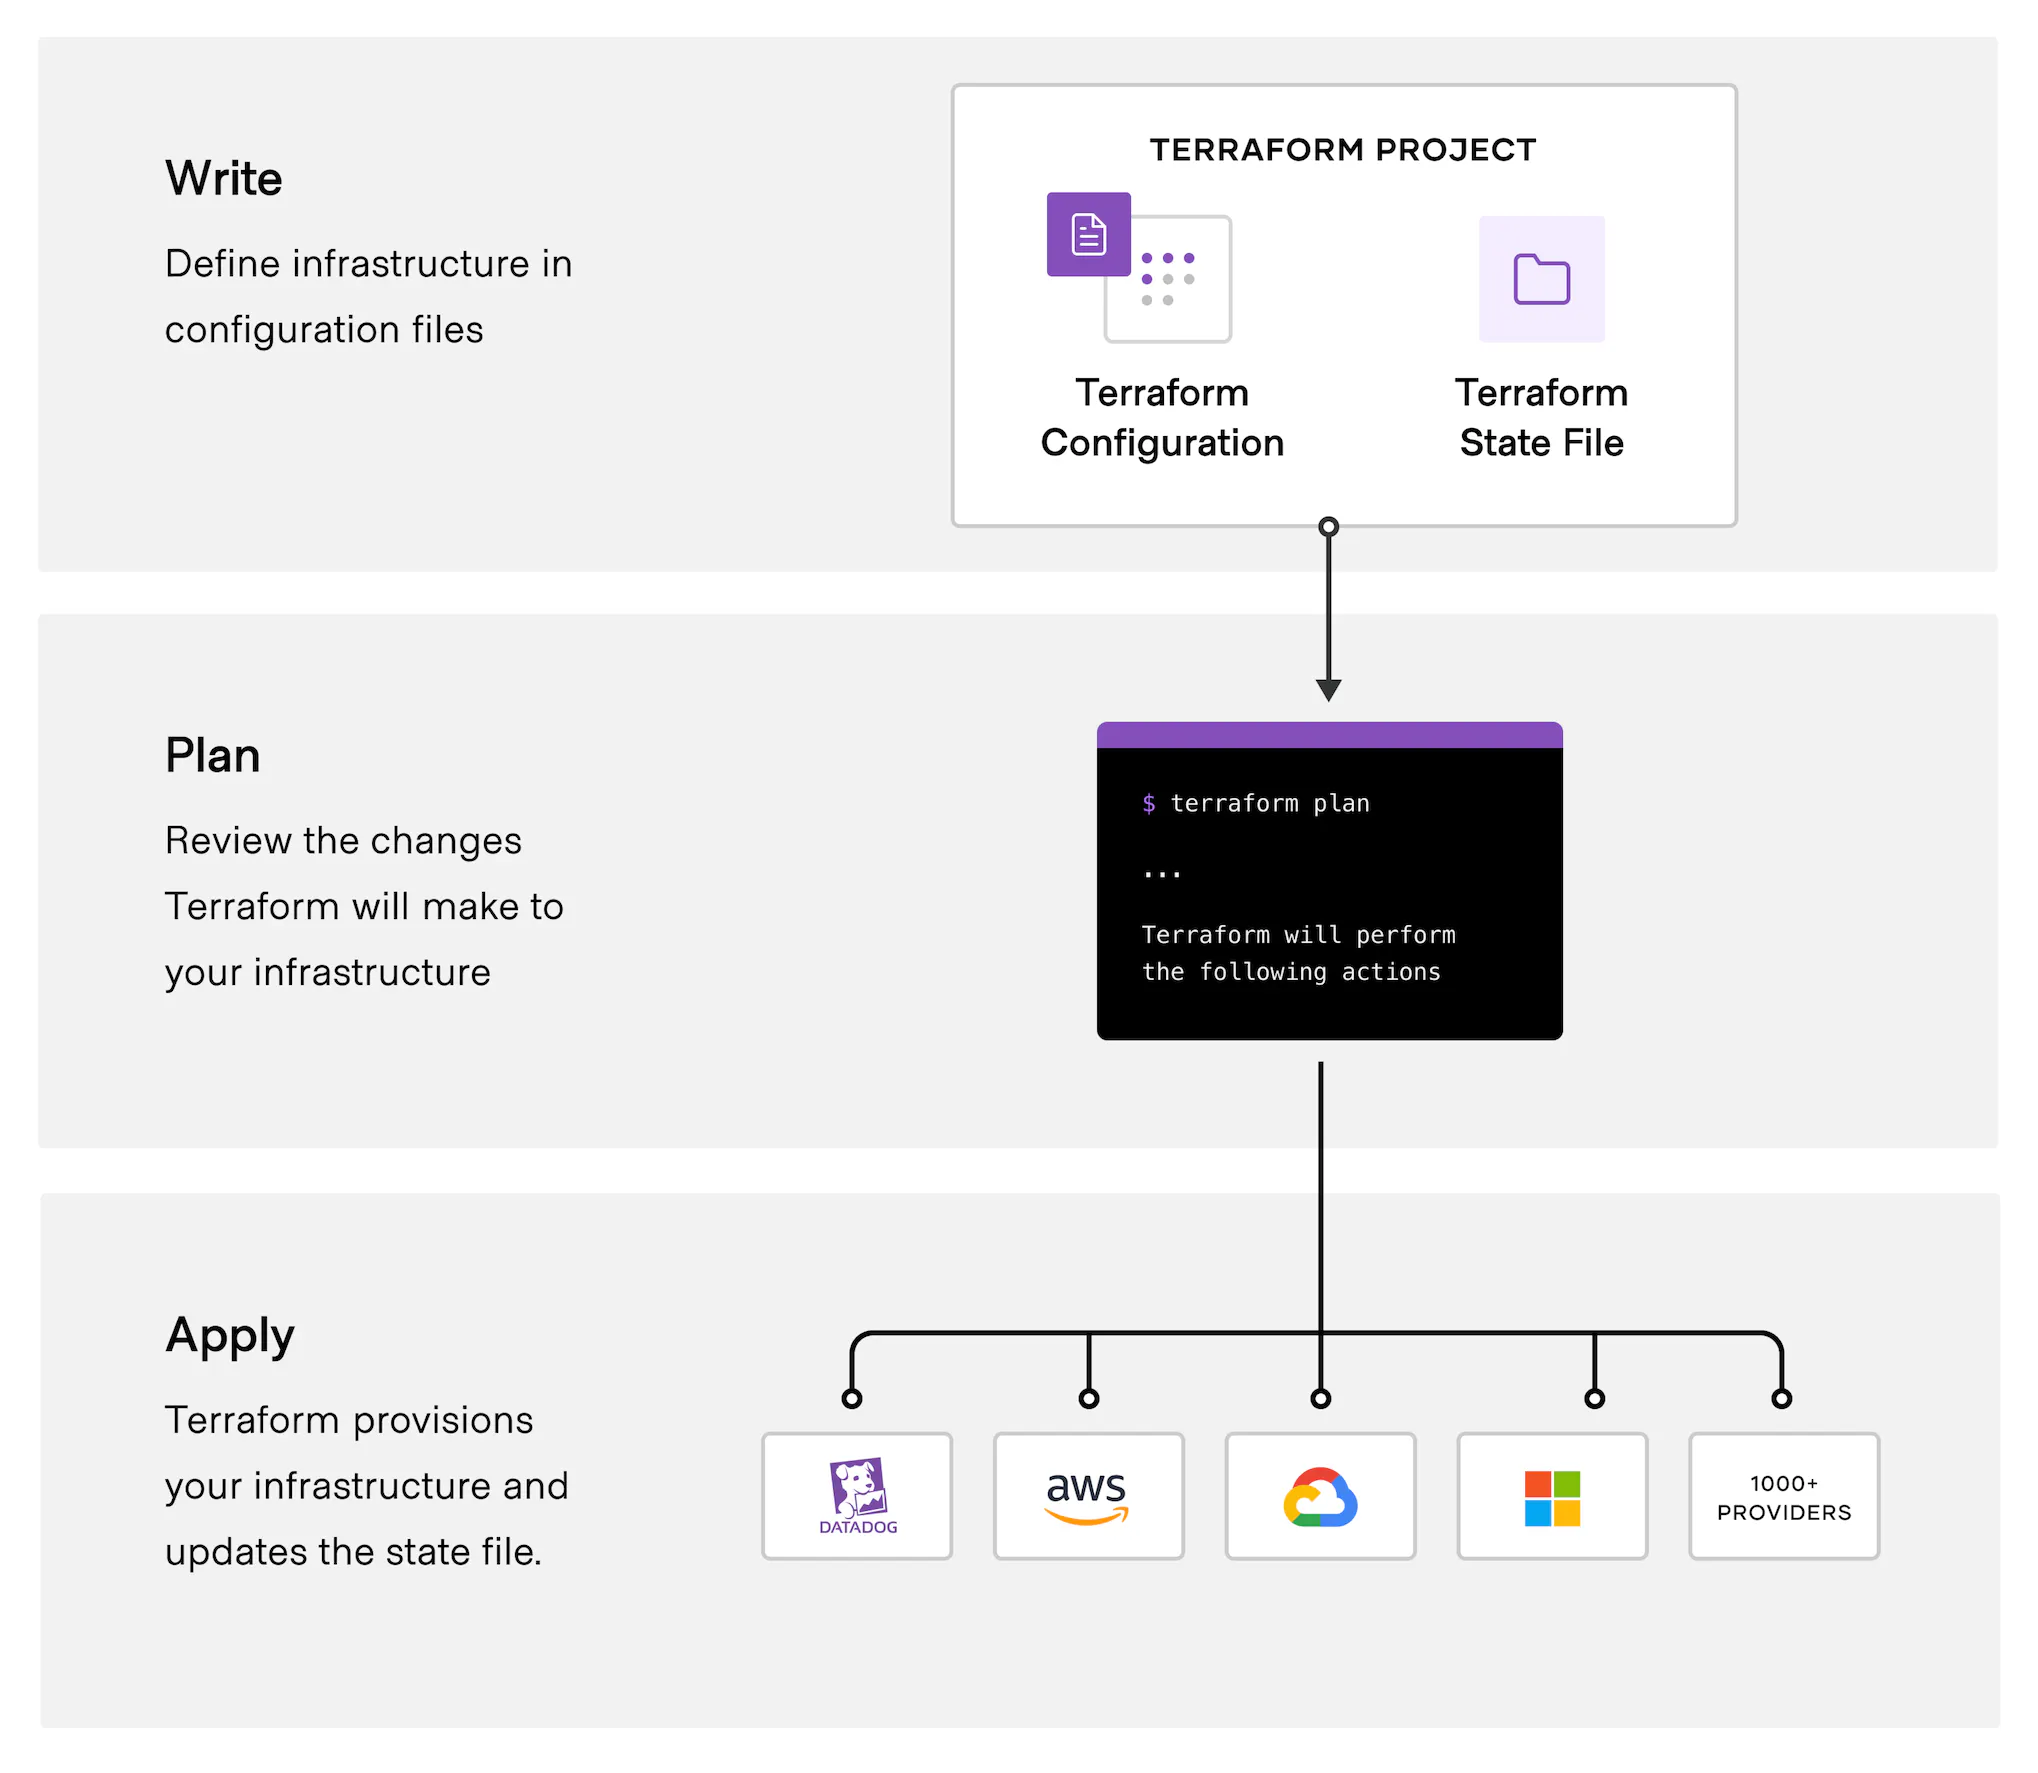
Terraform’s unique selling point is its use of a state file, which is a JSON file that contains the current state of the infrastructure. It allows Terraform to know what changes to make to the infrastructure to bring it to the desired state, and it also keeps track of the resources created by Terraform. This is a big benefit because it helps with version control of the infrastructure, and it ensures that the infrastructure is always in a known and expected state.
Choosing a hosting option for your Docusaurus site
When it comes to hosting a site or web application on Azure, there are several options to choose from, including Static Web App, Azure App Services, Azure Storage Static Website, and Azure Kubernetes. Each option has its own requirements, considerations, and benefits.
- Azure Static Web App is a fully managed service that provides a scalable and secure hosting solution for your website. It offers built-in support for Azure Functions, APIs, and database backends. This option is ideal for teams looking to deploy a website quickly and efficiently, without the need for complex infrastructure management.
- Azure App Service offers a scalable and flexible platform for hosting web applications. This platform supports a range of programming languages, frameworks, and tools. It provides the ability to deploy and manage your website on a secure and reliable infrastructure.
- Azure Storage Static Website is another option to host your site. It allows you to host static websites directly from Azure Storage, with support for serverless workflows and CDN integration. This option is ideal for developers looking for a simple and cost-effective hosting solution for their site.
- Azure Kubernetes Service (AKS) is a container-based hosting solution that offers unparalleled flexibility and scalability. It allows you to deploy and manage your site in a containerized environment, with support for automated scaling, continuous delivery, and more. This option is ideal for teams looking to build and deploy complex, large-scale applications.
For our purposes, we’re going to use Azure Static Web Apps. It is the most cost-efficient option and provides easy automation of build and release pipelines using GitHub Actions. It is also very easy to add a custom domain and self-managed SSL certificate, which we will cover in the last part of this series. Additionally, it is specifically designed for hosting static sites, making it an ideal option for hosting Docusaurus sites.
Hosting your Docs on Azure
In the following steps, we will walk step-by-step on the creation of Azure resources with Terraform, to host our previously build Docusaurus site. So, let’s dive right in and get started!
Prerequisites
Before you can start creating the resources and host your Docusaurus site, there are some prerequisites to fulfill:
- Docusaurus Build: You’ll need an actual build of a Docusaurus site. This is the build output directory and files of the
npm run buildcommand in the first part of this blog series. - Azure tenant and user account: You’ll need an Azure tenant, an Azure Active Directory (Azure AD) instance. This instance is the foundation of the environment. And it allows you to create an identity (user account) to connect to Azure, set up the environment, and deploy the resources.
- Subscriptions: You’ll need a subscription and owner permissions to deploy the resources and minimize the costs by removing the resources at the end.
- GitHub account: You’ll need a GitHub account. We’ll be using GitHub Actions to streamline the deployment process and easily deploy our app to Azure. You can sign up here.
- Terraform: You’ll need the Terraform command-line interface to deploy and manage Azure resources. You can find more information about Terraform in the documentation.
- Azure CLI: You’ll need the Azure command-line interface for deploying the resources, and you can find more information about the Azure CLI in the documentation.
- Git: You’ll need to have Git installed on your machine to track and deploy changes to your files within the source code of your app. You can download it here.
- Visual Studio Code: You’ll need a code editor. Although any code editor will do and this is something of personal preference, Visual Studio Code is a good (and free) choice. You can download it here.
Once you have fulfilled the prerequisites, we are ready to move forward and create our resources to host our Docusaurus site! We’ll cover the implementation through various examples. All of the examples below can be downloaded from this GitHub Repository.
Creating Azure resources for the Terraform state file
We are creating the Azure resource group and storage account with Azure CLI, because Terraform requires an existing storage account to store the state file. The state file is used to store the current state of the infrastructure being managed by Terraform, including the resources that have been created or modified. By storing the state file in an Azure storage account, it can be easily accessed and shared by multiple users, and can be used to recover the infrastructure in case of a disaster.
Step 1: First, log in to Azure CLI by running the command az login in your terminal of choice, and follow the prompts to complete the login process.
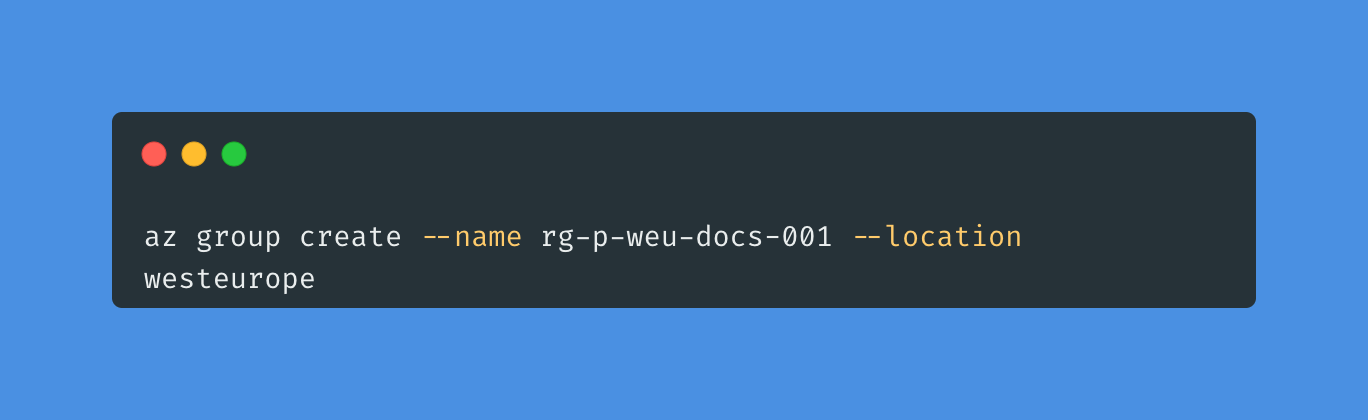
Step 2: After logging in, create an Azure resource group with the following command:
az group create --name <resource-group-name> --location <location>
Replace resource-group-name with a unique name for the resource group and location with the Azure region where you want to create the resource group. See the example below:
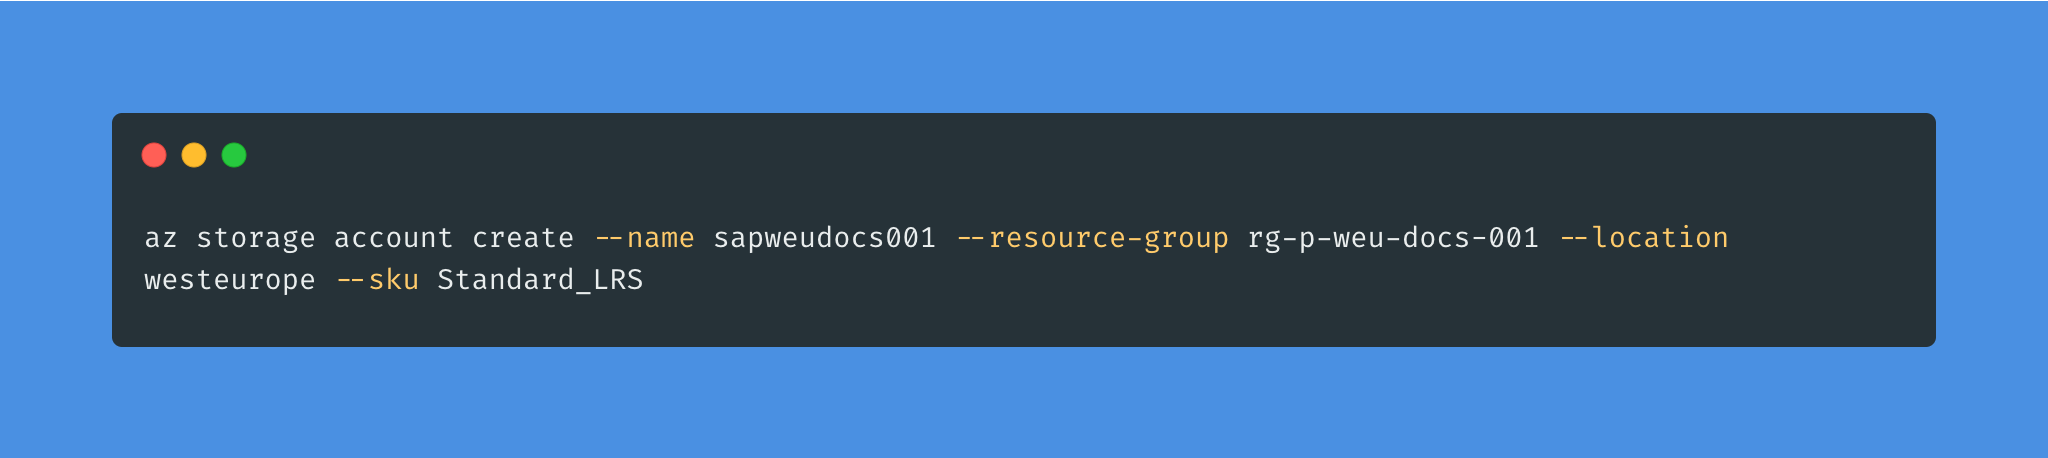
Step 3: Next, create an Azure storage account with the following command:
az storage account create --name <storage-account-name> --resource-group <resource-group-name> --location <location> --sku Standard_LRS
Replace storage-account-name with a unique name for the storage account, resource-group-name with the name of the resource group you created in step 2, and location with the same Azure region you used in step 2. The --sku parameter sets the redundancy level of the storage account to Standard_LRS, which is the cheapest and most commonly used option. See the example below:
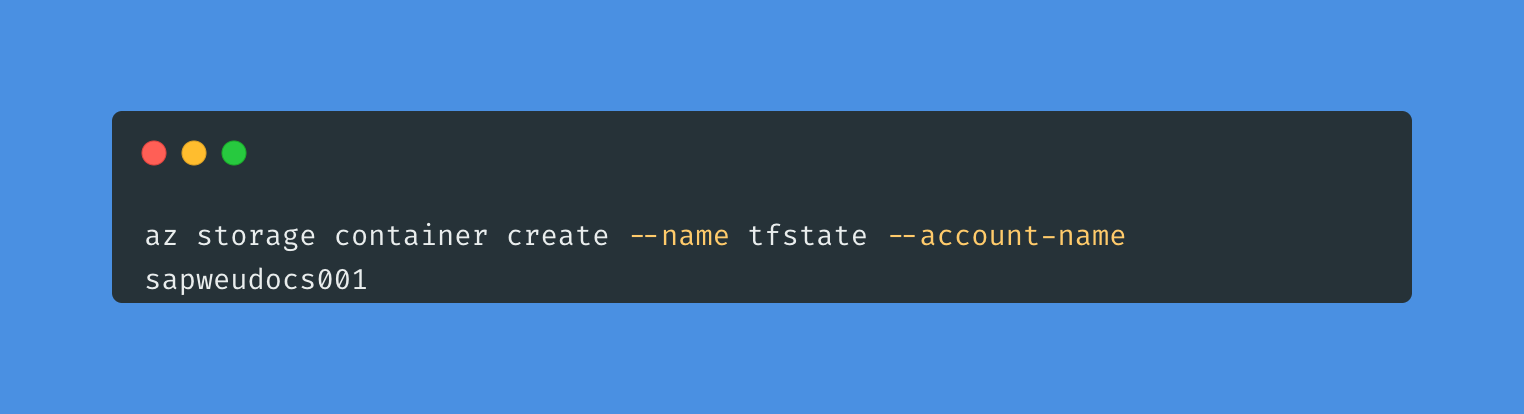
Step 4: Once the storage account is created, create a storage container within it using the following command:
az storage container create --name <container-name> --account-name <storage-account-name>
Replace container-name with a name for the storage container, and storage-account-name with the name of the storage account you created in step 3. See the example below:
Creating infrastructure with Terraform for Azure Static Web App
In the previous section, we created an Azure resource group, an Azure storage account, and a storage container for the terraform state file, all by using Azure CLI. In this section, we will use Terraform for the creation of the resources that will host our Docusaurus site on an Azure Static Web App.
Before we get started with writing Terraform code, let’s briefly explain the file structure of Terraform. There are three main types of Terraform files: provider, variable, and main configuration files.
- The
provider.tffile is used to specify the provider that will be used in the Terraform code. The provider is essentially the API that Terraform will use to create, update, and delete resources. In our case, we will be using the AzureRM provider. - The
variables.tffile is used to declare the variables that will be used in the Terraform code. Declaring variables allows us to pass values to the Terraform code at runtime, which makes our code more flexible and reusable. - The
main.tffile is where the bulk of the Terraform code will reside. This file contains the resources we want to create and their configurations, as well as any other necessary settings.
Now that we have a basic understanding of Terraform file structure, let’s dive into the steps for creating the necessary resources to host our Docusaurus site on an Azure Static Web App.
Step 1: Open a terminal or command prompt and navigate to the directory where you want to create the Terraform files. Create the three new files with the names providers.tf, main.tf, and variables.tf, by running the command below.
touch providers.tf main.tf variables.tf
Step 2: Open the providers.tf file using Visual Studio Code, or any other code editor of your choice. Define the provider for Azure and configure the backend to store the state file in the previously created storage account in the providers.tf file. See the example below:
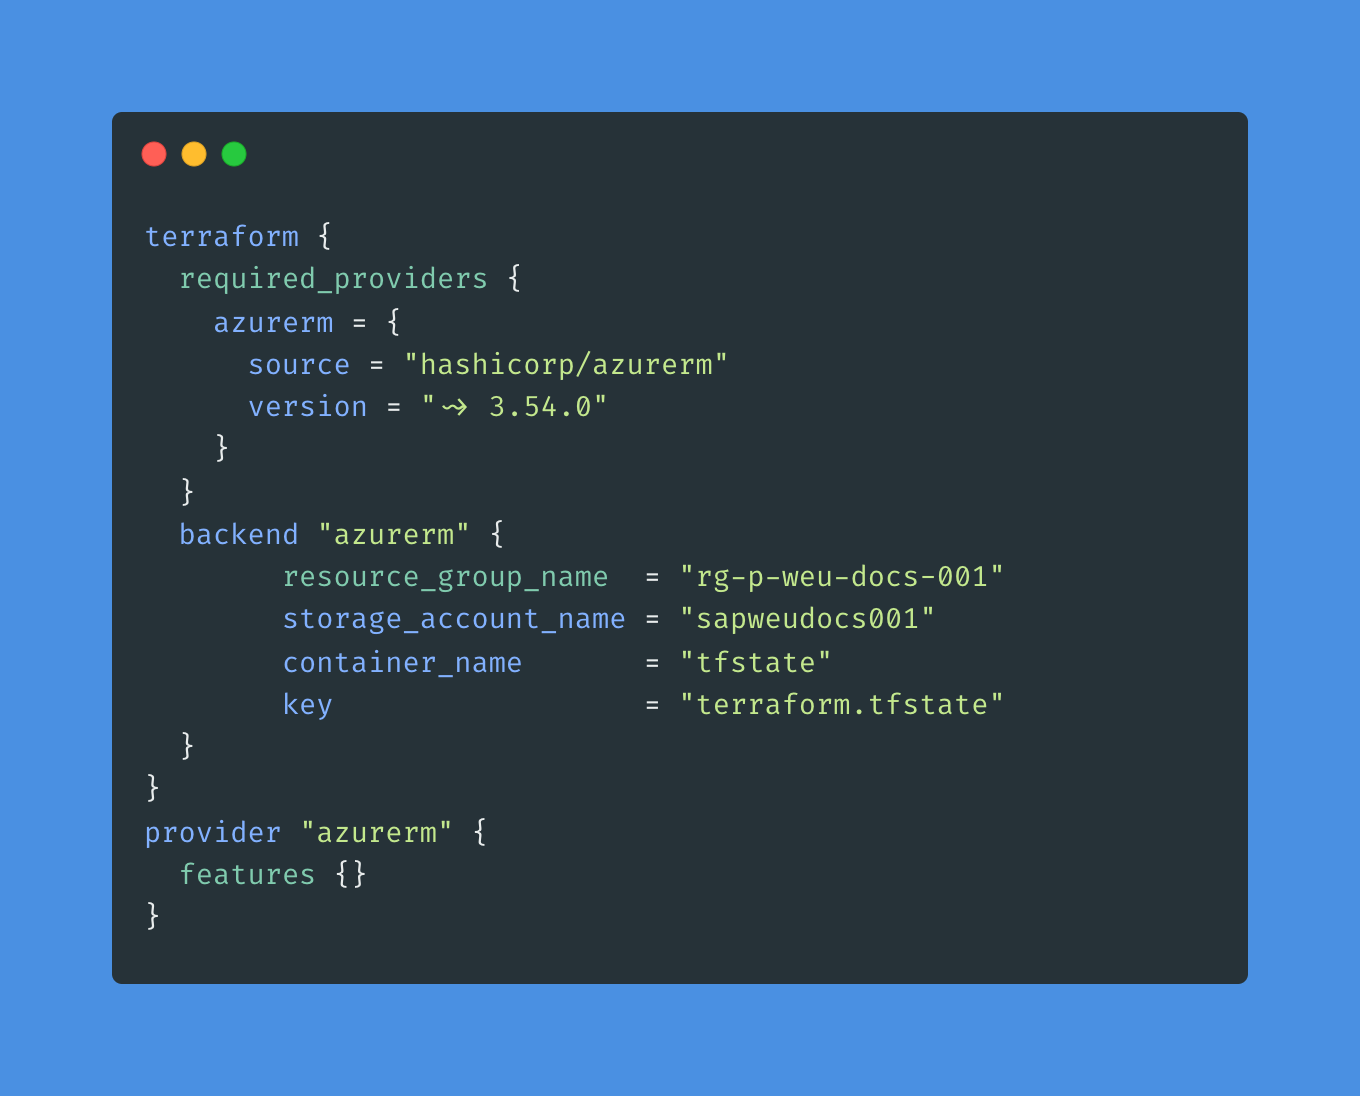
In this example, resource_group_name and storage_account_name are the names of the previously created Azure resource group and storage account, respectively. The container_name is the name of the container you created within the storage account. The key is the name of the state file.
Note that you will need to replace the resource_group_name and storage_account_name with your own values! Also, make sure to save your changes.
With this configuration, Terraform will store the state file in the container called tfstate within the storage account, and it will be accessible from the backend. The provider block specifies the azurerm provider, which is used to manage Azure resources.
We have specified that we require the azurerm with a minimum version of ~> 3.54.0. The tilde ~> specifies a range of compatible versions, and the 3.54.0 part specifies the minimum required version.
This constraint means that Terraform will use any version of the azurerm provider that is greater than or equal to version 3.54.0, but less than the next major version (e.g. it will not use version 4.x).
Step 3: Open the main.tf file using Visual Studio Code, or any other code editor of your choice. Add the Terraform code to create an Azure resource group and a static web app resource. See the example below:
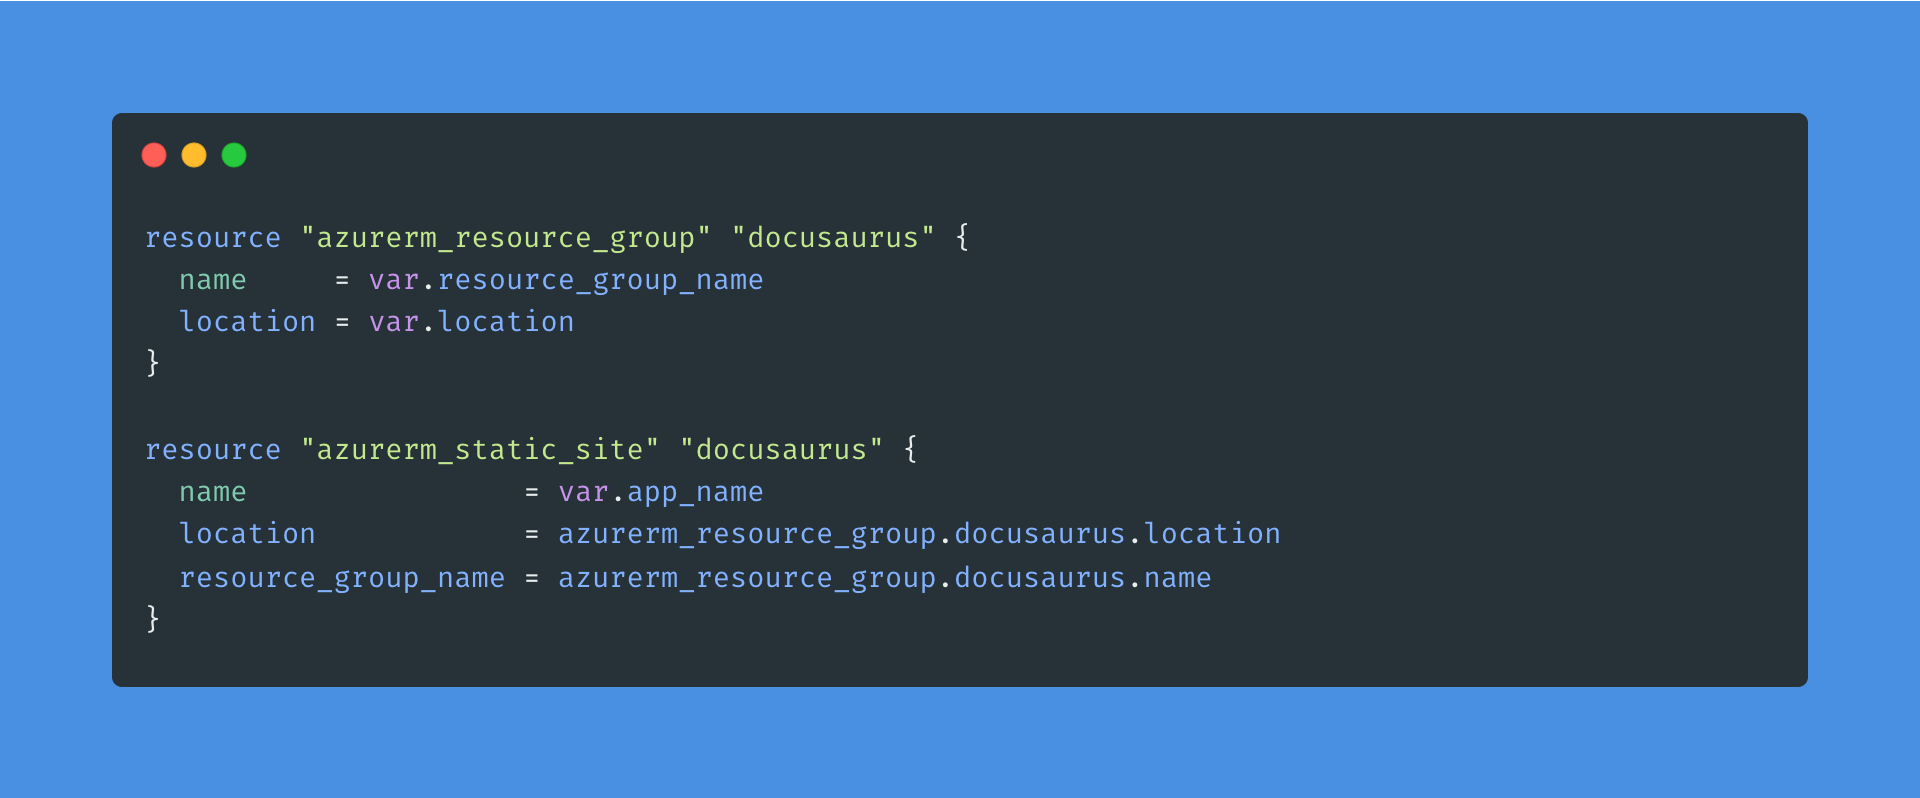
This Terraform code defines two resources that will be created on Azure: an Azure resource group and an Azure Static Web App.
Sure! The var. values in the Terraform code refer to variables that are defined in the variables.tf file.
Step 4: Open the variables.tf file using Visual Studio Code, or any other code editor of your choice. Add the variables to your Terraform code as the example below:
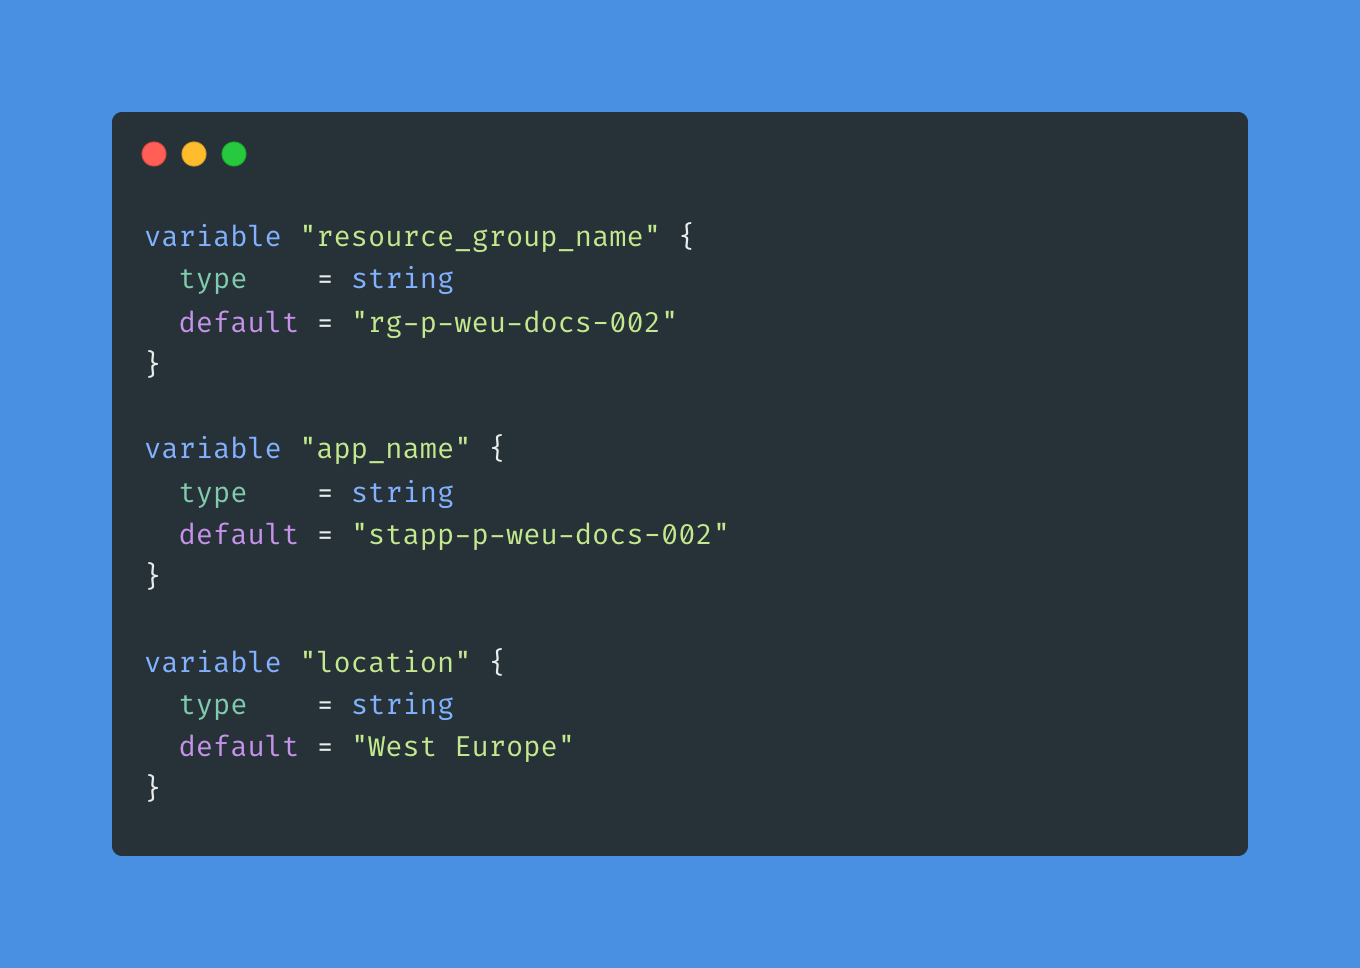
These variables will be used throughout the Terraform configuration to ensure that the code is reusable and can be easily updated. Change the variable default values to your liking.
The resource_group_name variable specifies the name of the resource group that will be created, the location variable specifies the location for all resources, and the app_name variable specifies the name of the Static Web App that will be created.
Step 5: Finally, it’s time to deploy our infrastructure components through our Terraform code. Run the commands below from the folder where you’ve created the .tf files as your working directory. These commands will log you in with Azure CLI, and initialize the working directory, create an execution plan, and execute the actions proposed in the plan using Terraform.
az login

terraform init
terraform plan
terraform apply --auto-approve
Once the deployment is completed, you can access the Azure Portal to validate the creation of your resources.
Deploying the Docusaurus build to the Azure Static Web App
Now that we’ve created the necessary Azure resources using Terraform, it’s time to deploy our Docusaurus build to the Azure Static Web App. This process involves deploying the build artifacts to the Azure Static Web App. Let’s get started!
Step 6: Open a terminal or command prompt and navigate to the build directory of your Docusaurus site using the cd command. Initialize a new git repository in this directory with git init command.
Step 7: Open your web browser and head on over to GitHub. Create a new repository on GitHub and save the URL of the repo to your clipboard.

Step 8: Add the GitHub repository as a remote to your local repository by running the following command in your terminal or command prompt:
git remote add origin <your repository url>
Step 9: Add the changes to the git repository with the following command:
git add .
Step 10: Commit the changes with the following command:
git commit -m "initial commit"
Step 11: Push the changes to the GitHub repository with the following command:
git push -u origin main
Step 12: Now we will deploy the website to the Azure Static Web App. To do this, we will create a new deployment action in GitHub. Navigate to the GitHub repository in your web browser, and click on the “Actions” tab. Click on the “Set up a workflow yourself” button.

Step 13: Add the following code to the YAML file and save:
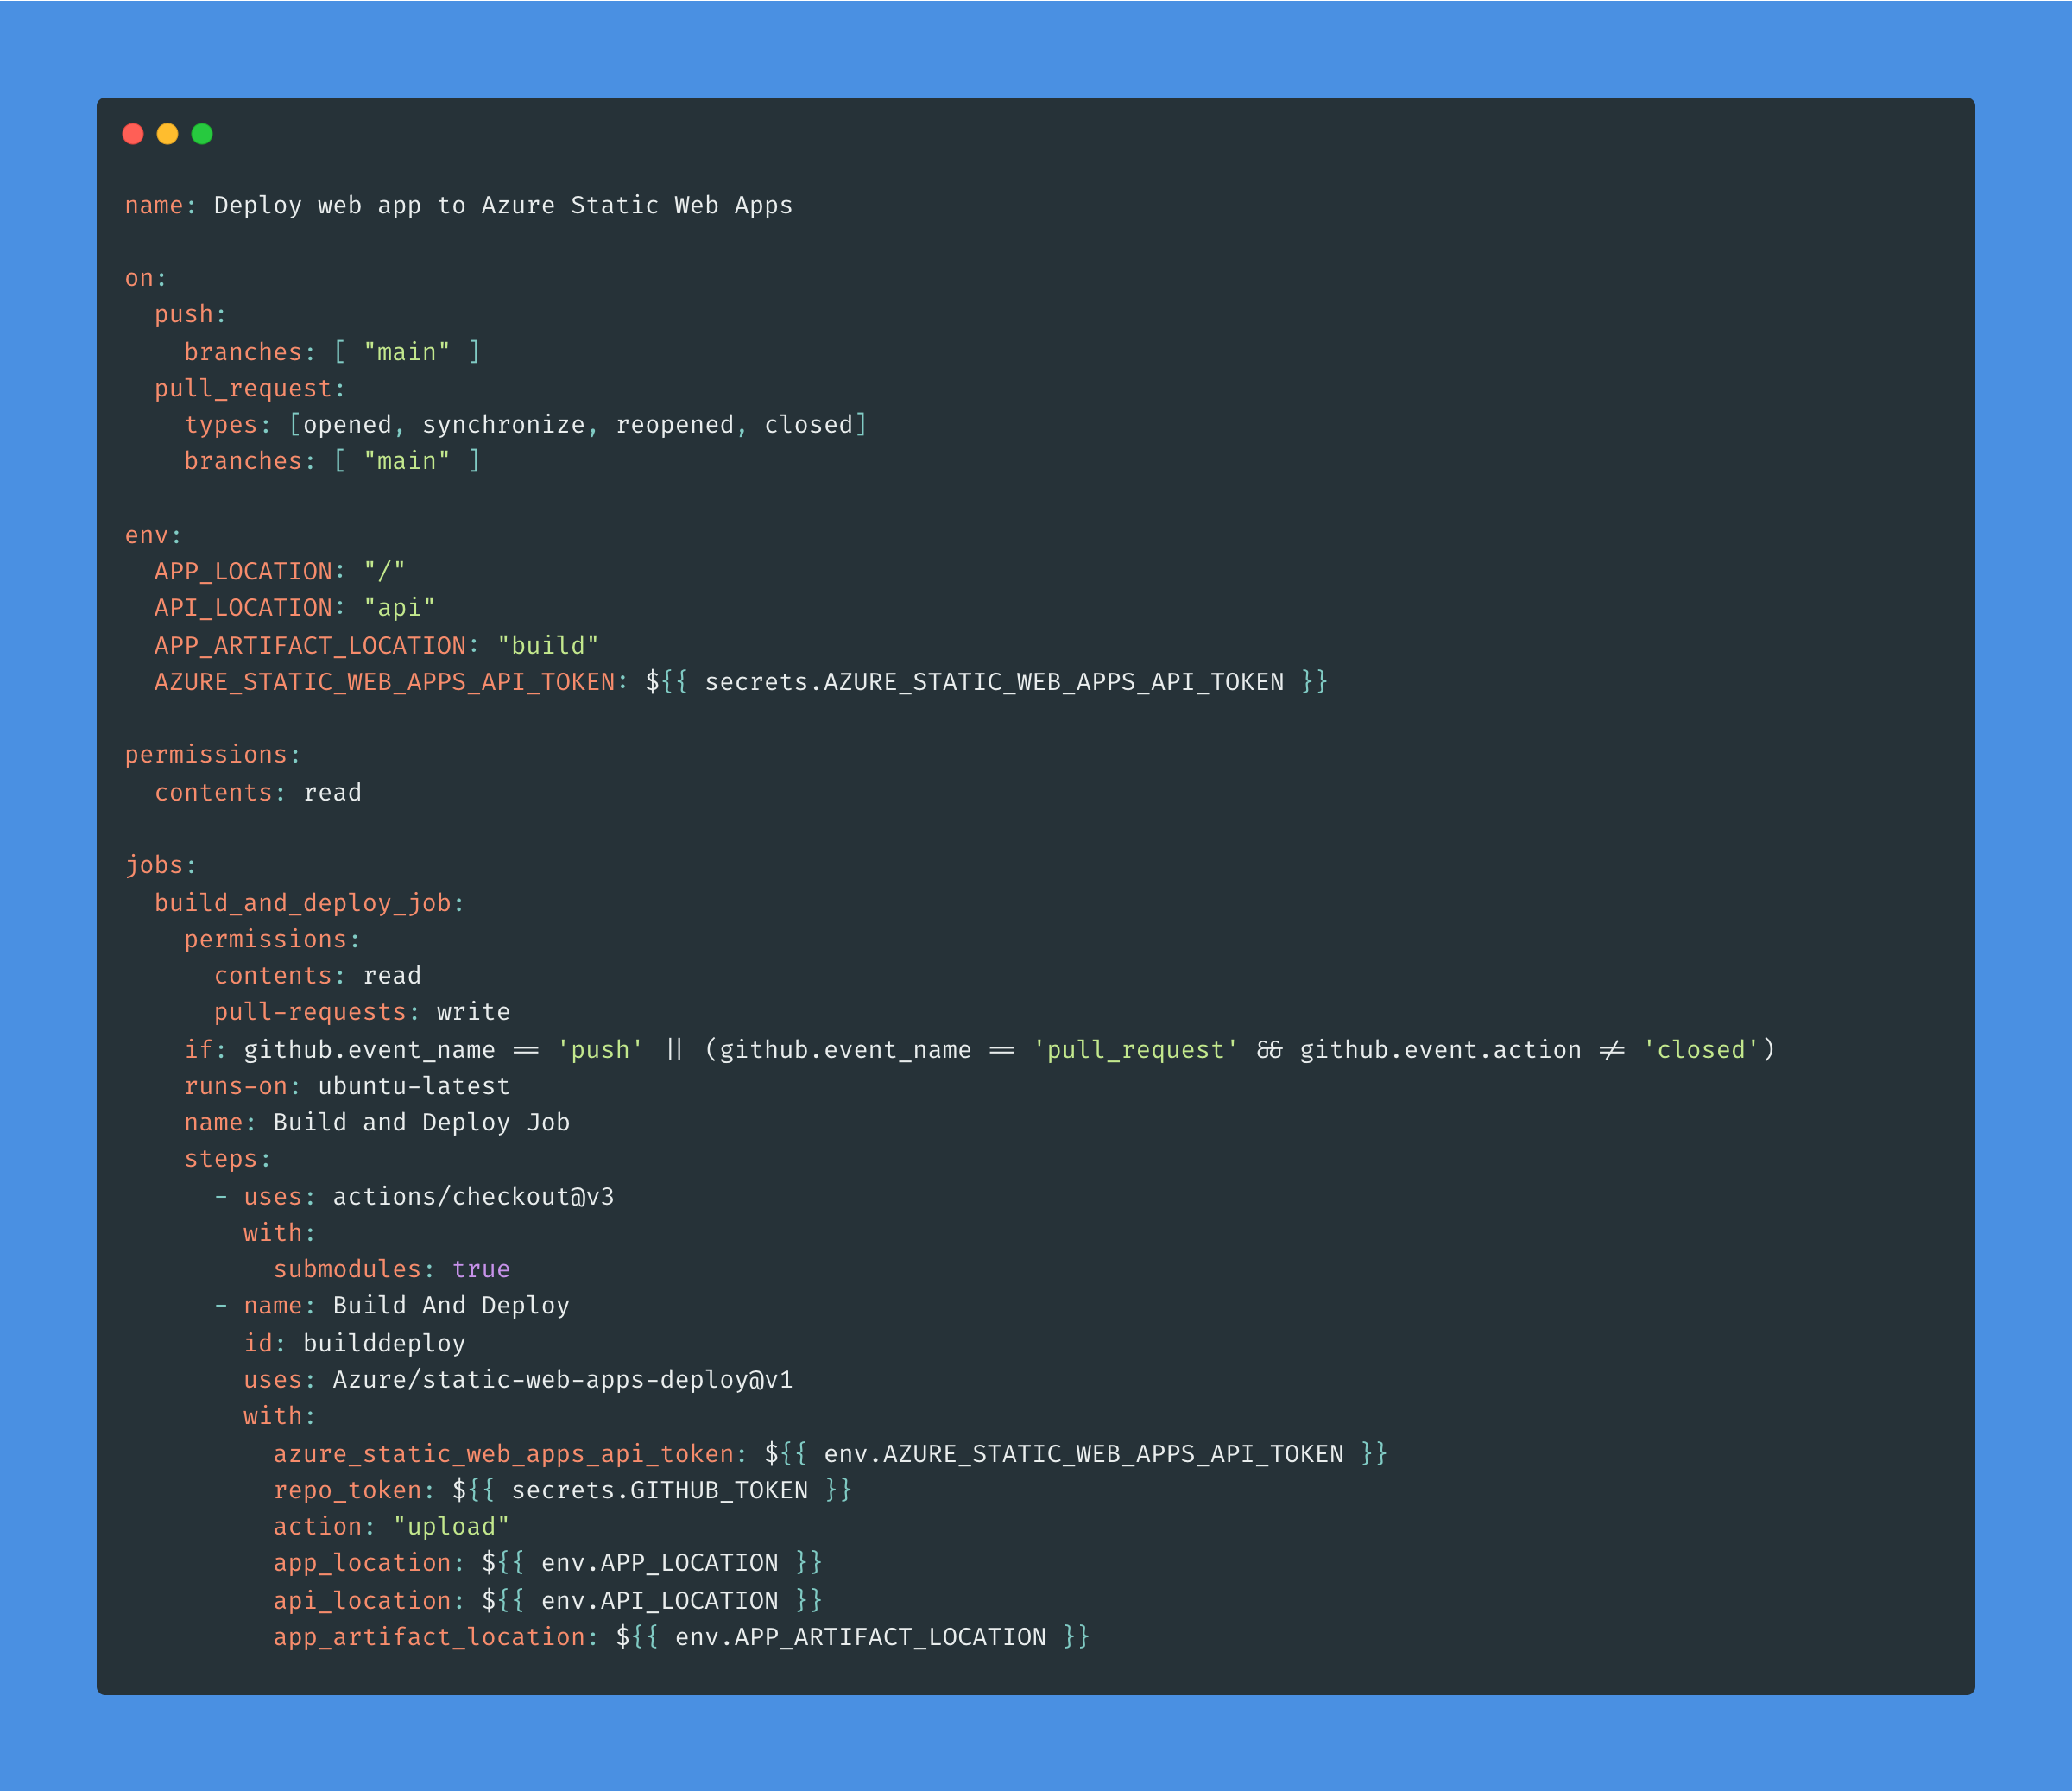
This is a YAML file for a GitHub Actions workflow that builds and deploys a web app to an Azure Static Web App.
The on section specifies when the workflow should run. In this case, it runs on push events to the main branch and on pull request events for the main branch that are opened, synchronized, reopened, or closed.
The permissions section specifies the level of access that the workflow has to the repository contents. In this case, it has read access.
The jobs section defines one job called “build_and_deploy_job”. This job runs on Ubuntu latest and has permissions to read repository contents and write to pull requests. The job is conditional on the type of GitHub event (push or pull request).
The steps section lists the steps that the job will execute. First, it checks out the repository using the actions/checkout action. Then, it builds and deploys the app using the Azure/static-web-apps-deploy action.
The “env” section defines environment variables that will be used in the workflow. Specifically, it defines the root directory of the app ("APP_LOCATION"), the directory for the API ("API_LOCATION"), the location of the build artifact ("APP_ARTIFACT_LOCATION"), and the Azure Static Web Apps API token ("AZURE_STATIC_WEB_APPS_API_TOKEN").
For this last one in particular, it is being declared as a secret. As we haven’t created our secret in GitHub Actions with API token yet, this first run will surely fail. We’ll do that in the next step.
Step 14: Being still logged in to our Azure environment with Azure CLI (if not, run az login), run the following command in your terminal or command prompt to retrieve a deployment token for your Azure Static Web App:
az staticwebapp deployment-token show --name <app_name> --resource-group <resource_group_name>
Copy this value to your clipboard, as we will be needing it in the next step.
Step 15: Go back to the GitHub repository in your web browser, where you have the Docusaurus code uploaded. Click on the “Settings” tab. In the left sidebar, click on “Secrets”. Click on “New repository secret”.
In the Name field, enter AZURE_STATIC_WEB_APPS_API_TOKEN. In the Value field, paste the deployment token that you obtained from the Azure CLI (from your clipboard), and click on “Add secret”.
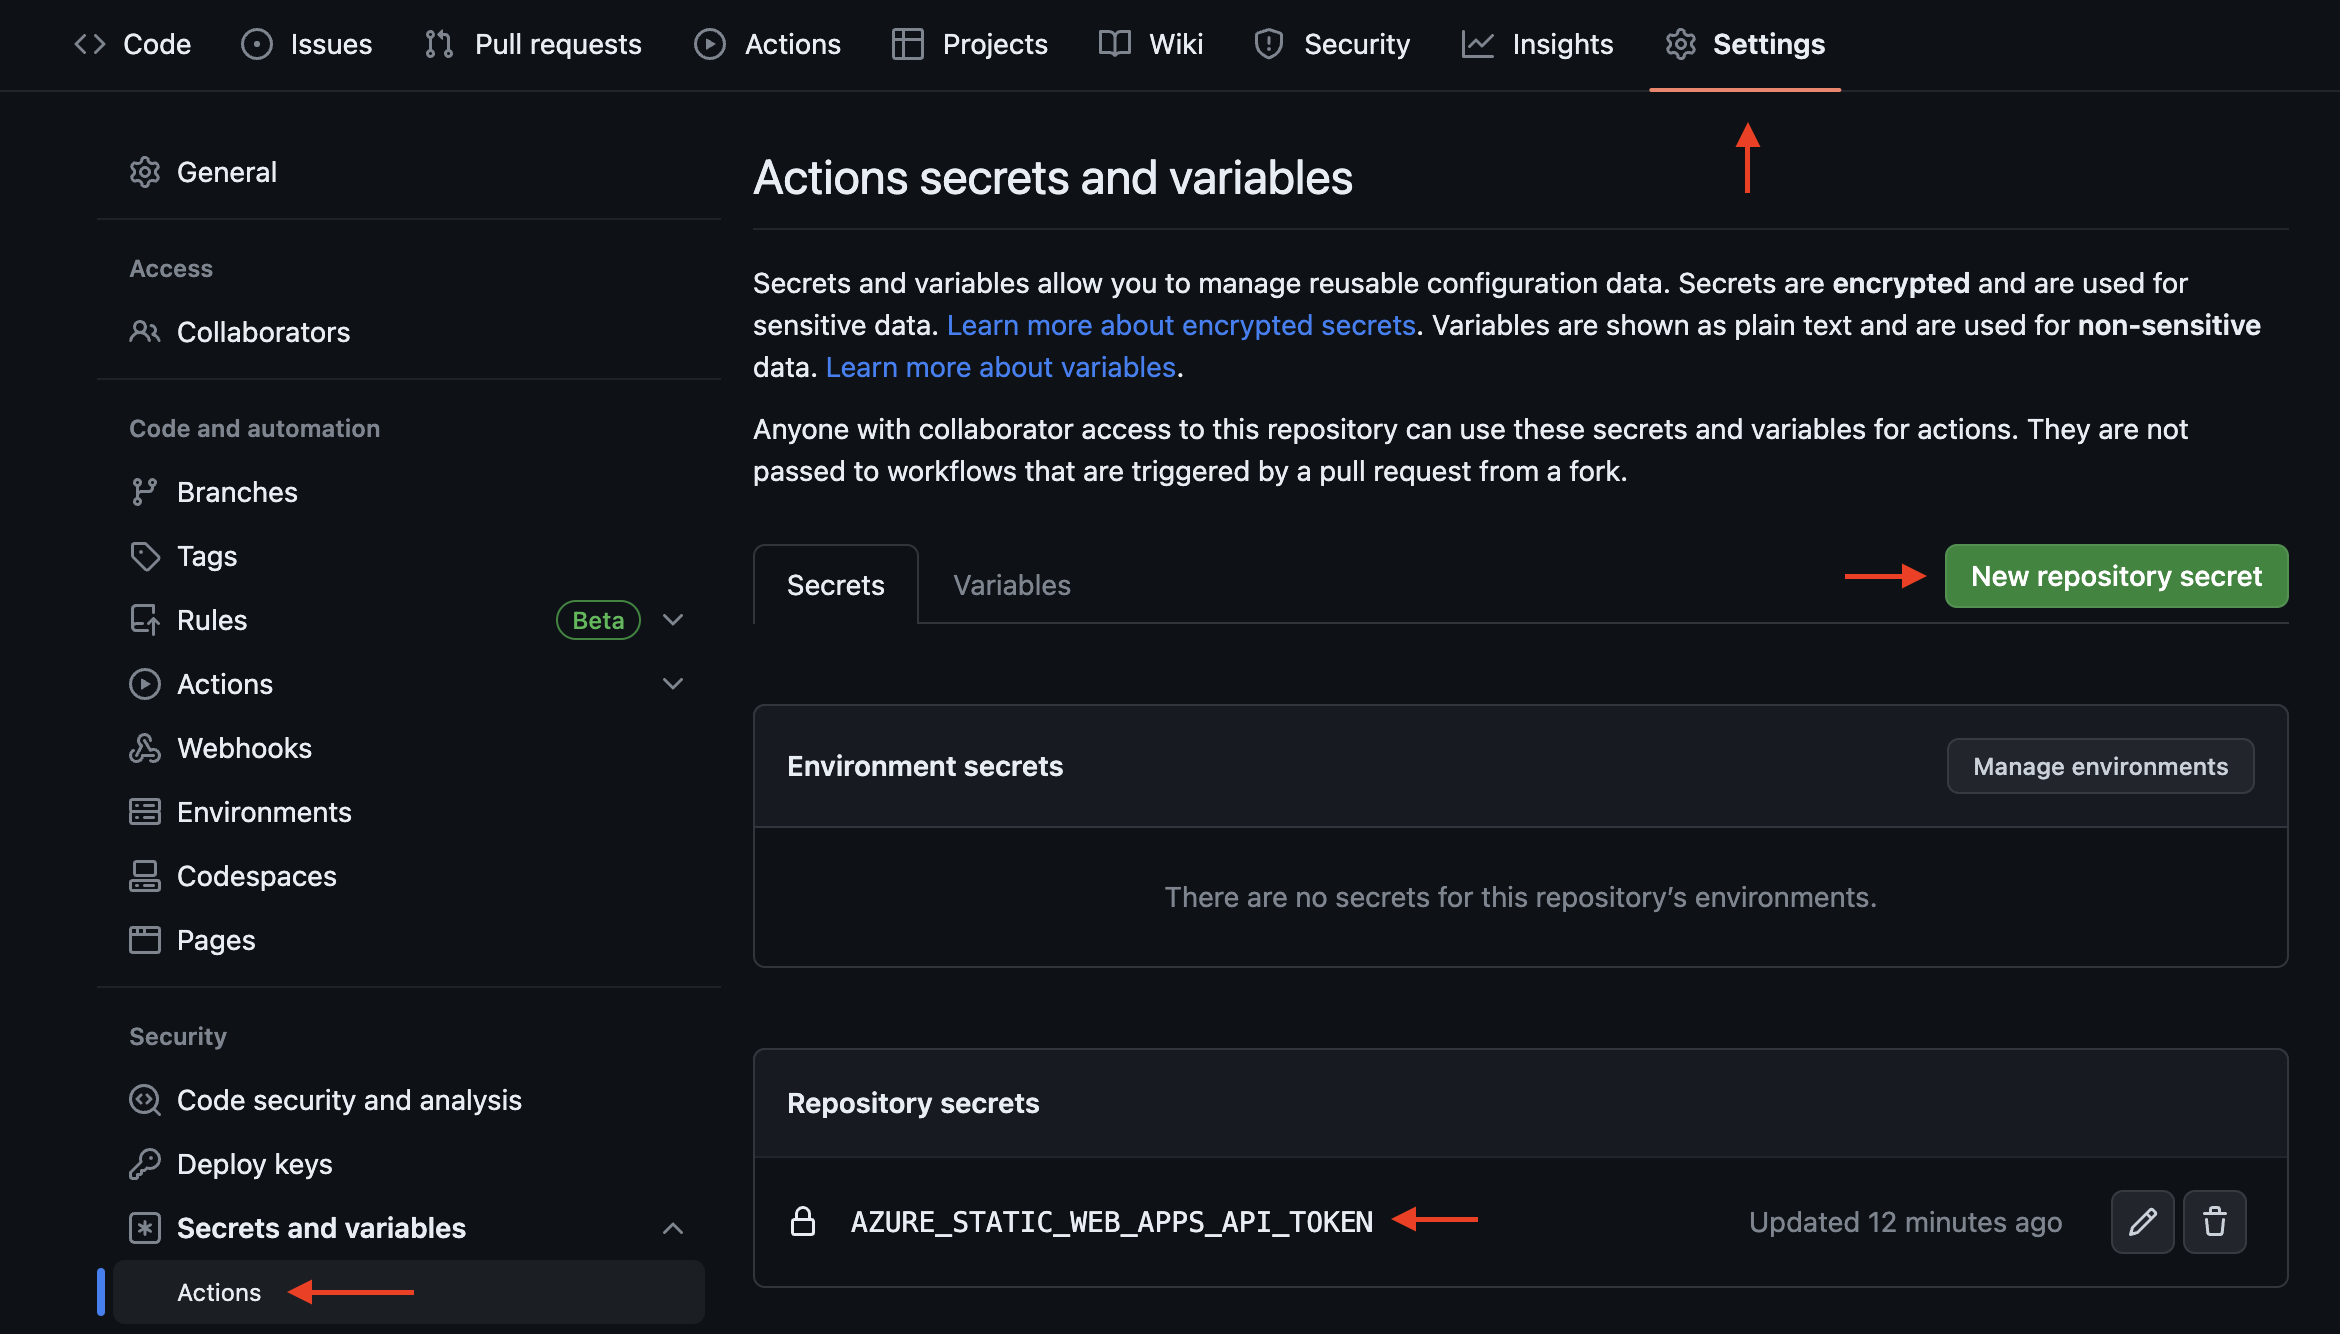
Now, you have added the deployment token as a secret to your GitHub repository, which is referred to in your GitHub action workflow by using the syntax ${{ secrets.AZURE_STATIC_WEB_APPS_API_TOKEN }}.
Step 16: Click on the “Actions” tab. Click on the failed job run title, and click on the “Re-run jobs”. Click on “Re-run all jobs”. This will make the job re-run and complete with success, now that we’ve added the deployment token as a secret.
Step 17: Return back to your terminal or command prompt, and run the following command to retrieve the public URL of your Azure Static Web App:
az staticwebapp show -n <app_name> -g <resource_group_name> --query "defaultHostname" -o tsv
Replace <app_name> with the name of your Azure Static Web App and <resource_group_name> with the name of the resource group in which it is located. Copy the returned value to your clipboard.
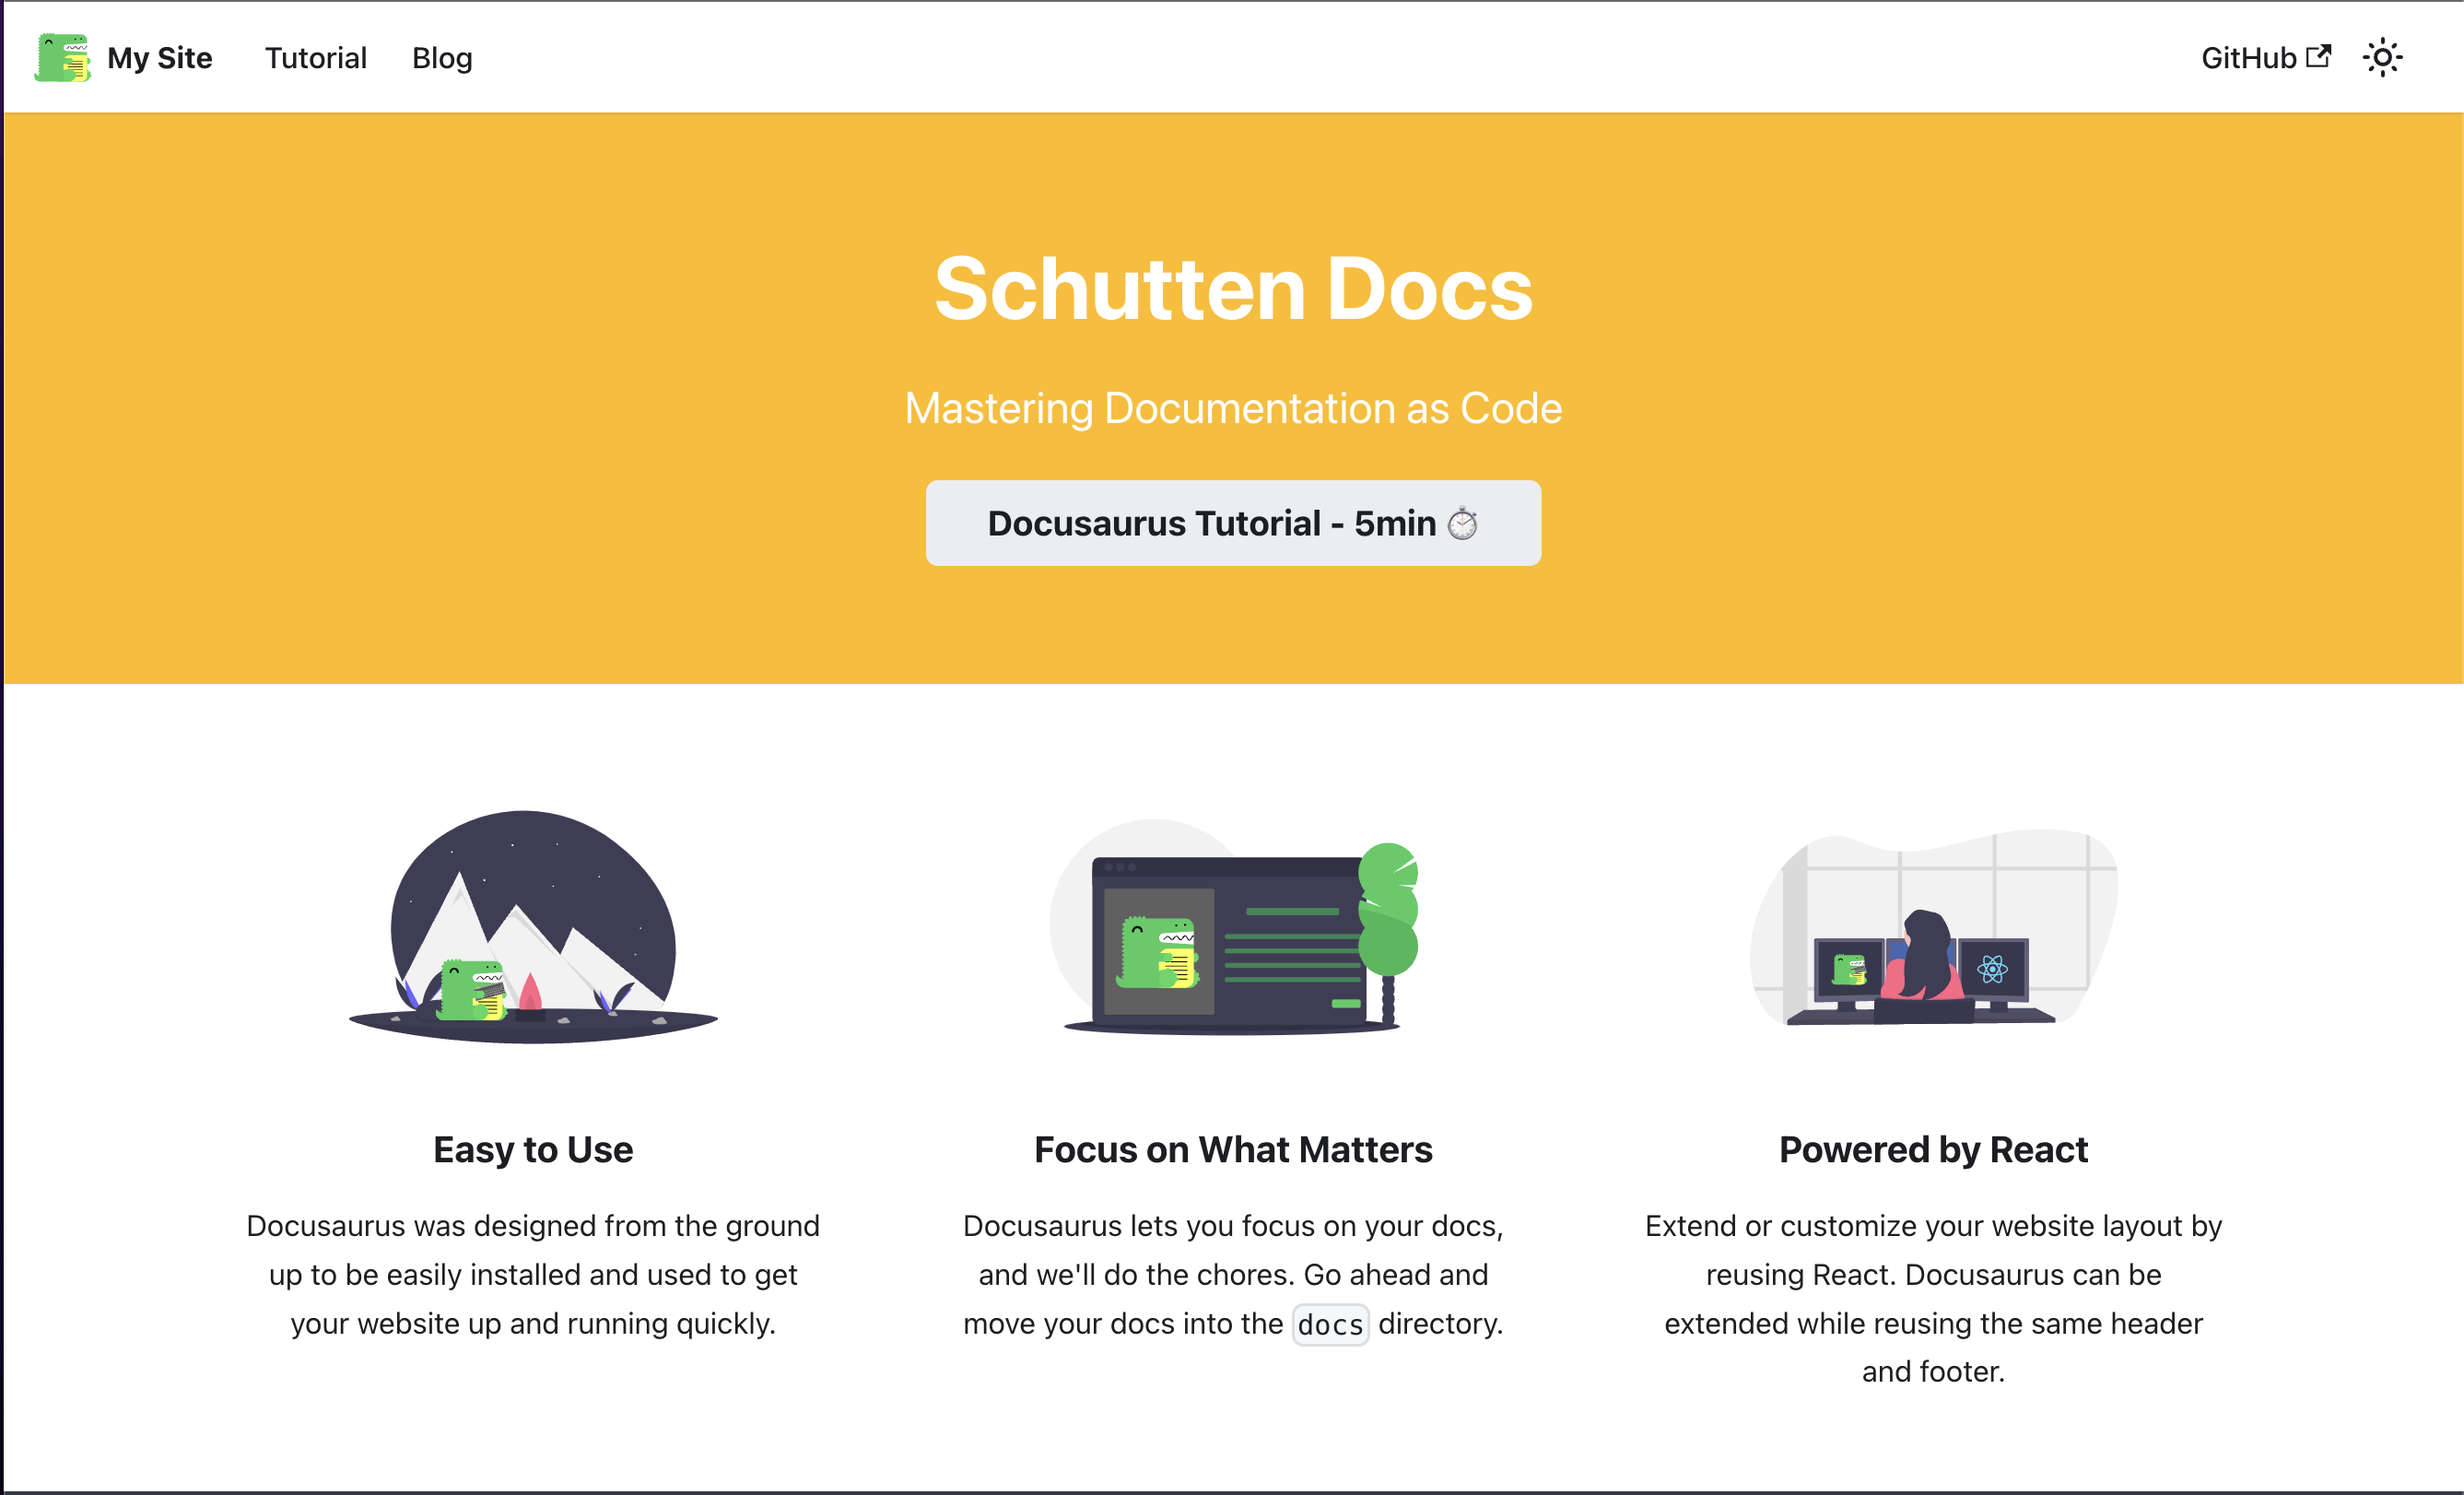
Step 18: Open your web browser and go to the copied URL, that you’ve saved to your clipboard. Congratulations, you’ve now succesfully deployed your Docusaurus site to an Azure Static Web App.
Closing words
In this second part of the blog series, we have successfully created the necessary infrastructure on Azure to host a Docusaurus website, and deployed the build to an Azure Static Web App using GitHub Actions. By using Terraform to manage the infrastructure, we have ensured that our infrastructure is easily reproducible. By automating the deployment using GitHub Actions, we have streamlined the deployment process and reduced the potential for errors. Overall, this approach provides a scalable and efficient way to host and deploy a Docusaurus website on Azure. To learn more about the topics that were covered in this blog article, refer to the links below:
- Choose the right Azure hosting option
- Terraform AzureRM Provider | Static Site
- Deploy a static web app with Azure Static Web Apps CLI
Thank you for taking the time to go through this post and making it to the end. Stay tuned because we’ll keep continuing providing more content on topics like these in the future.