In this blog, we’ll cover the necessary steps for configuring GitHub Actions to automate your documentation build and deployment process.
This article is part of the “Mastering Documentation as Code” series, a comprehensive blog series designed to guide you through the process of building, hosting, and automating your documentation using Docusaurus, Azure, Terraform, and GitHub Actions. It’s broken down in the following parts:
- Part I: “Getting Started with Documentation as Code”. This part gives an introduction to Docusaurus and the concept of Documentation as Code.
- Part II: “Hosting Your Docs on Azure with Infrastructure as Code”. This part covers how to set up and configure Azure services for hosting your docs.
- Part III: “Automating Your Docs Build and Deployment with GitHub Actions”. This part contains a step-by-step guide for configuring GitHub Actions to automate your docs build and deployment.
- Part IV: “Adding a Custom Domain and SSL Certificate”. This part covers how to set up a custom domain and SSL certificate for your docs site using Azure services.
In the previous chapter of this blog series, we created and deployed our Docusaurus website to an Azure Static Web App using GitHub Actions. We automated the build process for our website and used Terraform to provision the Azure resources required to host our website. In this chapter, we will continue to build upon the pipeline that we created in the previous chapter by adding infrastructure provisioning and deployment to our automation process. This will allow us to fully automate the process of building and deploying our website without any manual intervention.
DevOps and GitOps
DevOps and GitOps are two methodologies that aim to streamline software development, deployment, and operations. DevOps focuses on bridging the gap between software development and IT operations, promoting collaboration and communication between teams. DevOps is a software development methodology that emphasizes communication, collaboration, and automation between software development teams and IT operations teams. The goal of DevOps is to break down silos between these teams and improve the speed and quality of software development and delivery. DevOps relies on a variety of tools and practices, such as continuous integration and continuous delivery (CI/CD), infrastructure as code (IaC), and automated testing.
GitOps is a relatively new approach that extends the principles of DevOps and applies them to infrastructure and operations. GitOps is based on the idea of using Git as a single source of truth for both application code and infrastructure code. This means that all infrastructure changes are made through version-controlled code and are subject to the same review, approval, and audit processes as application code changes. GitOps utilizes two main deployment approaches: push-based and pull-based. While push-based deployment relies on a CI/CD tool to push changes to the infrastructure environment, pull-based deployment uses an agent installed in a cluster to pull changes whenever there is a deviation from the desired configuration. The pull-based approach is limited to Kubernetes, and an agent must be installed in each Kubernetes cluster.
Automating Infrastructure Provisioning with Terraform and GitHub Actions
In the following steps, we will walk step-by-step on adding the Terraform files to the GitHub repository, creating the connection with Azure, and adjusting the GitHub Actions workflow to automate the process. Let’s dive right in and get started!
Prerequisites
Before you can start creating the resources and host your Docusaurus site, there are some prerequisites to fulfill. In this blog article we build on the previous parts (part 1 and 2) of the series:
- GitHub account: You’ll need a GitHub account. We’ll be using GitHub Actions to streamline the deployment process and easily deploy our app to Azure. You can sign up here.
- Docusaurus Build: You’ll need an actual build of a Docusaurus site. This is the build output directory and files of the
npm run buildcommand in the first part of this blog series, which we added to the GitHub repository in the second part of this blog series. - Azure tenant and user account: You’ll need an Azure tenant, an Azure Active Directory (Azure AD) instance. This instance is the foundation of the environment. And it allows you to create an identity (user account) to connect to Azure, set up the environment, and deploy the resources.
- Subscriptions: You’ll need a subscription and owner permissions to deploy the resources and minimize the costs by removing the resources at the end.
- Azure CLI: You’ll need the Azure command-line interface for deploying the resources, and you can find more information about the Azure CLI in the documentation.
- Git: You’ll need to have Git installed on your machine to track and deploy changes to your files within the source code of your app. You can download it here.
- Visual Studio Code: You’ll need a code editor. Although any code editor will do and this is something of personal preference, Visual Studio Code is a good (and free) choice. You can download it here.
Once you have fulfilled the prerequisites, we are ready to move forward and further automate our process. We’ll cover the implementation through various examples. All of the examples below can be downloaded from this GitHub Repository.
Creating the Service Principal
In order to automate the deployment of infrastructure resources to Azure, we need to create a service principal that has the necessary permissions to perform the required actions. The service principal is essentially a type of identity that can be used by an application, a service or a tool to authenticate with Azure. In our case we’ll is it for the GitHub Actions workflow to authenticate to Azure.
Step 1: Log in to your Azure account using the az login command in your terminal or command prompt.
Run the az account list command to retrieve information of the subscriptions within your Azure tenant. Copy the subscriptionId of the subscription you have previously deployed your Azure Static Web App (for your Docusaurus site) and the Azure Storage Account (for the Terraform state file) to your clipboard.
Step 2: Create a new service principal, by running the following command in your terminal or command prompt:
az ad sp create-for-rbac --name <your-service-principal-name> --role contributor --scopes /subscriptions/<subscription-id>
Replace <your-service-principal-name> with the name of your service principal, and <subscription-id> with the ID of your Azure subscription (on your clipboard). This command will create a new service principal with the ‘Contributor’ role assigned to it and scope set to the specified subscription.
Step 3: The output of the previous command will contain the following information:
appId(also known as client ID: This is the application (client) ID that uniquely identifies the service principal.displayName(also known as name: This is the display name of the service principal.password(also known as client secret: This is the secret key that will be used for authentication.tenant(also known as tenant ID): This is the ID of the Azure Active Directory tenant that contains the service principal.
Note down this information as we will use it in the next step. Now that we have created a service principal and granted it the necessary permissions, we can use it to authenticate and automate our deployment process to Azure.
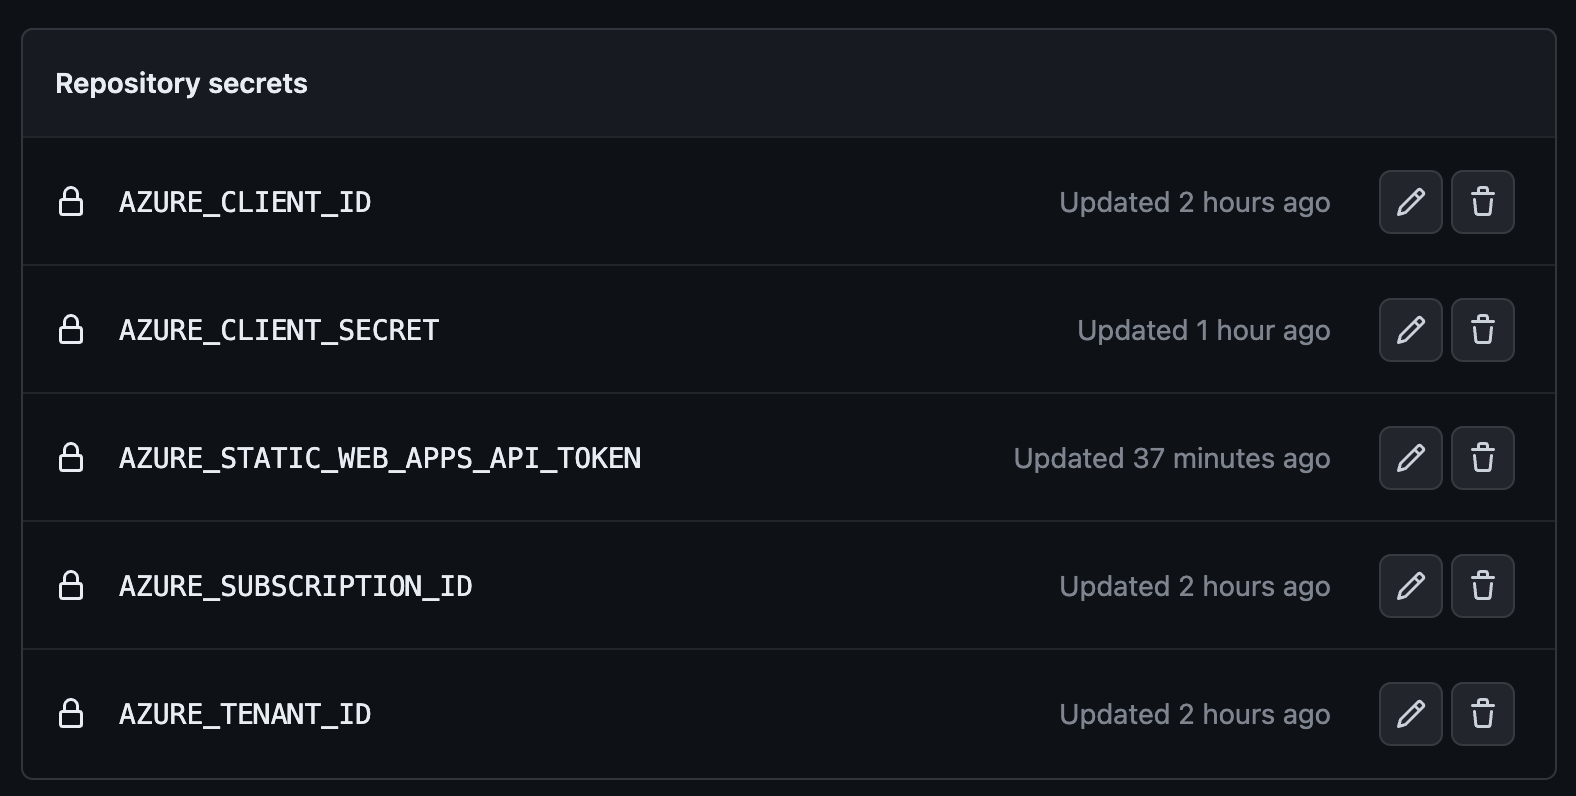
Step 4: Go to the GitHub repository in your web browser, where you have the Docusaurus code uploaded. Click on the “Settings” tab. In the left sidebar, click on “Secrets”. Add the following secrets, with the corresponding values from the previous steps:
| Secret Name | Secret Value |
|---|---|
| AZURE_CLIENT_ID | appId |
| AZURE_CLIENT_SECRET | password |
| AZURE_SUBSCRIPTION_ID | <subscription-id> |
| AZURE_TENANT_ID | tenant |
Once completed, you should have 5 secrets in total like the image below:
Add the Terraform code to the repository
Step 5: Open a terminal or command prompt and navigate to the directory of your Docusaurus site using the cd command.
Step 6: Run the git pull command in your terminal or command prompt to update your local repository with changes made to the remote repository.
You will see the .github/workflows directory is being downloaded, including the .yml file we created in the previous part of this blog series.
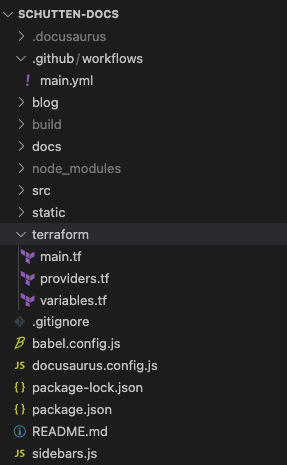
Step 7: In the root directory of your Docusaurus site, create a new folder called terraform. Copy the .tf files (main.tf, providers.tf, and variables.tf) that we created in the previous part of this blog series into this folder.
Your complete file structure should look similar like the image below:
Step 8: Now, let’s commit and push the changes we made to our local Git repository to the remote repository hosted on GitHub by running the following commands:
git add .
git commit -m "Adding Terraform files"
git push -u origin main
This will also trigger our GitHub Actions workflow, but we haven’t added the Terraform jobs to this workflow yet. Let’s dive right into that!
Update the GitHub Actions workflow
Step 9: Open the .yml file in the .github/workflows directory and replace the code with the code below and save:
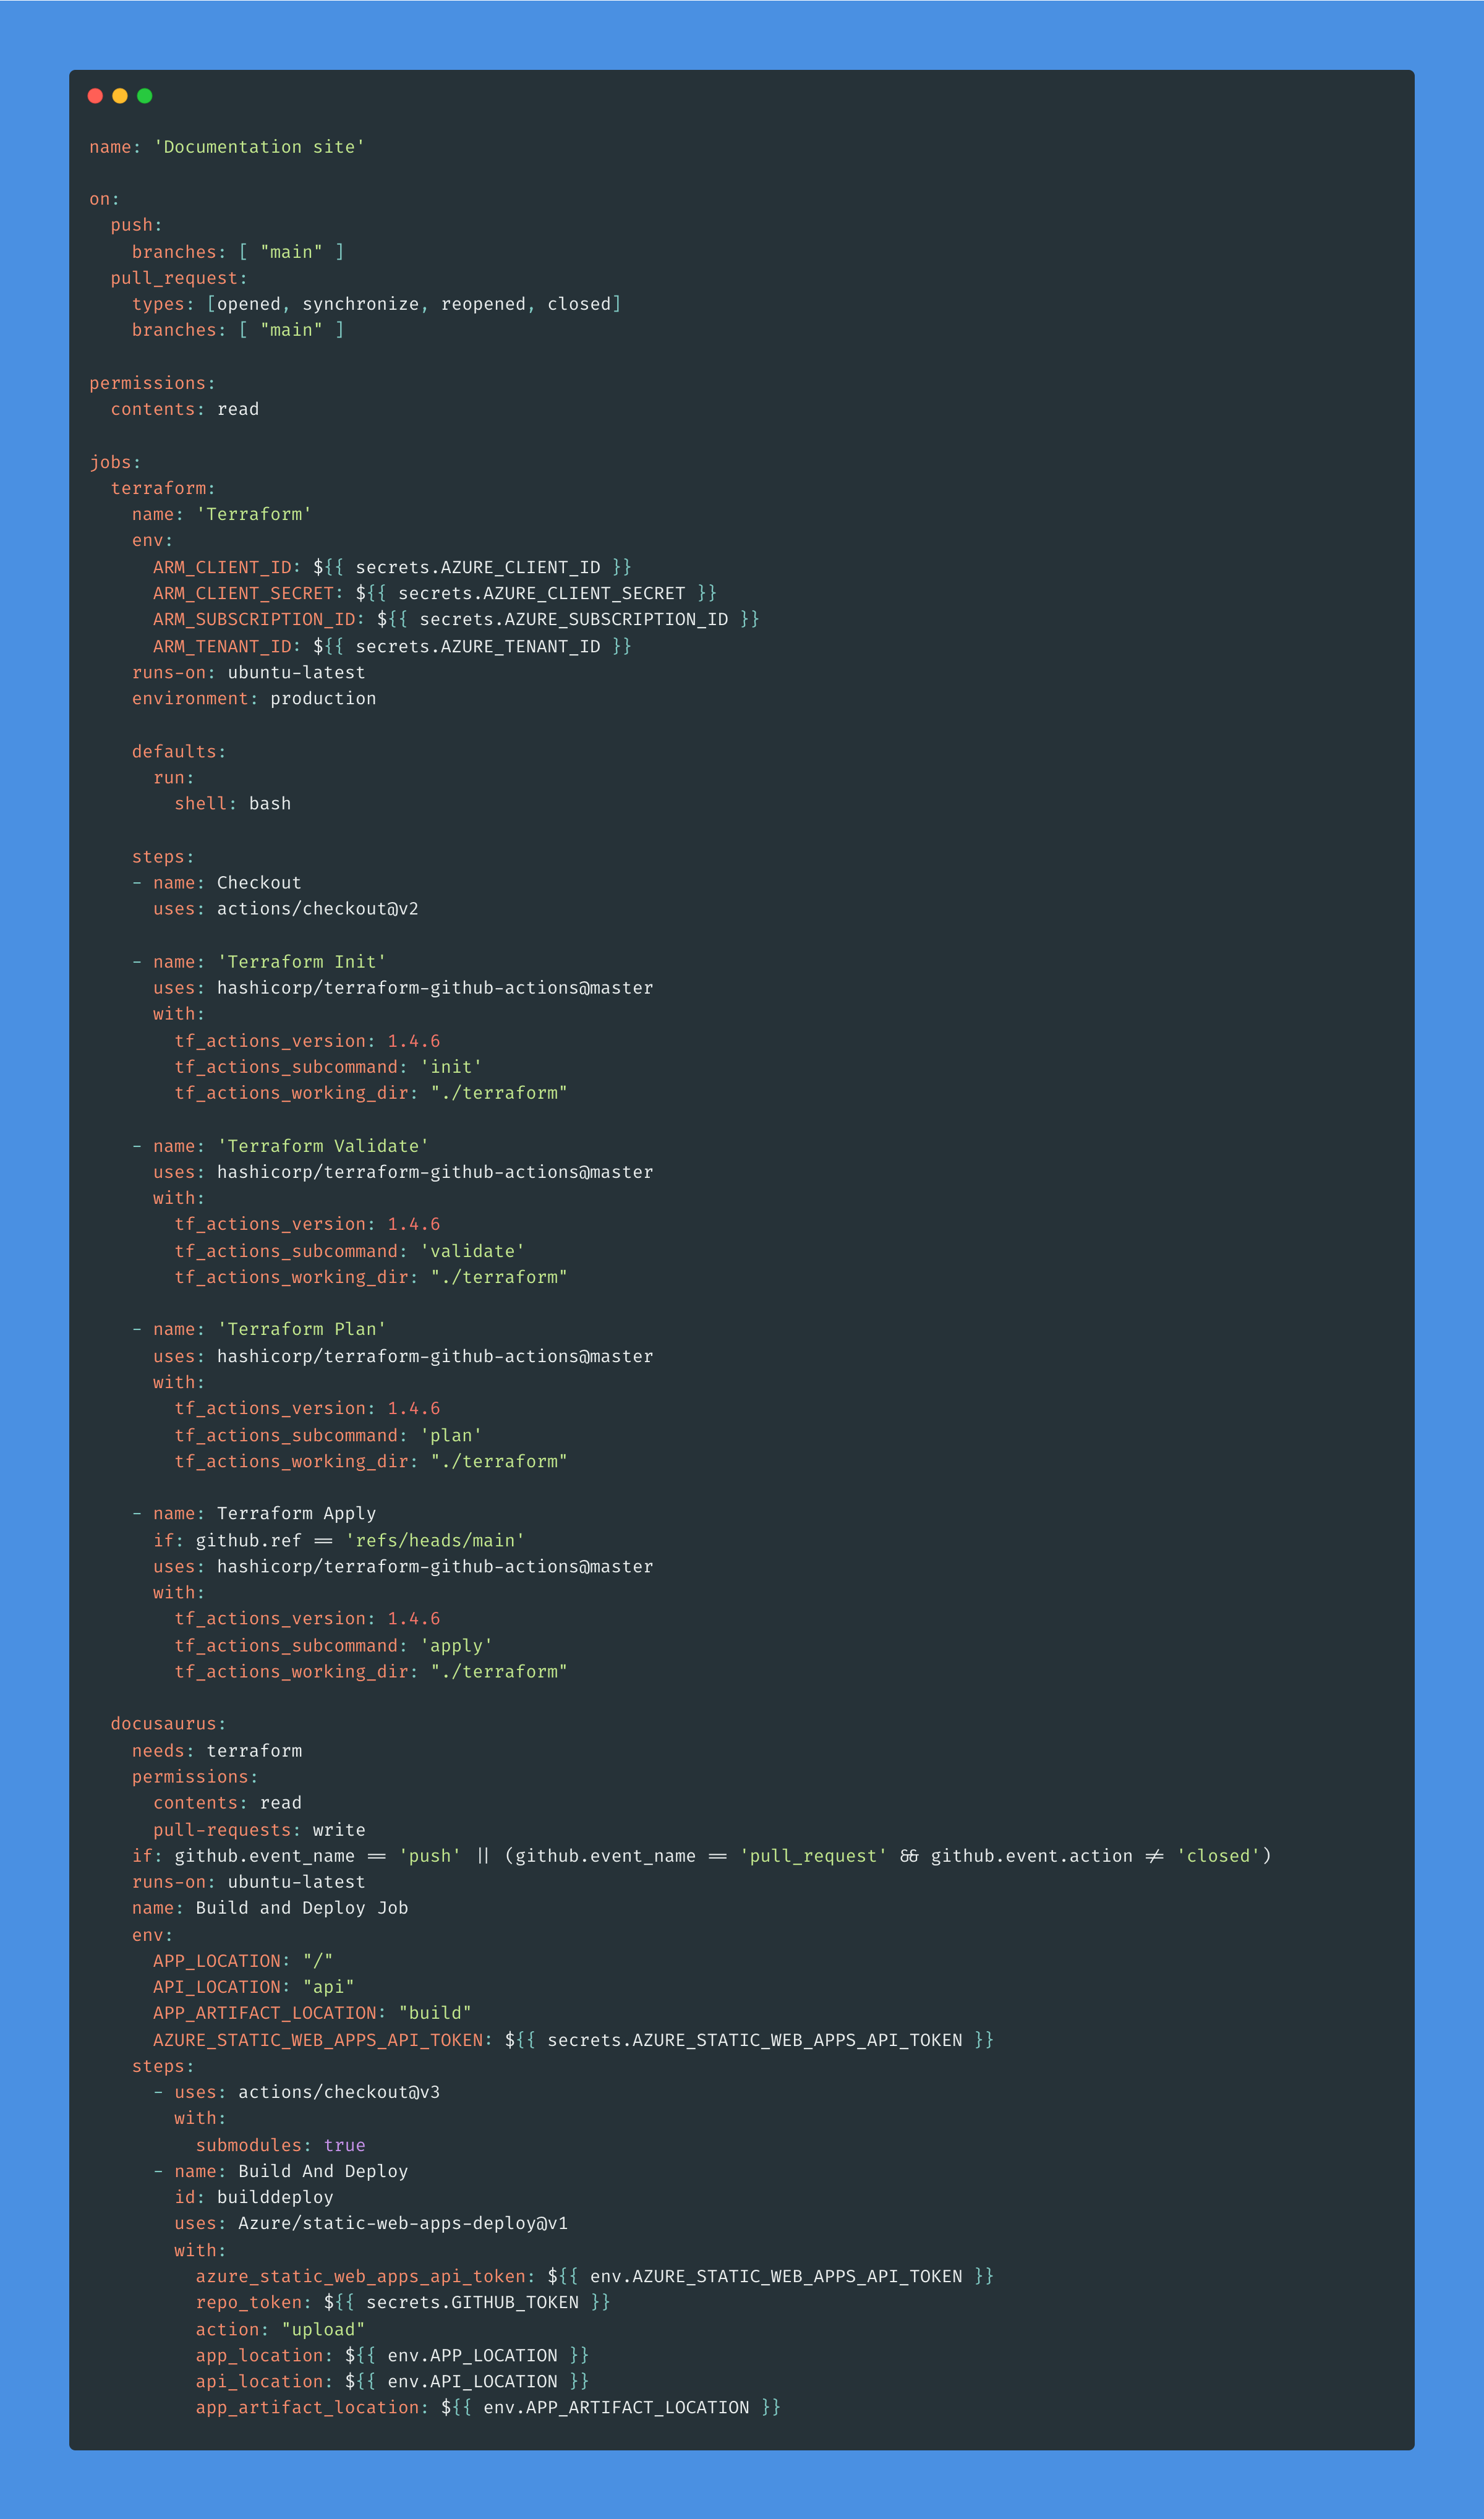
This workflow creates and configures the infrastructure in Azure using Terraform, and deploys our Docusaurus site to Azure using the Azure Static Web Apps Deploy action.
Step 10: Let’s commit and push these changes to the remote repository hosted on GitHub by running the following commands:
git add .
git commit -m "Adding Terraform"
git push -u origin main
In our case, the workflow is triggered on pushes to the main branch, as well as pull requests that are opened, synchronized, reopened, or closed on the main branch. Since we pushed our changes to the main branche, the workflow is immediatly triggered.
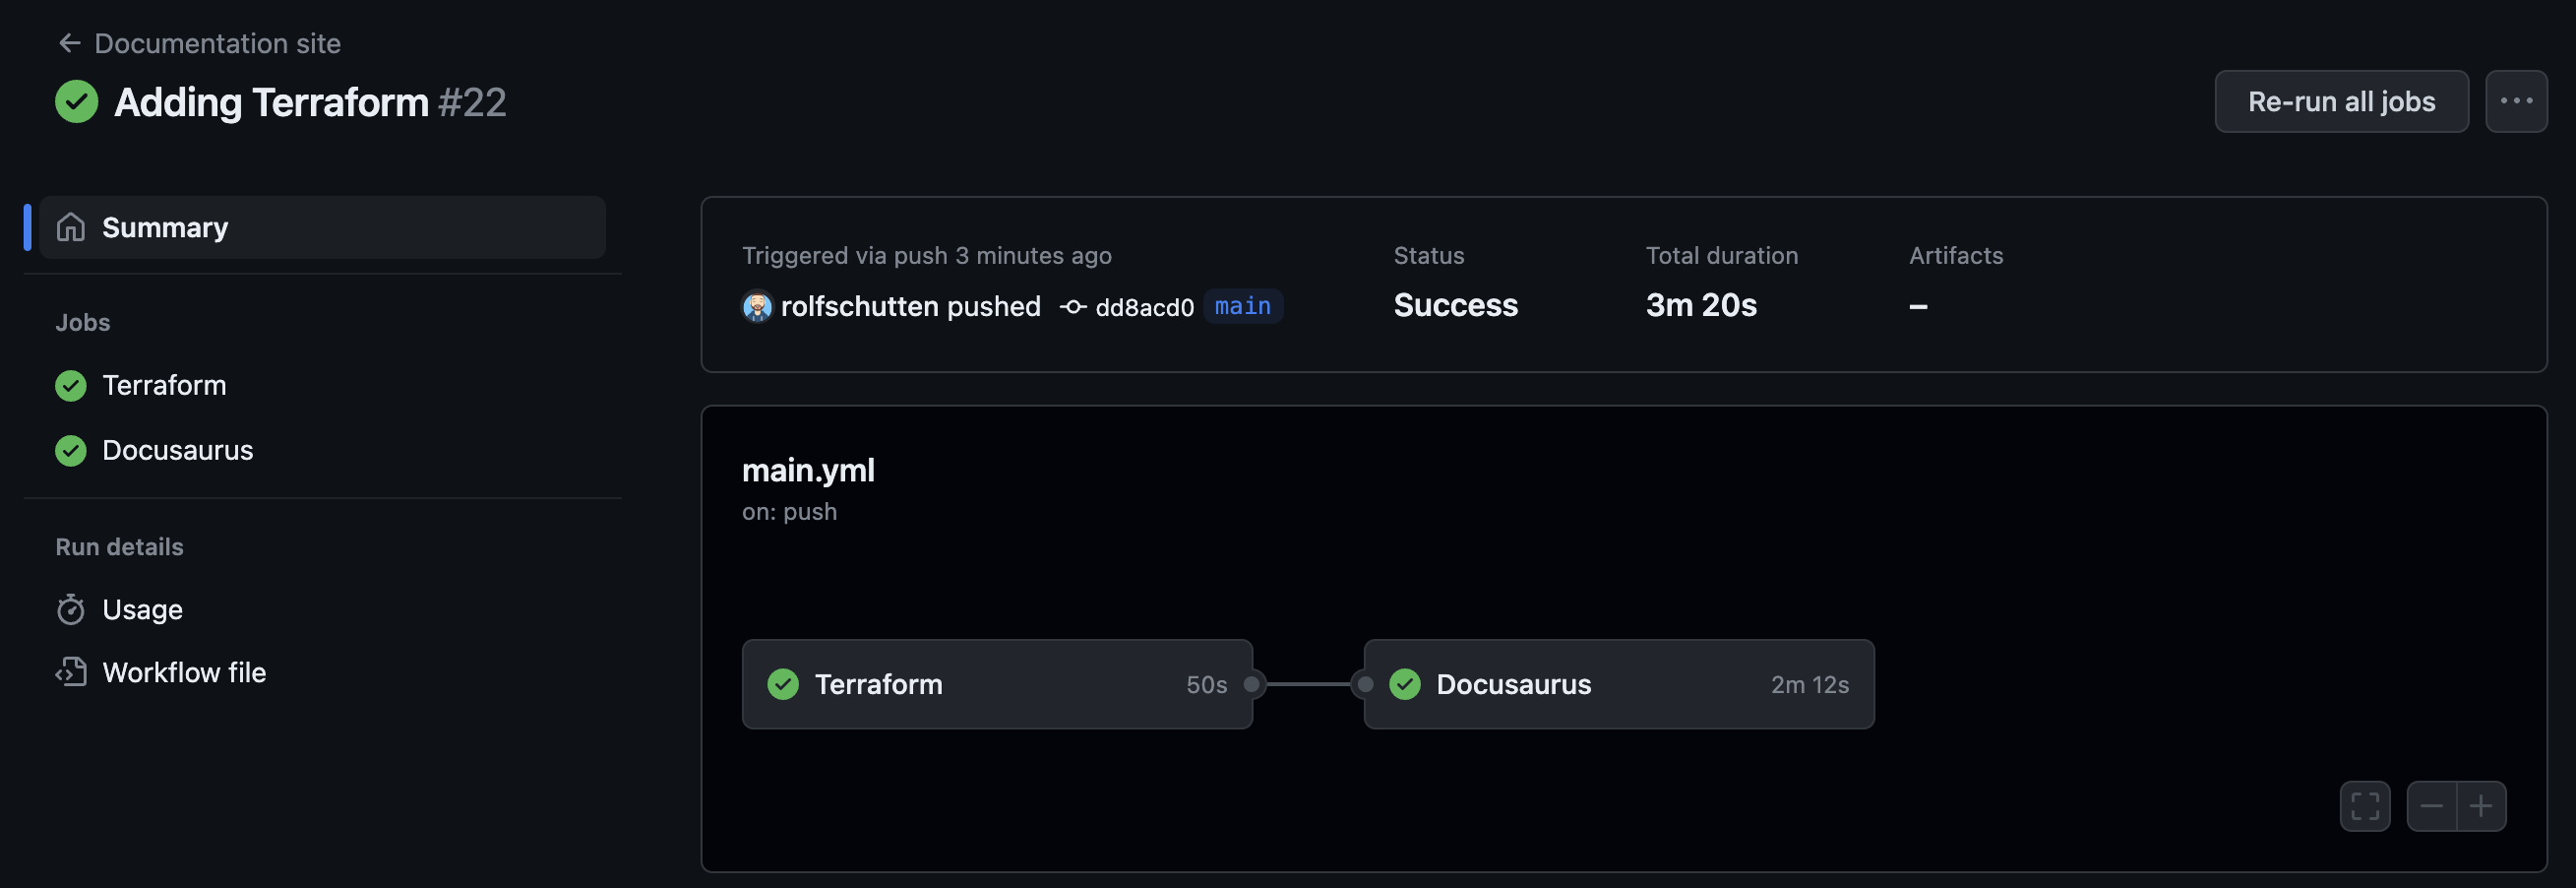
If you have followed all the steps accordingly, the workflow will run without faults like the image below:
Note: If the Azure Static Web App is recreated, you must also update the secret deployment key in your GitHub repository, which we’ve created with the name
AZURE_STATIC_WEB_APPS_API_TOKEN.
Let’s do some last final test to see if the workflow works as intended, by changing the site title.
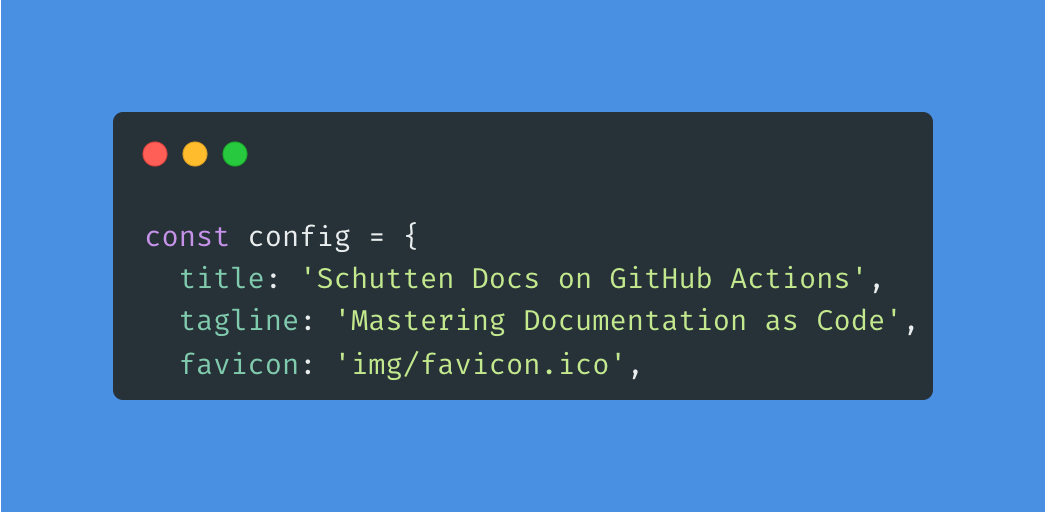
Step 11: Navigate to the docusaurus.config.js file in the root directory of the Docusaurus site, and open it in Visual Studio Code, or other code editor you’re using. Modify the title field and save it. For example, if you want to change the title to “Schutten Docs on GitHub Actions", your code would look like this:
Step 12: Commit and push the changes to the remote repository by running the following commands:
git add .
git commit -m "Adding Terraform"
git push -u origin main
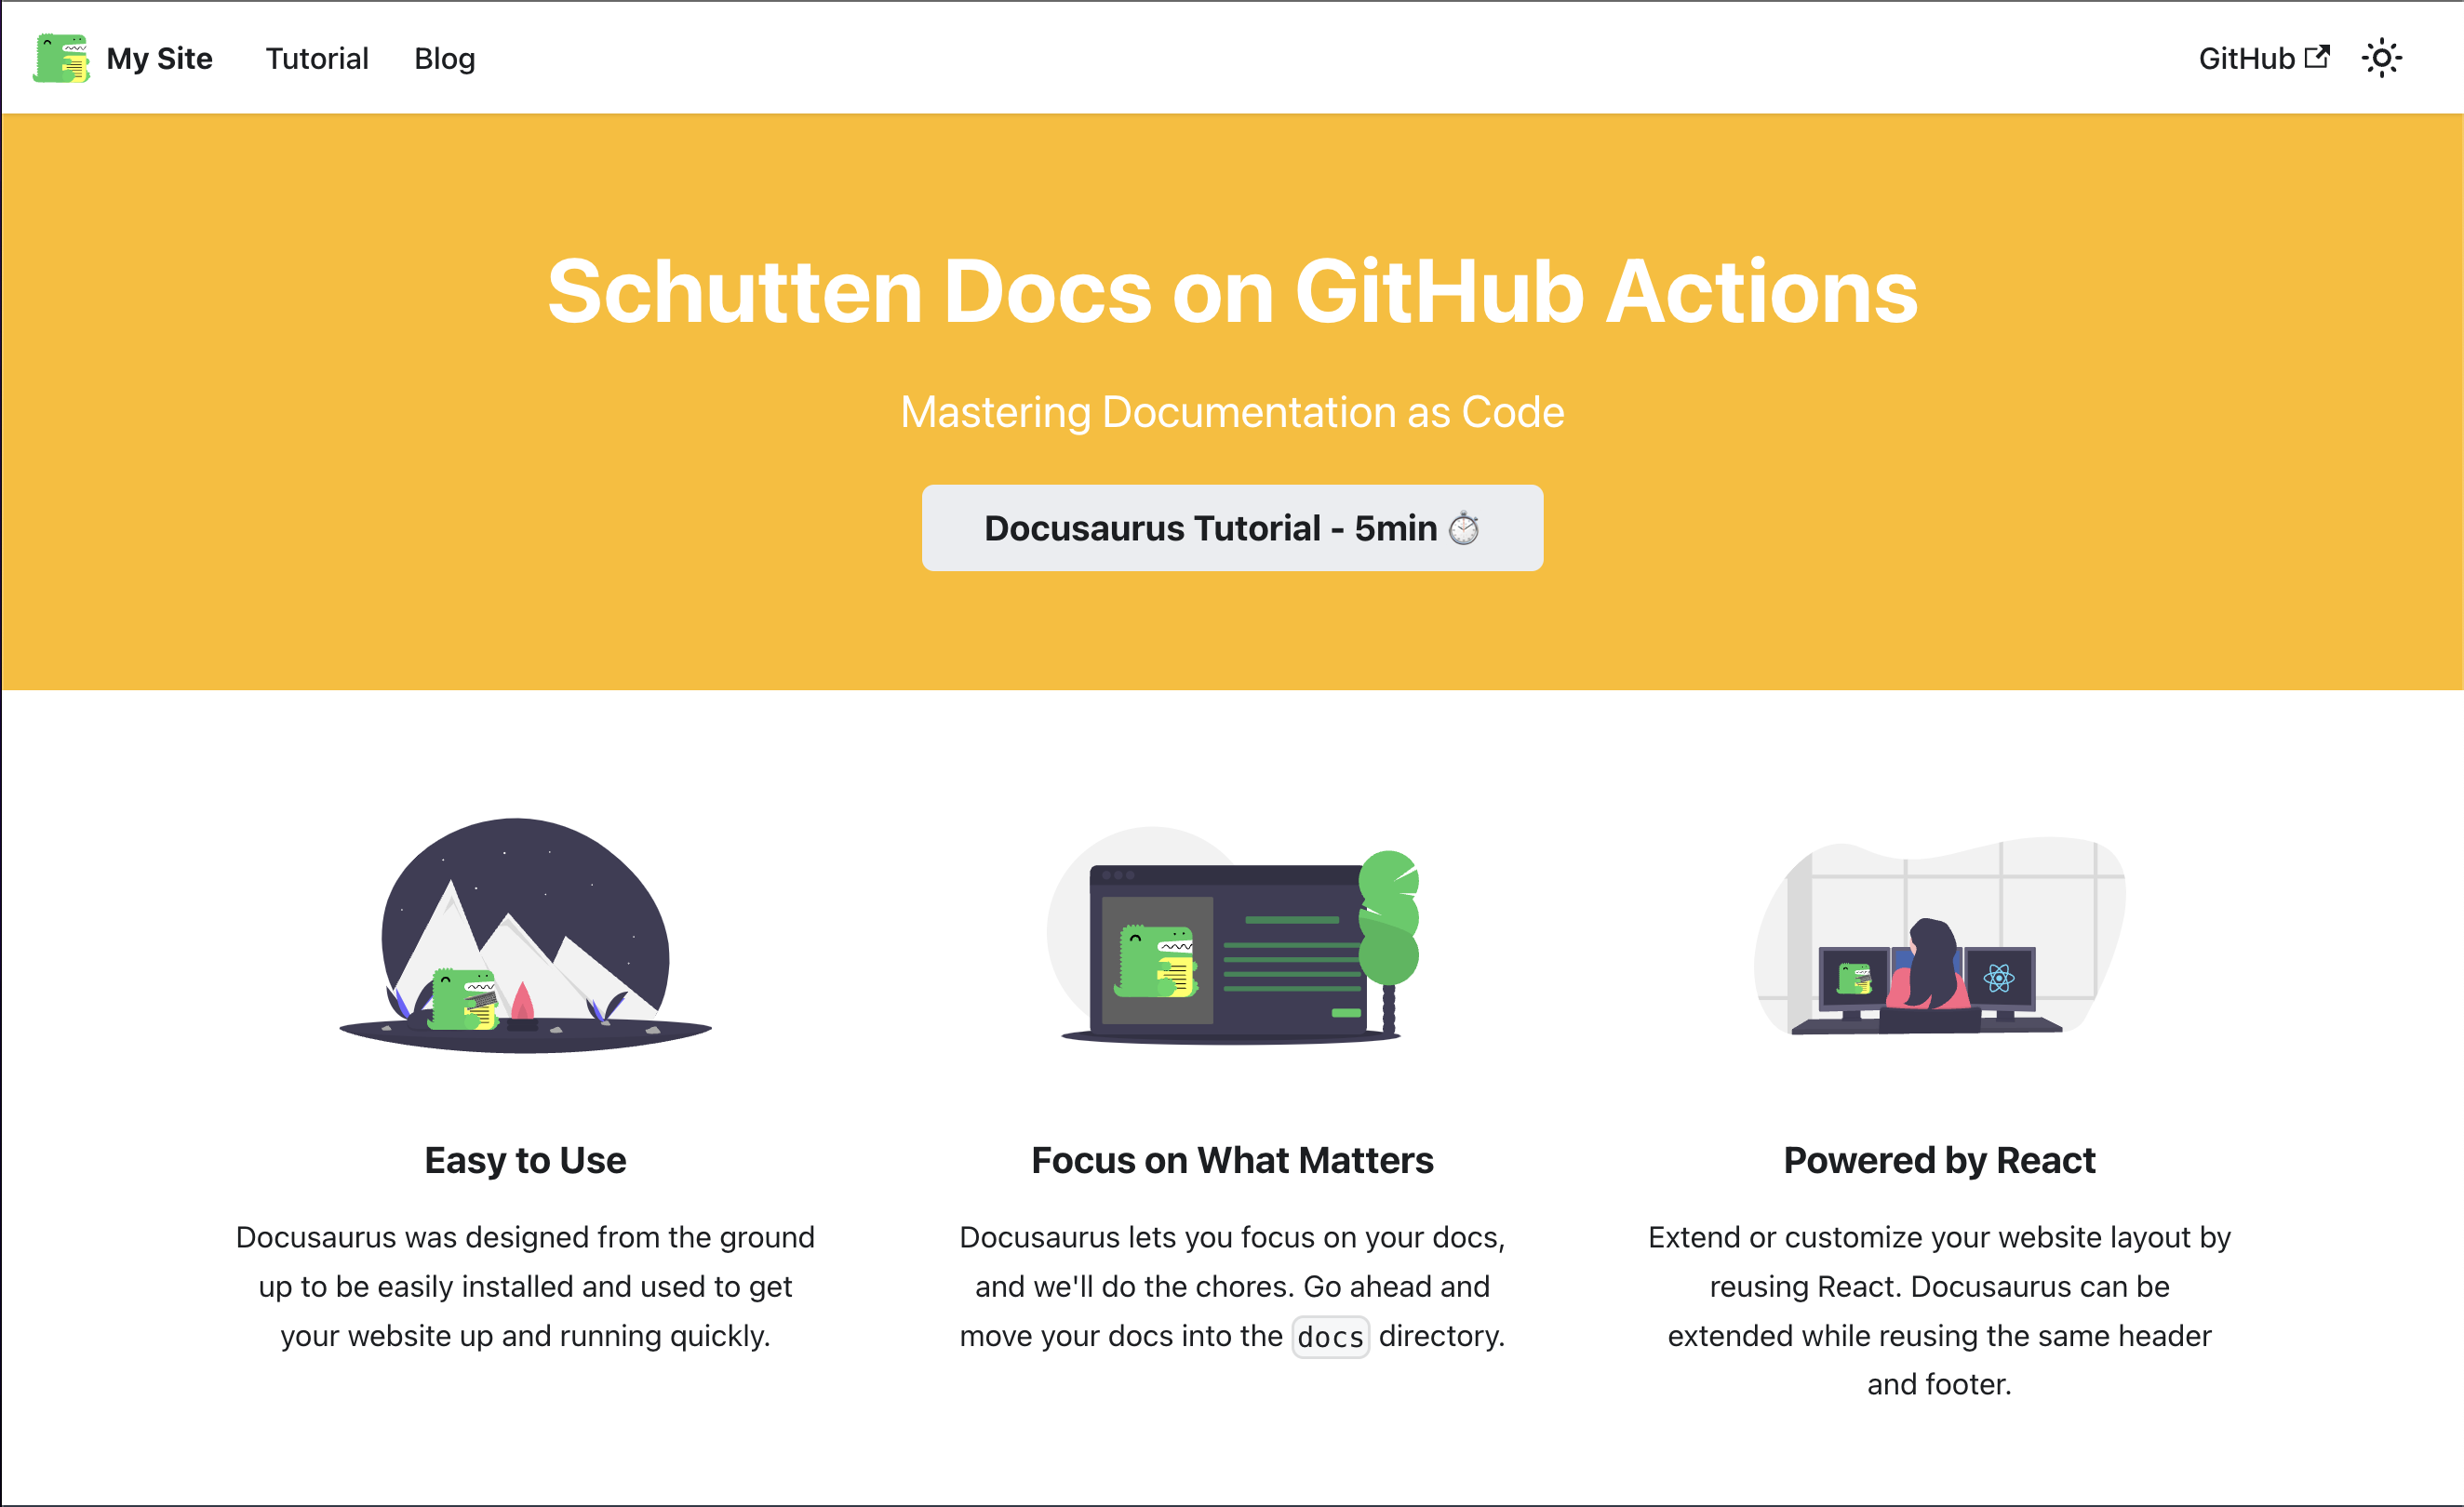
Once the workflow has completed to run, go check out your Azure Static Web App URL.
Closing words
implementing a CI/CD workflow for your application development process is crucial in today’s fast-paced world. It saves developers valuable time and effort, streamlines the software development process, and ensures the delivery of high-quality code. By combining application code and infrastructure code in the same repository, developers can ensure that any changes made to the application are automatically reflected in the infrastructure, and vice versa. This approach not only helps to detect and fix issues more efficiently but also ensures that the entire system is always up-to-date and consistent.
By automating the deployment process using GitHub Actions, developers can focus on creating and enhancing their code rather than worrying about the deployment process. They can also rest assured that their code will be delivered to the end-users in a timely and secure manner.
To learn more about the topics that were covered in this blog article, refer to the links below:
Thank you for taking the time to go through this post and making it to the end. Stay tuned because we’ll keep continuing providing more content on topics like these in the future.