In this blog, we’ll cover how to add a custom domain and SSL certificate to your documentation site using Azure services.
This article is part of the “Mastering Documentation as Code” series, a comprehensive blog series designed to guide you through the process of building, hosting, and automating your documentation using Docusaurus, Azure, Terraform, and GitHub Actions. It’s broken down in the following parts:
- Part I: “Getting Started with Documentation as Code”. This part gives an introduction to Docusaurus and the concept of Documentation as Code.
- Part II: “Hosting Your Docs on Azure with Infrastructure as Code”. This part covers how to set up and configure Azure services for hosting your docs.
- Part III: “Automating Your Docs Build and Deployment with GitHub Actions”. This part contains a step-by-step guide for configuring GitHub Actions to automate your docs build and deployment.
- Part IV: “Adding a Custom Domain and SSL Certificate”. This part covers how to set up a custom domain and SSL certificate for your docs site using Azure services.
In the previous chapter, we automated the deployment process by integrating Terraform with GitHub Actions, allowing us to deploy infrastructure changes through code. We also set up a Docusaurus site that gets built and deployed automatically when changes are pushed to the main branch.
In this final chapter, we’ll take things a step further by adding a custom domain and self-managed SSL certificate to our Azure Static Web App. This will give our website a professional look and secure it with encryption, providing a better user experience and increasing trust in our website.
Thanks to the automation we set up in the previous chapter, this process will be straightforward and easy to follow. We’ll continue building on top of our existing infrastructure and workflow, showing you how to add custom domains and SSL certificates to your Azure Static Web App.
Custom domains
A custom domain is a unique web address that identifies a website. It’s an essential component for hosting a public-facing website because it allows you to personalize your website’s URL, making it more memorable, professional, and easy to find. With a custom domain, you can create a strong brand identity, improve your website’s search engine rankings, and establish credibility with your audience. You can purchase a custom domain from a domain registrar, and then configure it to point to your website’s IP address or DNS records.
Azure DNS
Azure DNS is a cloud-based domain name system (DNS) service provided by Microsoft. It’s used to host and manage DNS domains, including custom domains for Azure services, such as Azure Web Apps and Azure Static Web Apps. Azure DNS provides high availability, scalability, and security for your DNS infrastructure, ensuring that your website’s DNS records are always available and can be resolved quickly. You can configure Azure DNS to manage your custom domain’s DNS records, such as A records, CNAME records, and TXT records.
SSL certificates
An SSL (Secure Sockets Layer) certificate is a digital certificate that authenticates the identity of a website and encrypts data transmitted between the website and its users. It’s an essential component for hosting a public-facing website because it provides secure communication and helps to protect sensitive information, such as passwords, credit card details, and personal data.
You can obtain an SSL certificate from a trusted certificate authority (CA), such as Let’s Encrypt or DigiCert, and then install it on your web server or load balancer to enable HTTPS (HTTP Secure) communication.
Content Delivery Network
A Content Delivery Network (CDN) is a distributed network of servers that delivers content, such as images, videos, and scripts, to users based on their geographic location, network proximity, and server availability. It’s an essential component for hosting a public-facing website because it improves the website’s performance, availability, and scalability by caching and delivering content from the nearest server to the user.
Azure CDN is a Microsoft-managed CDN that can be used to accelerate and optimize the delivery of static and dynamic content for Azure services, such as Azure Blob Storage, Azure Web Apps, and Azure Static Web Apps.
Azure Key vault
Azure Key Vault is a cloud-based service provided by Microsoft that helps you safeguard cryptographic keys, secrets, and certificates used by your applications and services. It’s an essential component for hosting a public-facing website because it enables you to store and manage your SSL certificate securely and to automate the certificate renewal process. With Azure Key Vault, you can create a managed certificate, import a certificate, or generate a certificate signing request (CSR), and then store and manage the certificate’s private key and certificate chain. You can also use Azure Key Vault to retrieve secrets, such as API keys, connection strings, and passwords, used by your website’s backend services.
Add a custom domain and SSL certificate
In the following steps, we will walk step-by-step on adding the custom domain and SSL certificate in our Terraform configuration. Let’s dive right in and get started!
Prerequisites
Before diving into the step-by-step guide of adding a custom domain with Azure CDN and a self-managed SSL certificate to the Azure Static Web App, there are some prerequisites that must be met:
- Azure CLI: You’ll need the Azure command-line interface for deploying the resources, and you can find more information about the Azure CLI in the documentation.
- Git: You need to have Git installed on your local machine. If you haven’t done so, please download and install Git from the official website.
- Visual Studio Code: You need a code editor, and I recommend having Visual Studio Code installed to make the process smoother and easier to manage. You can download it here.
- Custom domain: You’ll need a custom domain, and access to the domain registrar DNS settings to add a CNAME record pointing to the CDN endpoint that we will be creating later. This guide will not cover purchasing a custom domain, so make sure you have one before proceeding.
- SSL certificate: You’ll also need an SSL certificate for the custom domain. This guide covers an example on how to get your SSL certificate.
- OpenSSL: You’ll need to use OpenSSL for converting SSL certificates, and therefore need it to be installed on your local machine. You can download it here.
- Lastly, it is essential to note that this guide builds on the previous three parts of the series. Therefore, it assumes that there is a working GitHub Actions workflow that creates the infrastructure with Terraform, builds the Docusaurus website, and deploys it on the Azure Static Web App.
Once you have fulfilled the prerequisites, we are ready to move forward. All of the examples below can be downloaded from this GitHub Repository.
Prepare Azure DNS
Step 1: To prepare Azure DNS, you will need to add the following Terraform code to your main.tf file, or to a new .tf file in the same directory:
resource "azurerm_dns_zone" "docusaurus" {
  name                = var.custom_domain_host_name
  resource_group_name = azurerm_resource_group.docusaurus.name
}
This code will create an Azure DNS zone for your custom domain by using the azurerm_dns_zone resource. The name parameter specifies the domain name to create the zone for, which is set to the value of the custom_domain_host_name variable. The resource_group_name parameter specifies the name of the resource group to create the DNS zone in, which is set to the value of the azurerm_resource_group.docusaurus.name attribute.
Step 2: Make sure you add the custom_domain_host_name variable to your variables.tf file, by adding the following Terraform code:
variable "custom_domain_host_name" {
  type    = string
  default = "yourdomain.com"
}
Step 3: Open a terminal or command prompt and navigate to the directory of your Docusaurus site using the cd command. Commit and push the changes to the remote repository by running the following commands:
git add .
git commit -m "Create Azure DNS zone"
git push -u origin main
Once the workflow is completed, you’re ready to go to the next step.
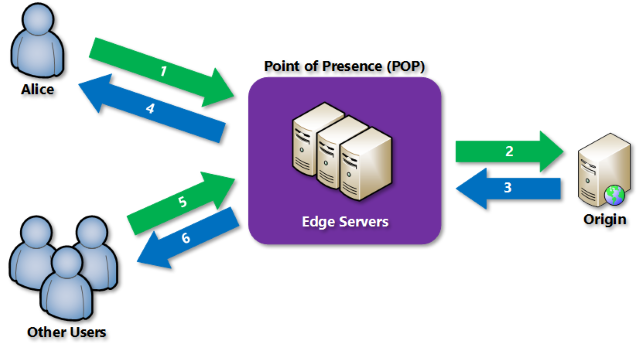
Step 4: Run the command below in your terminal or command prompt to retrieve the DNS zone data:
az network dns zone show --resource-group myresourcegroup --name contoso.com
The response data should look something like the image below, where we are especially looking for the four nameServers. Write these down, as we’ll be needing them in the next steps:
Step 5: Now is the time to replace the DNS name servers to the values of the previous step at your domain registrar. As each registrar has its own DNS management tools to change the name server records for a domain, it is not possible to include this in this guide. Your domain registrar probably has documentation available for updating the NS records. If not, please contact your domain registrar. To verify that the NS records are updated correctly, you can use the nslookup command. Use the example below and replace the values with your own:
nslookup -type=SOA schutten.cloud
Your response should look similar to the following nslookup output:

Set up Azure CDN
Step 6: To create a CDN endpoint, you will need to add the following Terraform code to your main.tf file, or to a new .tf file in the same directory:
resource "azurerm_cdn_profile" "docusaurus" {
  name                = var.cdn_profile_name
  location            = azurerm_resource_group.docusaurus.location
  resource_group_name = azurerm_resource_group.docusaurus.name
  sku                 = "Standard_Microsoft"
}

resource "azurerm_cdn_endpoint" "docusaurus" {
  name                = var.cdn_endpoint_name
  profile_name        = azurerm_cdn_profile.docusaurus.name
  location            = azurerm_resource_group.docusaurus.location
  resource_group_name = azurerm_resource_group.docusaurus.name
  origin_host_header  = azurerm_static_site.docusaurus.default_host_name

  origin {
    name                = var.app_name
    host_name           = azurerm_static_site.docusaurus.default_host_name
  }

  delivery_rule {
    name = "HttpsRedirect"
    order = 1

    request_scheme_condition  {
      match_values = ["HTTP"]
      operator = "Equal"
    }

    url_redirect_action {
      redirect_type = "Found"
      protocol = "Https"
    }
  }
}

resource "azurerm_dns_a_record" "docusaurus" {
  name                = "@"
  zone_name           = azurerm_dns_zone.docusaurus.name
  resource_group_name = azurerm_resource_group.docusaurus.name
  ttl                 = 60
  target_resource_id  = azurerm_cdn_endpoint.docusaurus.id
}

resource "azurerm_dns_cname_record" "docusaurus" {
  name                = "*"
  zone_name           = azurerm_dns_zone.docusaurus.name
  resource_group_name = azurerm_resource_group.docusaurus.name
  ttl                 = 60
  target_resource_id  = azurerm_cdn_endpoint.docusaurus.id
}

resource "azurerm_dns_cname_record" "cdnverify" {
  name                = "cdnverify"
  zone_name           = azurerm_dns_zone.docusaurus.name
  resource_group_name = azurerm_resource_group.docusaurus.name
  ttl                 = 60
  record              = "cdnverify.${azurerm_cdn_endpoint.docusaurus.fqdn}"
}
This will create an Azure CDN profile with a standard Microsoft SKU, and an Azure CDN endpoint associated with the Azure CDN profile. The CDN endpoint is associated with the origin of the Azure Static Web App, and HTTPS redirect delivery rules are defined to redirect HTTP requests to HTTPS.
Additionally, we’re creating an A record and a wildcard CNAME record in the Azure DNS zone that was created in the previous steps. Lastly, we’re also creating a CNAME record for CDN verification, which points to the fully qualified domain name (FQD) of the Azure CDN endpoint.
Step 7: Make sure you add the variables below to your variables.tf file, and give them a proper value to your liking:
variable "cdn_profile_name" {
  type    = string
  default = ""
}

variable "cdn_endpoint_name" {
  type    = string
  default = ""
}
Step 8: Commit and push the changes to the remote repository by running the following commands:
git add .
git commit -m "Create CDN endpoint"
git push -u origin main
Obtain and convert the SSL certificate
In the steps below, we will order an SSL certificate for domain validation from ZeroSSL, as they provide a 90-day valid free certificate. The steps are similar to other providers.
Step 9: Open your web browser and go to the ZeroSSL website on https://zerossl.com/. Click on “Get Free SSL” at the top of the page.
Step 10: Create your Free Account, and log in.
Step 11: Click on “New Certificate” at the top of the page. Enter your domain name in the "Domain name" field, then click on “Next Step”.
Step 12: Choose the “90-Day Certificate” for this guide. Click on “Next Step”. Leave the “Auto-Generate CSR” checked as default, and click on “Next Step”. Choose the “Free” option, and click on “Next Step”.
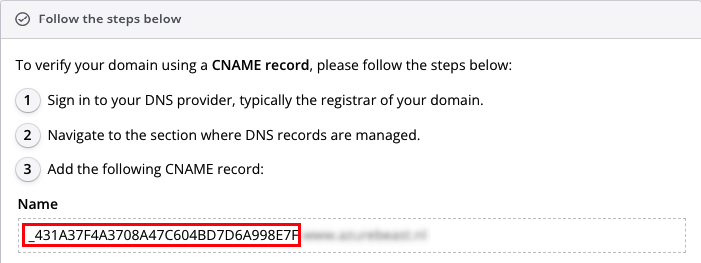
Step 13: Choose the “DNS (CNAME)" method to verify ownership of your domain name. Copy the values in the Point To field, and the Name field without the .domain. See the image below for reference (copy the shaded area).
Step 14: To add a CNAME record to your Azure DNS zone, you will need to add the following Terraform code to your main.tf file, or to a new .tf file in the same directory:
resource "azurerm_dns_cname_record" "SSL" {
  name                = var.ssl_validation_name
  zone_name           = azurerm_dns_zone.docusaurus.name
  resource_group_name = azurerm_resource_group.docusaurus.name
  ttl                 = 60
  record              = var.ssl_validation_record
}
Step 15: Make sure you add the variables below to your variables.tf file, and give them a proper value to your liking:
variable "ssl_validation_name" {
  type    = string
  default = "<shaded Name value>"
}

variable "ssl_validation_record" {
  type    = string
  default = "<Point To value>"
}
Step 16: Commit and push the changes to the remote repository by running the following commands:
git add .
git commit -m "Create DNS validation record"
git push -u origin main
Step 17: Click “Validate” on the ZeroSSL website in your browser. It might take a few minutes before the record is being recognized. Once completed, you can download your certificate files as a .zip bundle.
Step 18: Open your terminal or command prompt and navigate to the directory of your certificate files using the cd command.
Step 19: Use the openssl command-line tool to convert the .crt file into a .pfx file. This is necessary because Azure requires .pfx files for SSL certificates. Run the command below, replacing <your_password> with a password of your choice:
openssl pkcs12 -export -out certificate.pfx -inkey private.key -in certificate.crt -certfile ca_bundle.crt -password pass:<your_password>
Note that you’ll need to have the private.key file for your certificate in the same directory as the certificate.crt and ca_bundle.crt files for this command to work. Also, make sure to remember <your password>, as we’ll be needing it later.
Add the certificate and custom domain
Step 20: Open your web browser and go to the GitHub website. Navigate to your GitHub repository, where you have your code uploaded. Click on the “Settings” tab. In the left sidebar, click on “Secrets”. Click on “New repository secret”. In the Name field, enter CERTIFICATE_SECRET. In the Value field, paste the password you used in the previous step in <your password>, and click on “Add secret”.
Step 21: Open your terminal or command prompt, and login to Azure using the az login command. Once logged in, register the service principal for Azure Front Door as an app in your Azure Active Directory (Azure AD) by executing the following command:
az ad sp create --id 205478c0-bd83-4e1b-a9d6-db63a3e1e1c8
Step 22: Run the following command to find the object ID for the client service principal you’ve just registered:
az ad sp show --id 205478c0-bd83-4e1b-a9d6-db63a3e1e1c8 --query id --out tsv
Write down the returned value. We’ll be needing it in the next steps.
Step 23: We’re now going to create the Azure Key vault. Add the following Terraform code to your main.tf file, or to a new .tf file in the same directory:
resource "azurerm_key_vault" "docusaurus" {
  name                        = var.keyvault_name
  location                    = azurerm_resource_group.docusaurus.location
  resource_group_name         = azurerm_resource_group.docusaurus.name
  tenant_id                   = data.azurerm_client_config.current.tenant_id
  soft_delete_retention_days  = 7
  purge_protection_enabled    = false

  sku_name = "standard"
}

resource "azurerm_key_vault_access_policy" "github" {
  key_vault_id = azurerm_key_vault.docusaurus.id
  tenant_id    = data.azurerm_client_config.current.tenant_id
  object_id    = data.azurerm_client_config.current.object_id

  certificate_permissions = [
      "Backup", "Create", "Delete", "DeleteIssuers", "Get", "GetIssuers", "Import", "List", "ListIssuers", "ManageContacts", "ManageIssuers", "Purge", "Recover", "Restore", "SetIssuers", "Update",
  ]

  key_permissions = [
      "Backup", "Create", "Decrypt", "Delete", "Encrypt", "Get", "Import", "List", "Purge", "Recover", "Restore", "Sign", "UnwrapKey", "Update", "Verify", "WrapKey", "Release", "Rotate", "GetRotationPolicy", "SetRotationPolicy",
  ]

  secret_permissions = [
      "Backup", "Delete", "Get", "List", "Purge", "Recover", "Restore", "Set",
  ]

  storage_permissions = [
      "Backup", "Delete", "DeleteSAS", "Get", "GetSAS", "List", "ListSAS", "Purge", "Recover", "RegenerateKey", "Restore", "Set", "SetSAS", "Update",
  ]
}

resource "azurerm_key_vault_access_policy" "cdn" {
  key_vault_id = azurerm_key_vault.docusaurus.id
  tenant_id    = data.azurerm_client_config.current.tenant_id
  object_id    = var.AzureFrontDoorCdn_ID

  certificate_permissions = [
    "Get",
  ]

  secret_permissions = [
    "Get",
  ]
}

resource "azurerm_key_vault_certificate" "docusaurus" {
  name         = var.certificate_name
  key_vault_id = azurerm_key_vault.docusaurus.id

  certificate {
    contents = filebase64("certificate.pfx")
    password = var.certificate_password
  }
}
This Terraform code creates an Azure Key vault and sets access policies for your GitHub and Azure Front Door CDN entities. Additionally, the certificate is added to the Key vault.
Step 24: Make sure you add the variables below to your variables.tf file, and give them a proper value to your liking:
variable "keyvault_name" {
  type    = string
  default = ""
}

variable "AzureFrontDoorCdn_ID" {
  type    = string
  default = "<output step 22>"
}

variable "certificate_name" {
  type    = string
  default = ""
}

variable "certificate_password" {}
The variable for "certificate_password" is an empty variable that will hold the password for the SSL certificate. We have defined the password value as a secret in the Github repository variables, and we will parse it on through our pipeline in a later step.
Step 25: Move or copy the .pfx file (your certificate), that you’ve created in step 19, to the folder where your Terraform (.tf) files are.
Warning: Don’t do this in a production environment, and never do this in a public repository! A
.pfxfile includes both the public and private key for the associated certificate, so don’t share this outside your organization! You should always keep your certificates safe. In a production environment, you’ll probably want to manually import the certificate in the keyvault, and import it in the Terraform state after.
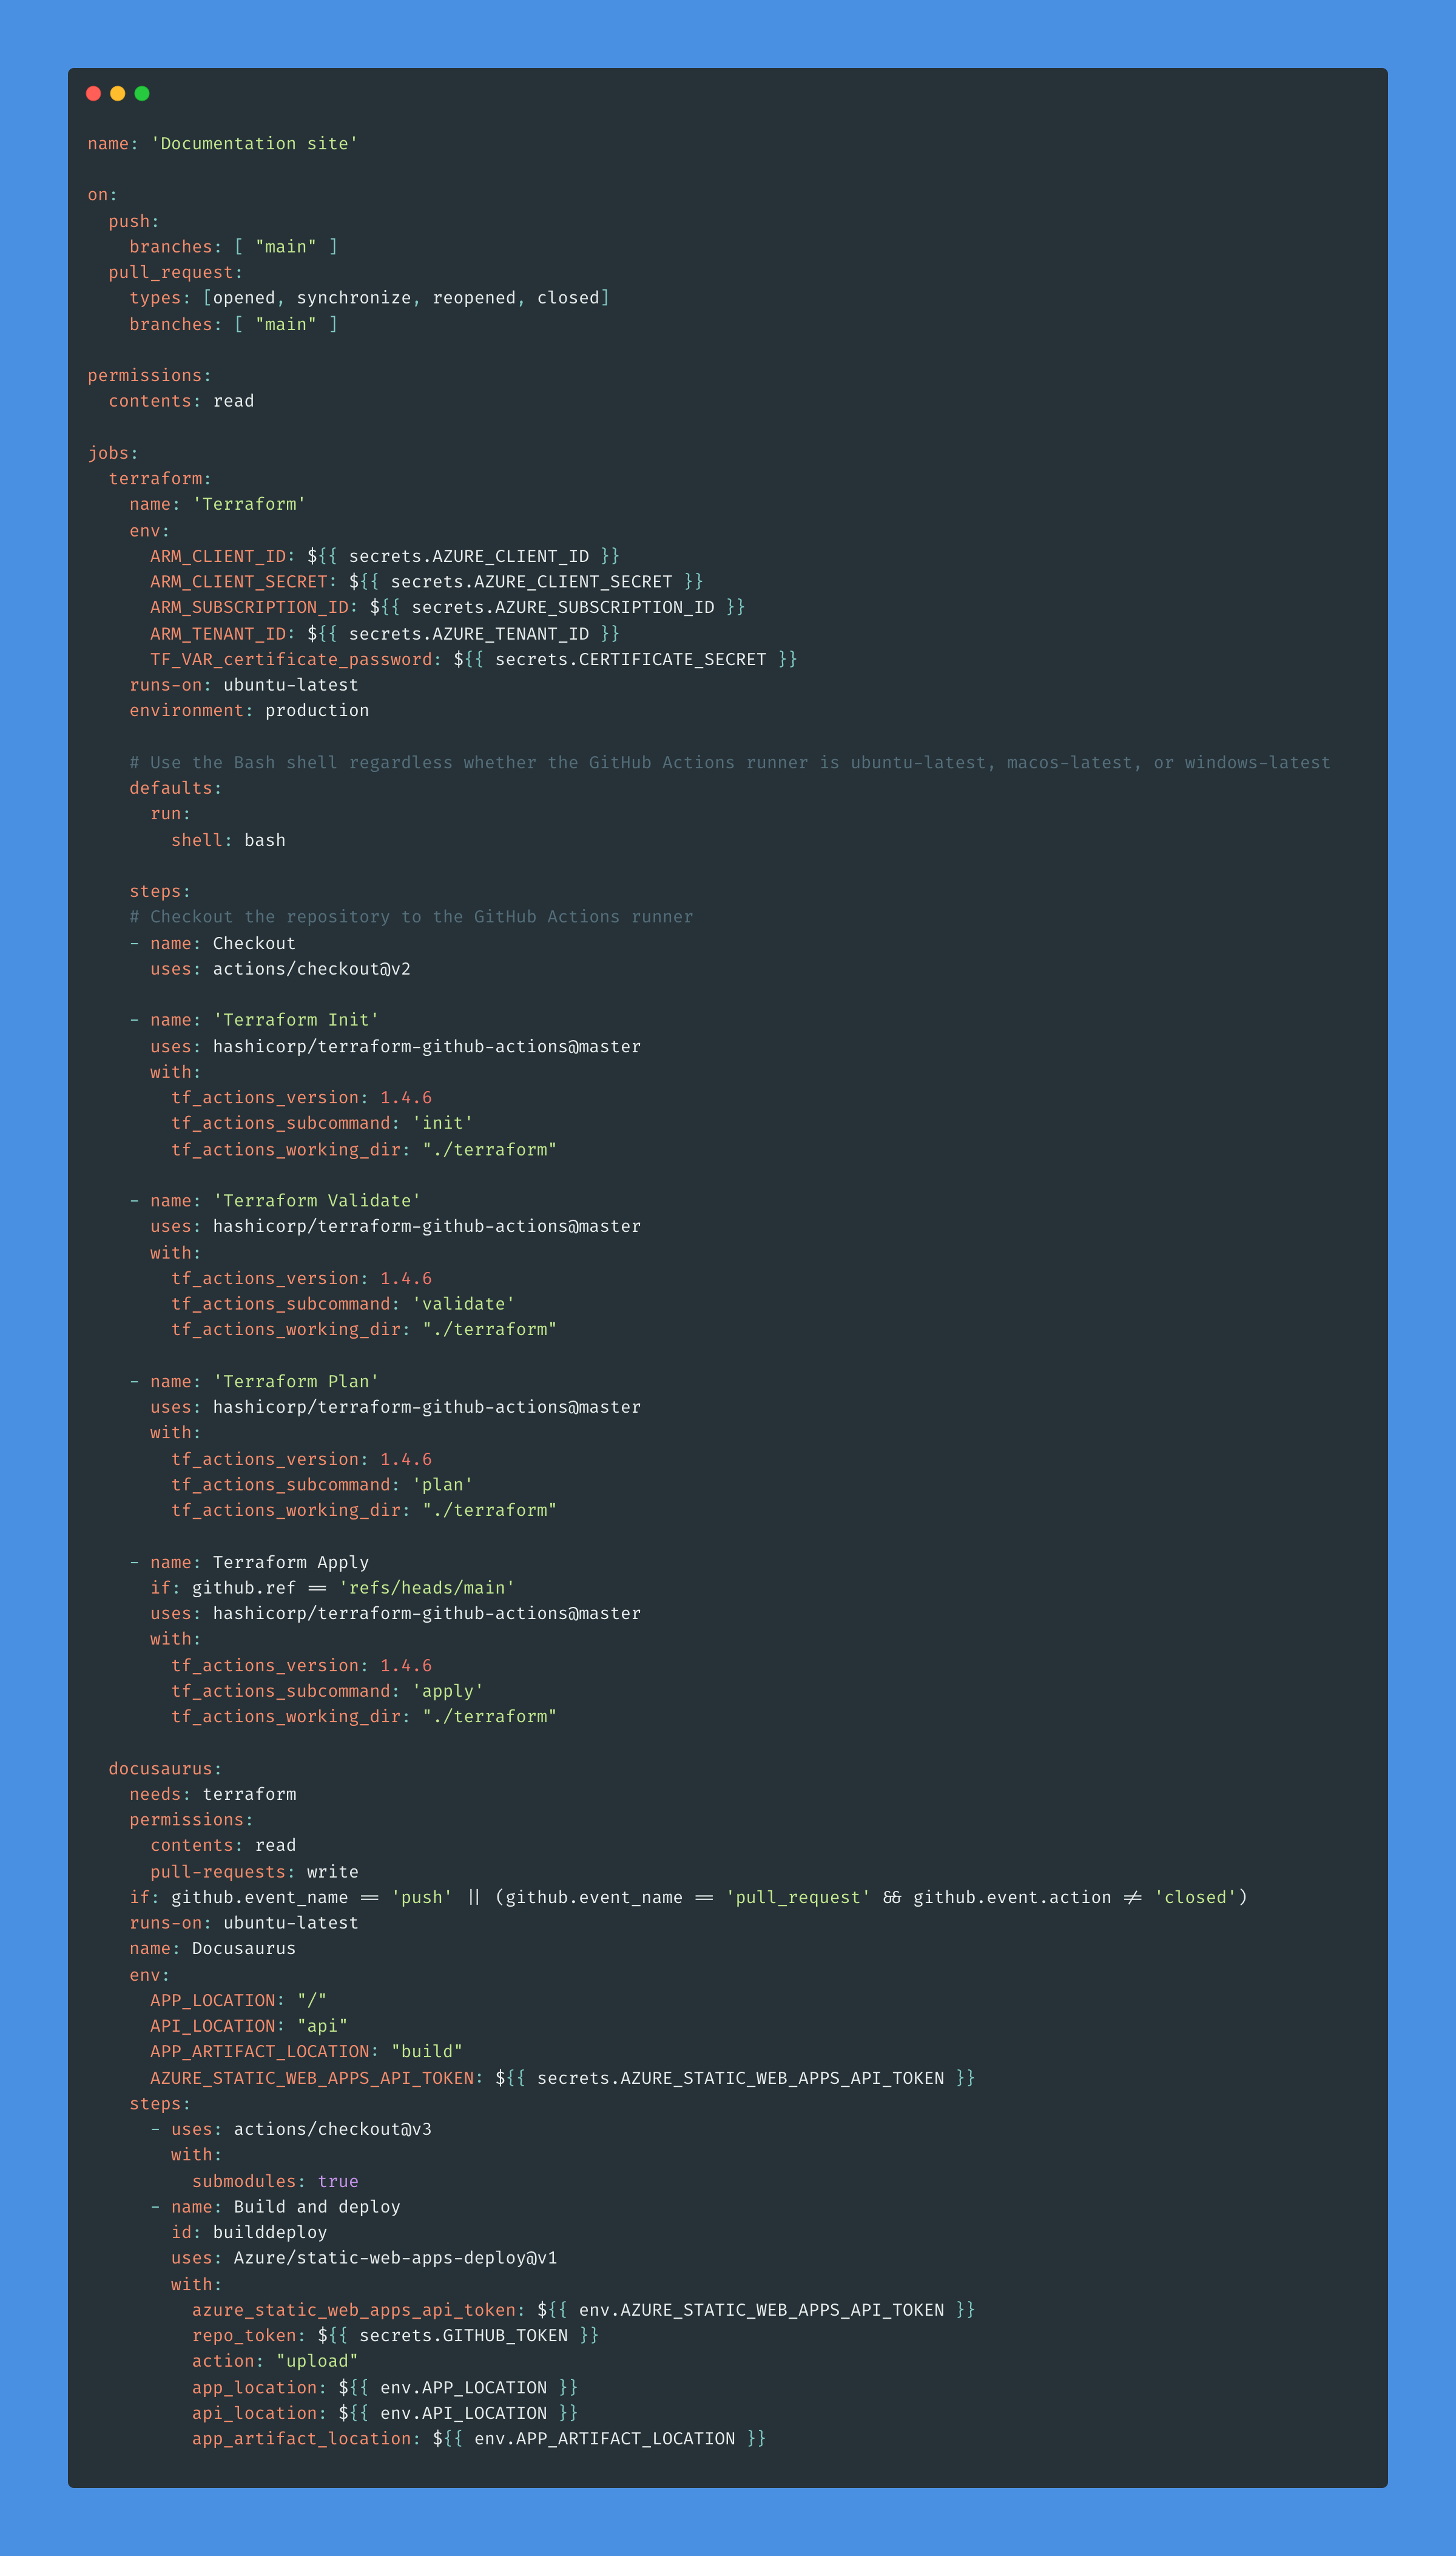
Step 26: Open your .yml GitHub Actions workflow file, and add the following line to your environment variables within the Terraform job:
TF_VAR_certificate_password: ${{ secrets.CERTIFICATE_SECRET }}
The value of this environment variable is set to the value of the CERTIFICATE_SECRET secret stored in GitHub. In Terraform, environment variables starting with TF_VAR_ are automatically read as input variables. In this case, TF_VAR_certificate_password will be used as an input variable in the Terraform script, allowing the script to access the value of the CERTIFICATE_SECRET secret. Your .yml file should look like the image below:
Step 27: It is finally time to commit and push the changes to the remote repository. Run the following commands:
git add .
git commit -m "Final commit"
git push -u origin main
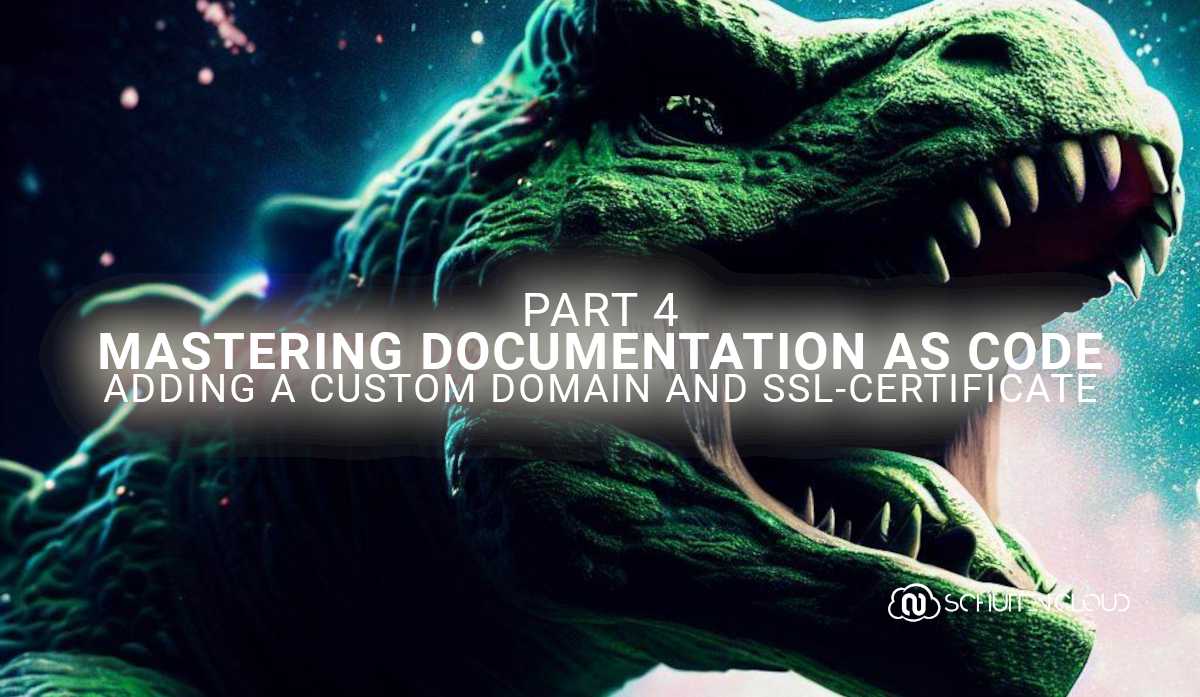
Once the workflow is completed, you can reach your website through your web browser on your custom domain, and see that your SSL certificate is valid like the image below:

Closing words
Setting up a custom domain and SSL certificate for an Azure Static Web App is a critical step towards securing the website and making it accessible to users on a unique domain. This blog covered a variety of tools and services that make this process easy and manageable, such as Azure DNS zones, Azure CDN, Azure Key Vault, and Terraform. Through the use of Terraform and GitHub Actions, the entire process can be automated and repeatable, saving time and ensuring consistency.
To learn more about the topics that were covered in this blog article, refer to the links below:
- Azure DNS
- Azure Front Door and CDN
- Azure Key Vault
- Transport Layer Security
- GitHub Actions Security guides
Thank you for taking the time to go through this post and making it to the end. Stay tuned because we’ll keep continuing providing more content on topics like these in the future.