In this blog, we explore how to leverage the power of HashiCorp Packer and Azure DevOps to create a seamless pipeline for building and deploying Windows Virtual Machine Scale Sets (VMSS) on Microsoft Azure.
Introduction
In today’s cloud-driven world, automating infrastructure deployment is essential for efficiency and scalability. While serverless computing is becoming more and more popular, alot of organizations still rely on the good old virtual machine. Therefore, automating your VM specifications, the provision of software, and the deployment process, still is very relevant for alot of IT pro’s to ensure security and reliability.
What is HashiCorp Packer?
HashiCorp Packer is a versatile and powerful tool used in modern DevOps and infrastructure automation workflows. It allows developers and operators to automate the process of creating machine images, such as virtual machine (VM) images or container images, for various platforms and environments. Packer achieves this by using a JSON configuration file that defines the components and settings of the machine image, including the operating system, software provisioning scripts, and post-processing tasks.
One of the key benefits of Packer is its ability to generate identical machine images from a single configuration across multiple platforms. Whether deploying to cloud providers like AWS, Azure, or Google Cloud Platform, or virtualization platforms like VMware or VirtualBox, Packer ensures consistency and reliability in the created images. This consistency is essential for ensuring that development, testing, and production environments remain synchronized and free from configuration drift.
Furthermore, Packer integrates seamlessly with other tools and automation pipelines, such as CI/CD systems like Jenkins or Azure DevOps. By incorporating Packer into the deployment pipeline, teams can automate the image creation process, speeding up development cycles and enhancing overall infrastructure scalability and reliability.
What are Virtual Machine Scale Sets (VMSS)?
Virtual Machine Scale Sets (VMSS) is a feature in Microsoft Azure that enables the deployment and management of a group of identical virtual machines (VMs) for high availability and scalability. VMSS allows you to automatically scale the number of VM instances based on demand, ensuring optimal performance and resource utilization.
With VMSS, you define the configuration of a single VM instance, including the operating system, software packages, and configurations. Azure then automatically creates and manages multiple instances of this VM, distributing them across availability zones or fault domains to ensure resilience and availability.
One of the primary advantages of VMSS is its ability to scale out or scale in based on predefined metrics such as CPU utilization or incoming network traffic. This auto-scaling capability allows your infrastructure to respond dynamically to changing workload demands, ensuring efficient resource utilization and cost-effectiveness.
VMSS integrates seamlessly with other Azure services such as Azure Load Balancer and Azure Application Gateway, enabling you to build highly available and scalable applications with minimal management overhead. Additionally, VMSS supports rolling upgrades and automatic OS image updates, simplifying maintenance and ensuring security compliance.
Prerequisites
Before diving into the deployment process, ensure you have the following prerequisites in place:
- Azure Subscription: It is necessary to have an Azure subscription. If you don’t have one, you can create it for free.
- Azure DevOps: Create an Azure DevOps project and a Git repository within it. This will be used to store your infrastructure-as-code (IaC) files and pipeline scripts. How to do this is not covered in this blog article. Sign up for an Azure DevOps account if you haven’t already.
- Service Connection: Set up a service connection from your Azure DevOps project to your Azure subscription. This will allow Azure DevOps to deploy resources to your Azure subscription. How to do this is not covered in this blog article.
- Azure CLI: You’ll need the Azure command-line interface for deploying the first resources. You can find more information about the Azure CLI in the documentation.
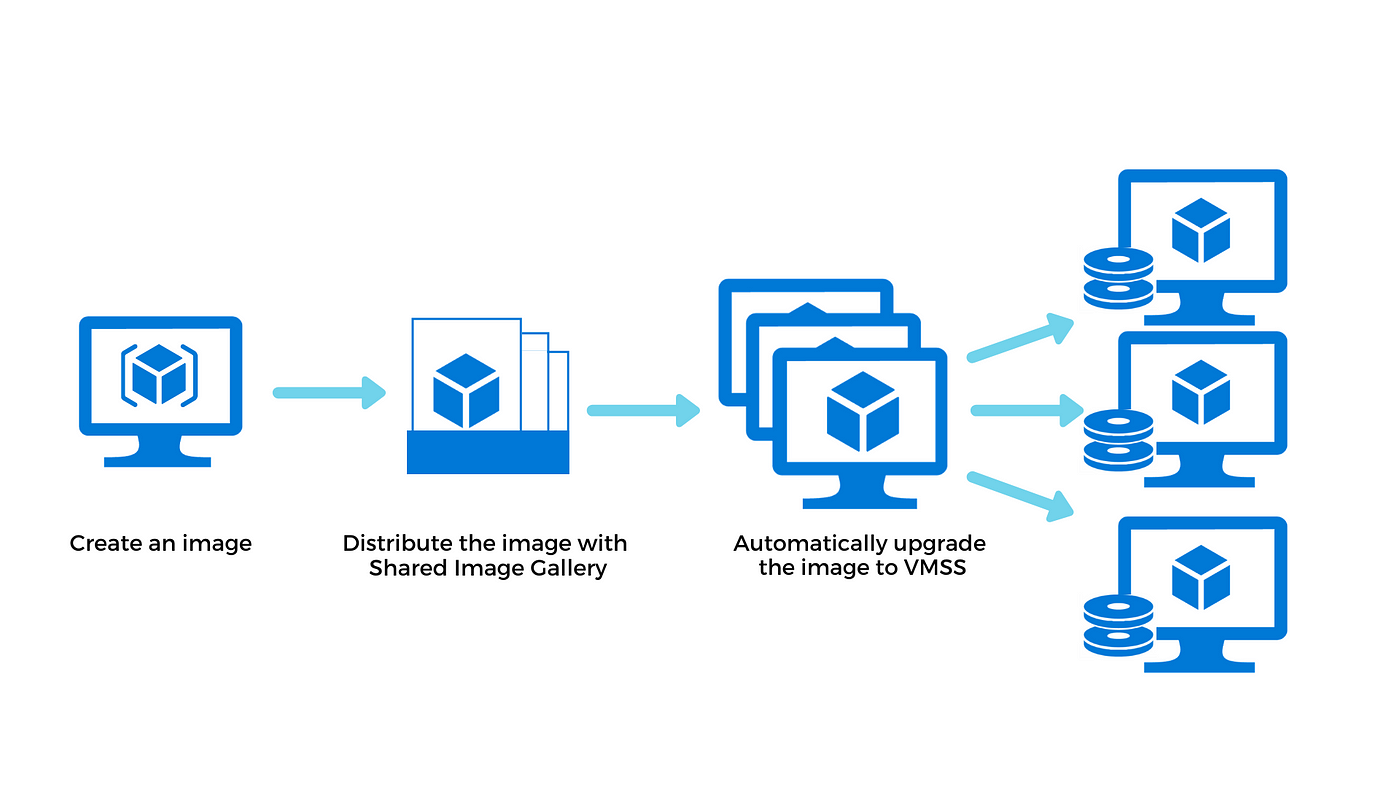
Additionally, we need to create a resource group, a shared image gallery, and a shared image definition. Below are the instructive steps to create these resources through Azure CLI:
Step 1: First, we’ll create the resource group that will hold all resources we’ll be creating during this step-by-step guide. Run the command below, after you’ve replaced <resource-group-name> with the desired name for your resource group and <location> with the Azure region where you want to create the resource group:
az group create \
    --name <resource-group-name> \
    --location <location>
Step 2: After the resource group has been created, we can now create the Shared Image Gallery. We’ll use the Shared Image Gallery to centrally manage and share our Packer built custom virtual machine images. Run the command below, after you’ve replace <resource-group-name> with the name of the resource group created in the previous step, <gallery-name> with the desired name for your shared image gallery, and <location> with the Azure region where you want to create the shared image gallery.
az sig create \
    --resource-group <resource-group-name> \
    --gallery-name <gallery-name> \
    --location <location>
Step 3: Lastly, we’ll create a Shared Image Definition. This is the template that defines the configuration of a virtual machine image. Run the command below, after you’ve replaced <resource-group-name> with the name of the resource group where the shared image gallery is located, <gallery-name> with the name of your shared image gallery, <image-definition-name> with the desired name for your shared image definition, <publisher-name> with the publisher name, <offer-name> with the offer name, <sku-name> with the SKU name, and <os-type> with the operating system type (in our case Windows).
az sig image-definition create \
    --resource-group <resource-group-name> \
    --gallery-name <gallery-name> \
    --gallery-image-definition <image-definition-name> \
    --publisher <publisher-name> \
    --offer <offer-name> \
    --sku <sku-name> \
    --os-type <os-type>
Prepare your Packer template
It is now time to create our Packer template, defining our Windows VM configuration. We’ll create this Packer template using HCL (HashiCorp Configuration Language). This file includes information about your Azure subscription, VM specifications, and any provisioning scripts. Below is an example.
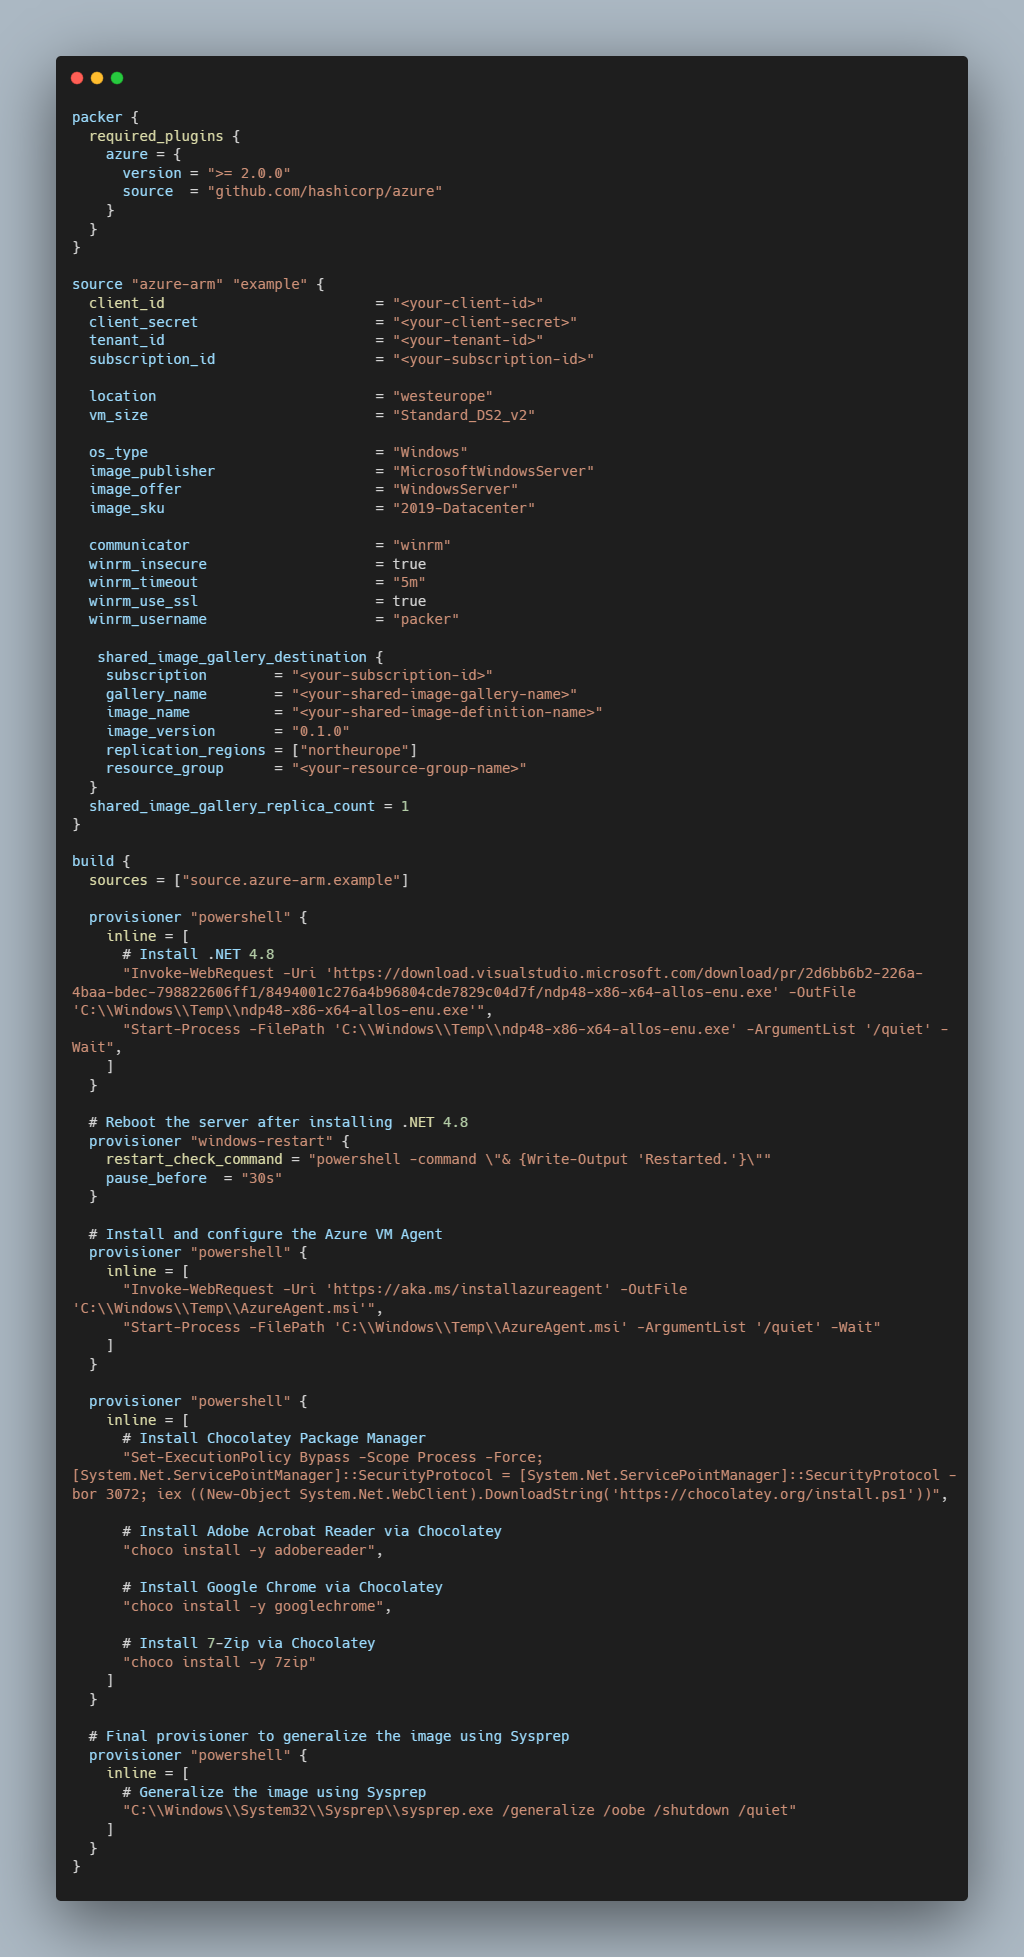
This Packer configuration file is used to create a custom Windows Server 2019 Datacenter image. Let’s break down the file section by section:
- The Packer block specifies the required plugins for Packer. In this case, it requires the Azure plugin with a version greater than or equal to 2.0.0.
- The Source block specifies the source for the Azure ARM (Azure Resource Manager) builder named “example”. It includes authentication details (client ID, client secret, tenant ID, subscription ID) for Azure, defines VM configuration like location, size, OS type, and image details, specifies communication settings for WinRM (Windows Remote Management), defines settings for the Shared Image Gallery where the custom image will be stored, and sets the replica count for the Shared Image Gallery.
- The Build block defines the build process. It references the source defined earlier, and includes several provisioners:
- To address the need for .NET 4.8 to be installed before Chocolatey, the first powershell provisioner downloads and installs .NET 4.8 silently.
- The second provisioner restarts the server after installing .NET 4.8. to address the need to reboot the VM after installing .NET. It uses the Packer’s built-in features for handling reboots and continuation of provisioning after a reboot.
- The third provisioner downloads, installs and configures the Azure VM Agent.
- The fourth provisioner installs software packages (Adobe Reader, Google Chrome, 7-Zip) via Chocolatey package manager.
- The last provisioner will execute the Sysprep tool with the necessary parameters to generalize the image, preparing it for deployment as a base image for multiple virtual machines or as a template for creating a Virtual Machine Scale Set (VMSS) in Azure.
Step 4: Create a new configuration file in the root directory of your Git repo, with the .pkr.hcl extension (for example, windows-vm.pkr.hcl). Copy the contents of the example into this file and adjust the file with your own values.
💡 More examples of configuration files are available on the official HashiCorp Packer GitHub page.
Create a build pipeline to build the VM image
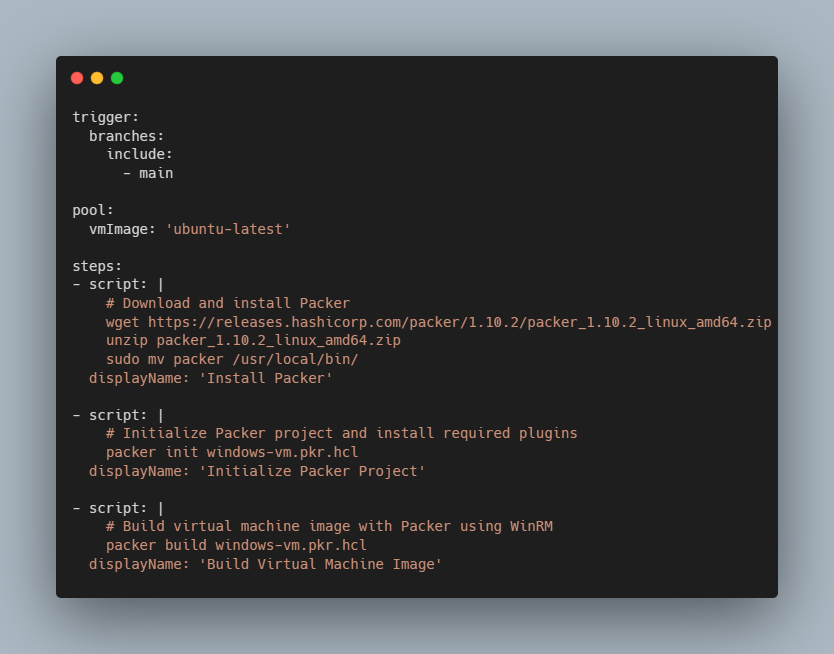
Next, it is time to create our build pipeline. It turns out that the Packer task in Azure Pipelines (PackerBuild@1) doesn’t work with the current versions of Packer. Therefore, we need to run Packer as part of a script instead. In our case, we’ll make use of our reliable friend PowerShell.
Step 5: Navigate to your Azure DevOps project and create a new pipeline. Choose your Git repository containing the Packer template. Configure the build pipeline like the example below. If you have a different filename than windows-vm.pkr.hcl, make sure you adjust the values accordingly.
Let’s break the file down section by section:
- The Trigger section specifies when the pipeline should be triggered. In our case, it’s triggered when changes are pushed to the main branch.
- The Pool section specifies the agent pool and the virtual machine image to use for running the pipeline. In our case, it’s using an Ubuntu-based agent.
- The Steps section specifies which tasks or scripts are being executed as part of the pipeline.
- The first step downloads and installs Packer onto the agent machine. It downloads specifically version 1.10.2 of Packer for Linux, extracts it, and moves the packer binary to /usr/local/bin/. The displayName field provides a human-readable name for the step.
- The second step initializes the Packer project and installs any required plugins specified in the
windows-vm.pkr.hclconfiguration file. - The last step builds a virtual machine image using Packer based on the configuration provided in
windows-vm.pkr.hcl.
Step 6: After the previous step, you’ll commit the file to the main branche. Since our pipeline triggers on changes to the main branch, it wil automatically run after committing, installing Packer, initializes the Packer project, and then builds the virtual machine image using Packer.
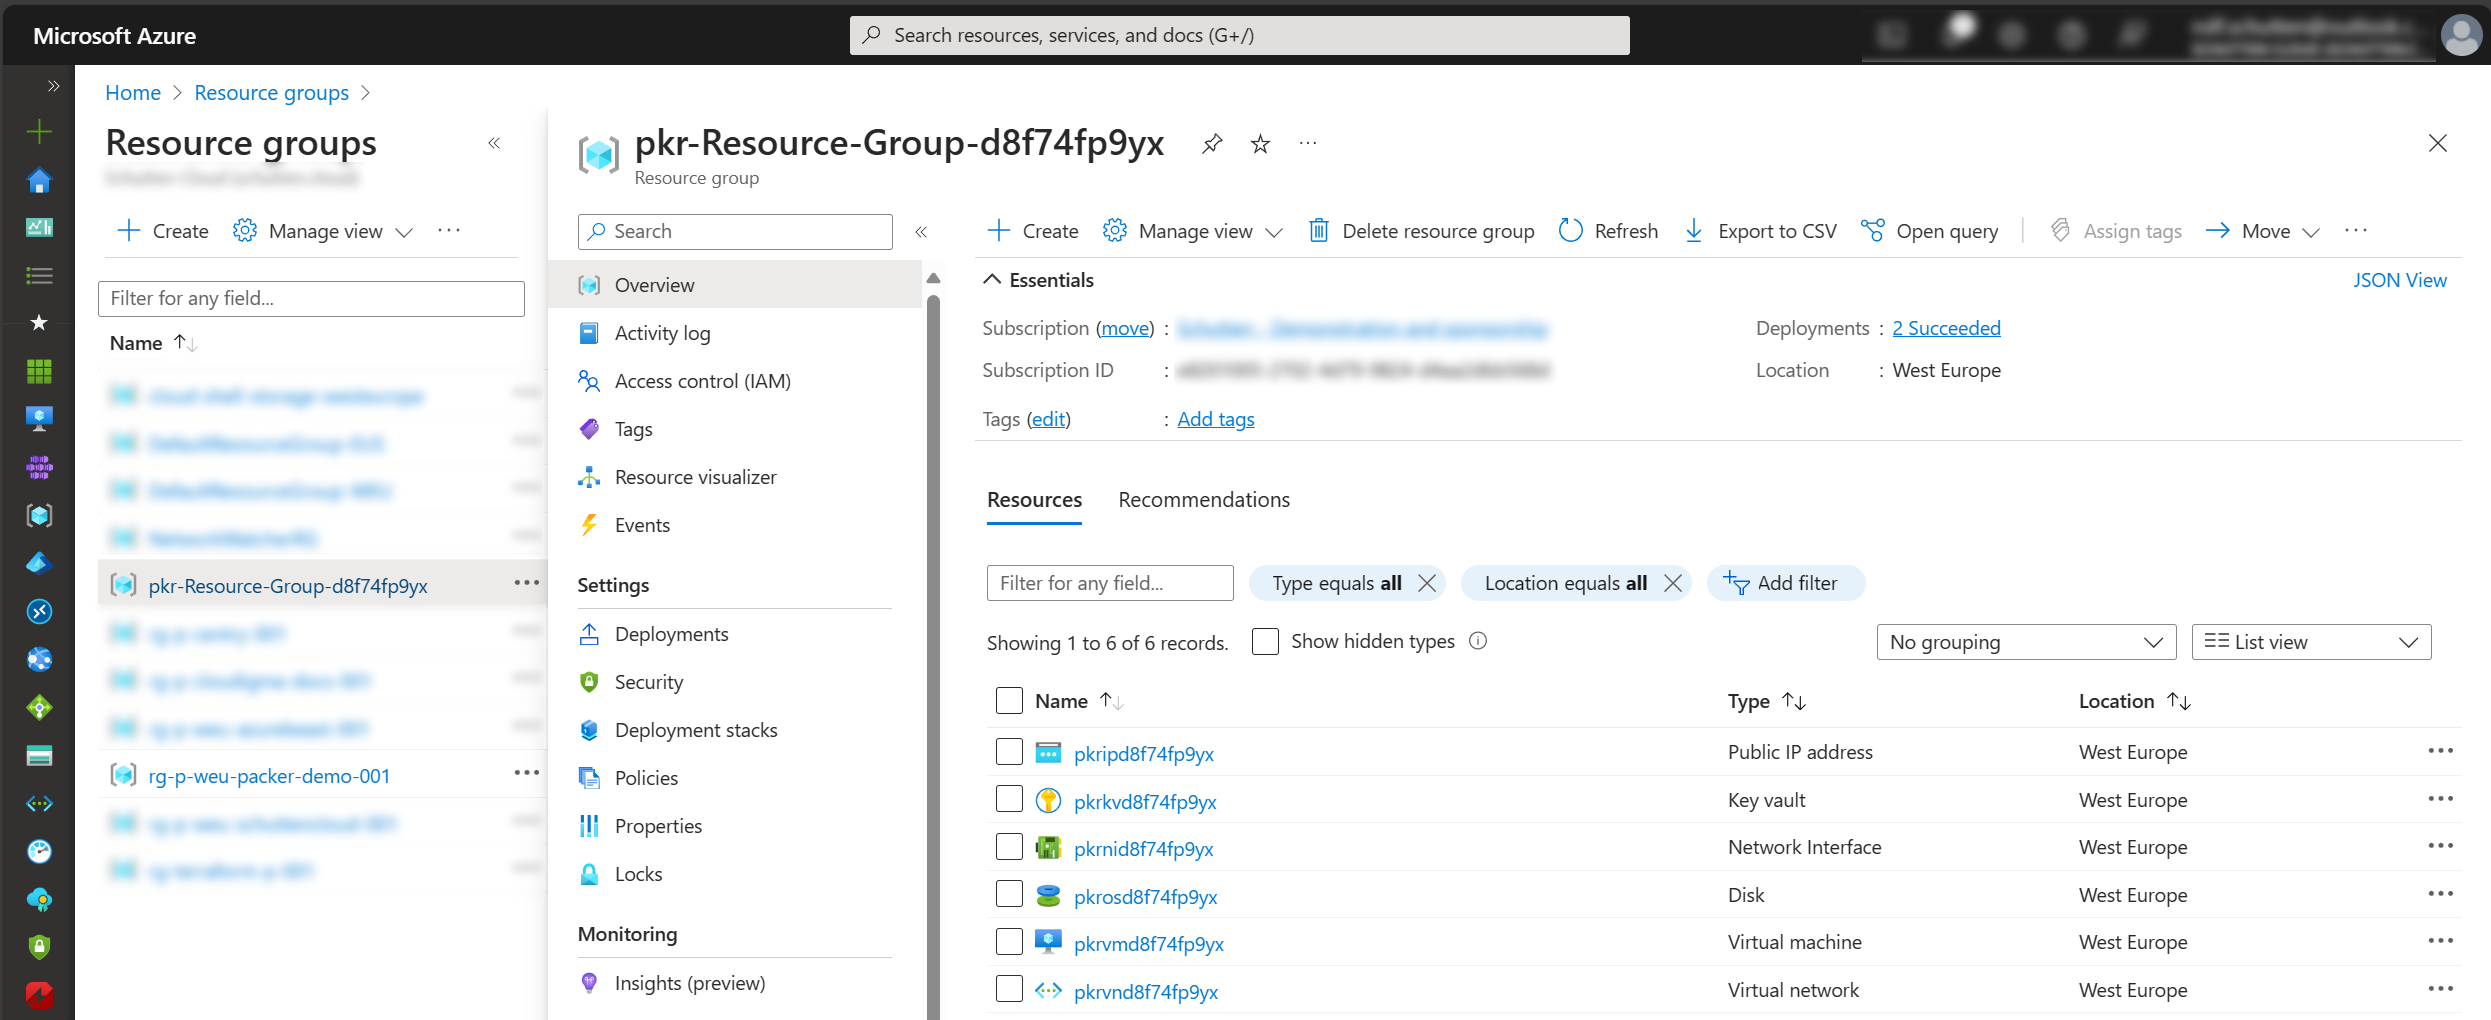
When the pipeline runs, Packer will create several temporary resources in order to build the virtual machine image. See the screenshot below for the temporary resources that are being created. Packer will automatically delete these resources at the end of the building process.
Running the pipeline can take a while (in my case about 32 minutes). Proceed to the next step when it has succesfully completed.
Prepare your Terraform configuration
Since we now have a proper image, it is time to create Terraform configuration files within our Git Repo and utilize a Release Pipeline to provision the necessary resources.
⚠️ Note: This setup is for demonstration purposes and does not adhere to best practices for production scenarios.
Step 7: In the root directory of your Git repository, create .tf files for your Terraform configurations. Copy and paste the following Terraform configurations into separate .tf files, and make sure you adjust the configuration files according your specific resource values:
The provider.tf file configures the Terraform provider for Azure. It establishes the connection to the Azure provider, enabling Terraform to manage Azure resources. In this example we don’t configure a Terraform backend.
provider "azurerm" {
  features {}
}
The variables.tf file declares variables used throughout the Terraform configuration. It defines variables such as subscription ID, resource group name, and location, allowing for customization and reusability.
variable "subscription_id" {
  description = "Azure Subscription ID"
}

variable "resource_group_name" {
  description = "Name of the resource group for your VMSS"
}

variable "location" {
  description = "Azure region where resources will be deployed"
}
The network.tf file defines Azure virtual network and subnet resources. It creates a virtual network with an address space and a subnet within the specified address prefix, providing network infrastructure for resources.
data "azurerm_client_config" "current" {}

resource "azurerm_virtual_network" "example" {
  name                = "vnet-example"
  resource_group_name = var.resource_group_name
  location            = var.location
  address_space       = ["10.0.0.0/16"]
}

resource "azurerm_subnet" "example" {
  name                 = "subnet-example"
  resource_group_name  = var.resource_group_name
  virtual_network_name = azurerm_virtual_network.example.name
  address_prefixes     = ["10.0.2.0/24"]
}
Lastly, the vmss.tf file configures a Virtual Machine Scale Set (VMSS) in Azure. It sets up a VMSS with specified parameters such as VM size, instance count, admin credentials, and networking configuration. The VMSS is designed to scale out by adding instances automatically based on load.
resource "azurerm_windows_virtual_machine_scale_set" "example" {
  name                = "vmss-example"
  resource_group_name = var.resource_group_name
  location            = var.location
  sku                 = "Standard_D2S_v5"
  instances           = 2

  admin_username      = "adminuser"
  admin_password      = "AdminPassword123!"

  computer_name_prefix = "vm-"

  source_image_id     = "/subscriptions/${var.subscription_id}/resourceGroups/${var.resource_group_name}/providers/Microsoft.Compute/galleries/<gallery_name>/images/<image_name>"

  os_disk {
    storage_account_type = "Premium_LRS"
    caching              = "ReadWrite"
  }

  network_interface {
    name    = "nic-example"
    primary = true

    ip_configuration {
      name      = "internal"
      primary   = true
      subnet_id = azurerm_subnet.example.id
    }
  }
}
Create a release pipeline to deploy the VMSS using the VM image
It is now time to provision the actual VMSS infrastructure using the Terraform configuration files.
Step 8: Navigate to your Azure DevOps project and create a new release pipeline. Choose your Git repository containing the Terraform configuration files, but also add the artifact from your build pipeline. In my case, I choose the artifact from my build pipeline to be the trigger for continous deployment.
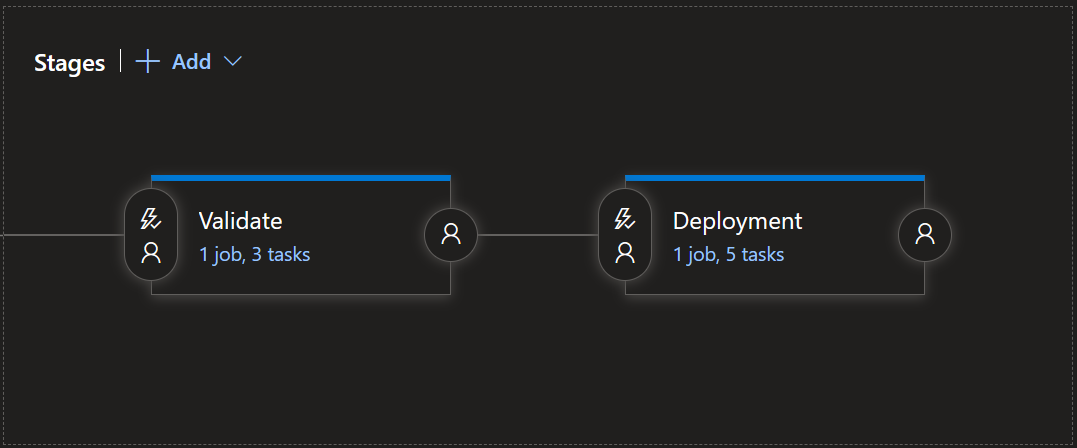
In the above below, I’ve added two stages: the first for validation, and the second for the actual deployment. Let’s break down these stages and the tasks within:
- The first stage, Validation, is using
Azure Pipelinesas the Agent Pool, andwindows-latestas the Agent Specification. Additionally, it downloads the Terraform configuration files from our Git Repo as the Artifact.- The first task is to download Terraform, using the built-in
Terraform tool installertask. - The second task is running the
terraform initcommand, using the built-inTerraformtask. If you wan’t to use a backend configuration for your state files, make sure you configure theAzureRM backend configuration. - The last task is running the
terraform validatecommand, using that sameTerraformtask.
- The first task is to download Terraform, using the built-in
- The second stage, Deployment, is using
Azure Pipelinesas the Agent Pool, andwindows-latestas the Agent Specification. Additionally, it downloads the Terraform configuration files from our Git Repo as the Artifact.- The first task is to download Terraform, using the built-in
Terraform tool installertask. - The second task is running the
terraform initcommand, using the built-inTerraformtask. Again, make sure you configure theAzureRM backend configurationif you wan’t to use a backend configuration for your state files. - The third task is running the
terraform plancommand, using that sameTerraformtask. - The fourth task is running the
terraform applycommand, using that sameTerraformtask. - The final task is running the
terraform outputcommand, again using that sameTerraformtask.
- The first task is to download Terraform, using the built-in
Step 9: Now, when a new image is created through the build pipeline, the release pipeline is being triggered. This will deploy your freshly created image to the Terraform provisioned resources, including the VMSS. Re-run the build pipeline, or manually create a new release by triggering the release pipeline. If you configured everything correctly, you’ll have a VMSS with your custom image within minutes.

Closing Words
We’ve covered the basics of automating the process of building virtual machine images with Packer and provisioning Virtual Machine Scale Sets (VMSS) with Terraform. It offers numerous benefits for organizations looking to streamline their infrastructure management:
- By defining infrastructure as code (IaC), you ensure that your virtual machine images and deployments are consistent across environments. This reduces the risk of configuration drift and minimizes human error.
- Automation significantly reduces the time and effort required to create and deploy virtual machine images and VMSS instances. This allows teams to focus on more strategic tasks and accelerates the development and deployment pipeline.
- VMSS enables you to automatically scale the number of virtual machine instances based on demand, ensuring that your applications can handle fluctuations in workload without manual intervention.
- With VMSS, you can dynamically scale your infrastructure up or down based on usage patterns, optimizing resource utilization and minimizing costs. Additionally, automating image building with Packer helps ensure that your images are lean and optimized for performance.
- Using Packer and Terraform allows you to easily customize and parameterize your image building and deployment processes, making it simple to adapt to changing requirements and environments.
This approach not only enhances operational efficiency but also enables faster time-to-market and better resource utilization. To learn more about the material we’ve covered in this blog article, you can start with reading some of the resources below:
- Azure Virtual Machine Scale Sets overview - Azure Virtual Machine Scale Sets | Microsoft Learn
- PowerShell - How to create VM Images with Packer - Azure Virtual Machines | Microsoft Learn
- Create an Azure virtual machine scale set from a Packer custom image by using Terraform | Microsoft Learn
- Documentation | Packer | HashiCorp Developer
- Docs overview | hashicorp/azurerm | Terraform | Terraform Registry
Thank you for taking the time to go through this post and making it to the end. Stay tuned, because we’ll keep continuing providing more content on topics like this in the future.