
In this blog, we look into Kubernetes cost management with Kubecost. Learn what Kubecost is, how it works, and how to install and utilize it effectively on your AKS cluster. With Kubecost, we’ll take control of our Kubernetes spending and optimize resource allocation effortlessly.
Introduction
Managing costs in Kubernetes environments comes with unique challenges, such as dealing with scalability concerns. As applications scale, so do infrastructure costs, leading to potential budgetary strains and operational complexities. This may result in the jarring phenomenon of cloud bill shock in many cases. Cloud bill shock refers to the unexpected surge in cloud service charges, often stemming from unchecked resource usage or inefficient allocation. More and more, new frameworks and best-practices are developed to navigate through the field of financial operations practices. Like the operational FinOps framework, the collaborative approach to cloud financial management that bridges the gap between technical teams and financial stakeholders, ensuring cost-effectiveness and optimization.
All these challenges call for tools like Kubecost. Kubecost is a leading open-source tool designed specifically for Kubernetes cost management. It provides granular insights into resource consumption, enabling teams to proactively manage spending and optimize resource allocation and utilization. Kubecost not only addresses the immediate challenges of cost management but also aligns with broader organizational objectives of scalability, cost-efficiency, and operational excellence in Kubernetes environments.
![]()
Kubecost offers granular cost allocation, breaking down costs by namespace, deployment, pod, and label, providing detailed insights into resource consumption. This allows organizations to understand exactly where their Kubernetes spending is going, facilitating informed decision-making and proactive cost management.
In addition to providing real-time cost monitoring, Kubecost scales effortlessly to meet the needs of single-cluster deployments or complex multi-cluster environments. Its seamless integration with developer workflows ensures that teams can make cost-conscious decisions without sacrificing productivity.
By promoting collaboration between development, operations, and finance teams, Kubecost facilitates the adoption of FinOps best practices for efficient cost management. With Kubecost, organizations can optimize their Kubernetes spending, enhance operational efficiency, and gain comprehensive visibility into their cloud costs.
Getting started with Kubecost
Let’s witness Kubecost in action firsthand.
Prerequisites
Before diving into the next steps, ensure you have the following prerequisites in place:
- Azure Subscription with Owner Permissions: You’ll need an active Azure subscription with Owner permissions to create and manage resources in Azure Kubernetes Service (AKS).
- Visual Studio Code: Have Visual Studio Code installed on your system for editing files and managing your project. You can download Visual Studio Code from here.
- Azure CLI: Install Azure CLI for interacting with Azure services from the command line. You can install Azure CLI by following the instructions at Microsoft’s official documentation.
- Terraform: We’ll use Terraform for setting up our practice lab. Ensure Terraform is installed on your system. You can install Terraform by following the instructions at Terraform’s official website.
- Kubectl and Kubectl Login: Ensure kubectl is installed no your system, along with kubelogin to log in to Azure Kubernetes Service (AKS) using Entra ID credentials. You can install kubectl and kubelogin by following the instructions in this documentation.
- Helm: Make sure you have Helm installed on your system. You can install Helm by following the instructions at Helm’s official website.
Setting up the Practice Lab
For the creation of our practice lab we’ll use Terraform.
⚠️ Note: This setup is for demonstration purposes and does not adhere to best practices for production scenarios.
Step 1: Create the main.tf, providers.tf, variables.tf and output.tf files, and copy the content from the examples below. Make sure you make adjustments to your liking.
# main.tf

resource "azurerm_resource_group" "aks" {
  name     = "rg-${var.environmentPrefix}-${var.locationPrefix}-${var.serviceName}-001"
  location = var.location
  tags     = var.resource_tags
}

resource "azurerm_kubernetes_cluster" "aks_cluster" {
  name                = "aks-${var.environmentPrefix}-${var.locationPrefix}-${var.serviceName}-001"
  location            = azurerm_resource_group.aks.location
  resource_group_name = azurerm_resource_group.aks.name
  dns_prefix          = var.serviceName

  default_node_pool {
    name       = "default"
    node_count = 3
    vm_size    = "Standard_DS2_v2"
  }

  identity {
    type = "SystemAssigned"
  }
  tags   = var.resource_tags
}

resource "azurerm_container_registry" "acr" {
  name                     = "cr${var.environmentPrefix}${var.locationPrefix}${var.serviceName}001"
  resource_group_name      = azurerm_resource_group.aks.name
  location                 = azurerm_resource_group.aks.location
  sku                      = "Basic"
  admin_enabled            = true
  tags                     = var.resource_tags
}

resource "azurerm_role_assignment" "acr_role_assignment" {
  scope                = azurerm_container_registry.acr.id
  principal_id         = azurerm_kubernetes_cluster.aks_cluster.kubelet_identity[0].object_id
  role_definition_name = "AcrPull"
  skip_service_principal_aad_check = true
}
# providers.tf

terraform {
  required_providers {
    azurerm = {
      source = "hashicorp/azurerm"
      version = "3.96.0"
    }
  }
  backend "azurerm" {
        resource_group_name  = "<your-resource-group-name>"
        storage_account_name = "<your-storage-account-name>"
        container_name       = "<your-container-name>"
        key                  = "key.tfstate"
  }
}
provider "azurerm" {
  features {}
}
# variables.tf

variable "location" {
    default     = "West Europe"
}

variable "locationPrefix" {
    default     = "weu"
}

variable "environmentPrefix" {
    default     = "p"
}

variable "serviceName" {
    default     = "kubecost"
}

variable "resource_tags" {
  type    = map(string)
  default = {
    ApplicationName = "KubeCost"
    Env             = "Prod"
    Owner           = "SchuttenCloud"
    ServiceClass    = "Dev"
  }
}
# output.tf

output "container_registry_login_server" {
  value = azurerm_container_registry.acr.login_server
}
Step 2: Next, login using az login, and set the right subscription with the following command:
az account set --subscription "<subscription-id>"
Step 3: It is now time to run our Terraform configuration, and deploy the resources. Make sure you are in the right working directory, and run the following Terraform commands:
terraform init
terraform validate
terraform plan
terraform apply --auto-approve
It may take up to a few minutes for the deployment process to complete. Once completed, move forward to the next steps.
Installing Kubecost
Now our Kubernetes infrastructure is running, it is time to install Kubecost on the AKS cluster.
Step 4: First, we need to get the credentials for the AKS cluster and login (interactively) using the command below:
az aks get-credentials -g <your-resource-group-name> -n <your-aks-cluster-name>
When it comes to installing Kubecost, you have two options. Depending on your specific requirements and preferences, you can choose either option to proceed with the installation process.
Step 5a: Helm is the preferred installation method for Kubecost. To add the Helm repository and scan for updates, run the command below:
helm repo add kubecost https://kubecost.github.io/cost-analyzer/
helm repo update
Once you’ve added the Helm repository and updated all your charts, you can run the command below to install the chart:
helm install kubecost kubecost/cost-analyzer -n kubecost --create-namespace \
  --set kubecostToken="aGVsbUBrdWJlY29zdC5jb20=xm343yadf98"
Step 5b: Although Helm is the preferred installation method for Kubecost, an alternative deployment approach involves utilizing a manifest file. It’s important to note that going for this route means installing Kubecost from a development branch, potentially incorporating unreleased modifications. To deploy Kubecost using the manifest file, run the command below:
kubectl apply -f https://raw.githubusercontent.com/kubecost/cost-analyzer-helm-chart/develop/kubecost.yaml
Step 6a (Optional): For testing Kubecost, you can either use port-forwarding or adding a Loadbalancer resource. To use port-forwarding, you run the command below:
kubectl port-forward --namespace svc/kubecost-cost-analyzer 9090
You can now access http://localhost:9090 in your web browser to see Kubecost’s UI.
Step 6b (Optional): To add a loadbalancer resource and expose an External IP, create a new file called kubecost-lb.yaml and copy the following content:
apiVersion: v1
kind: Service
metadata:
  name: kubecost-cost-analyzer-public
  namespace: kubecost
  labels:
    app.kubernetes.io/name: cost-analyzer
    helm.sh/chart: cost-analyzer-1.108.0
    app.kubernetes.io/instance: kubecost
    app.kubernetes.io/managed-by: Helm
    app: cost-analyzer
spec:
  selector:
    app.kubernetes.io/name: cost-analyzer
    app.kubernetes.io/instance: kubecost
    app: cost-analyzer
  type: LoadBalancer
  ports:
    - name: tcp-model
      port: 9003
      targetPort: 9003
    - name: tcp-frontend
      port: 9090
      targetPort: 9090
  sessionAffinity: None
To deploy the resource, run the kubectl apply -f kubecost-lb.yaml command.
Once the deployment process is done, run the kubectl get services command to show the running services, and the External IP that comes with it. You can now access the External IP in your web browser to see Kubecost’s UI.
Utilizing Kubecost Effectively
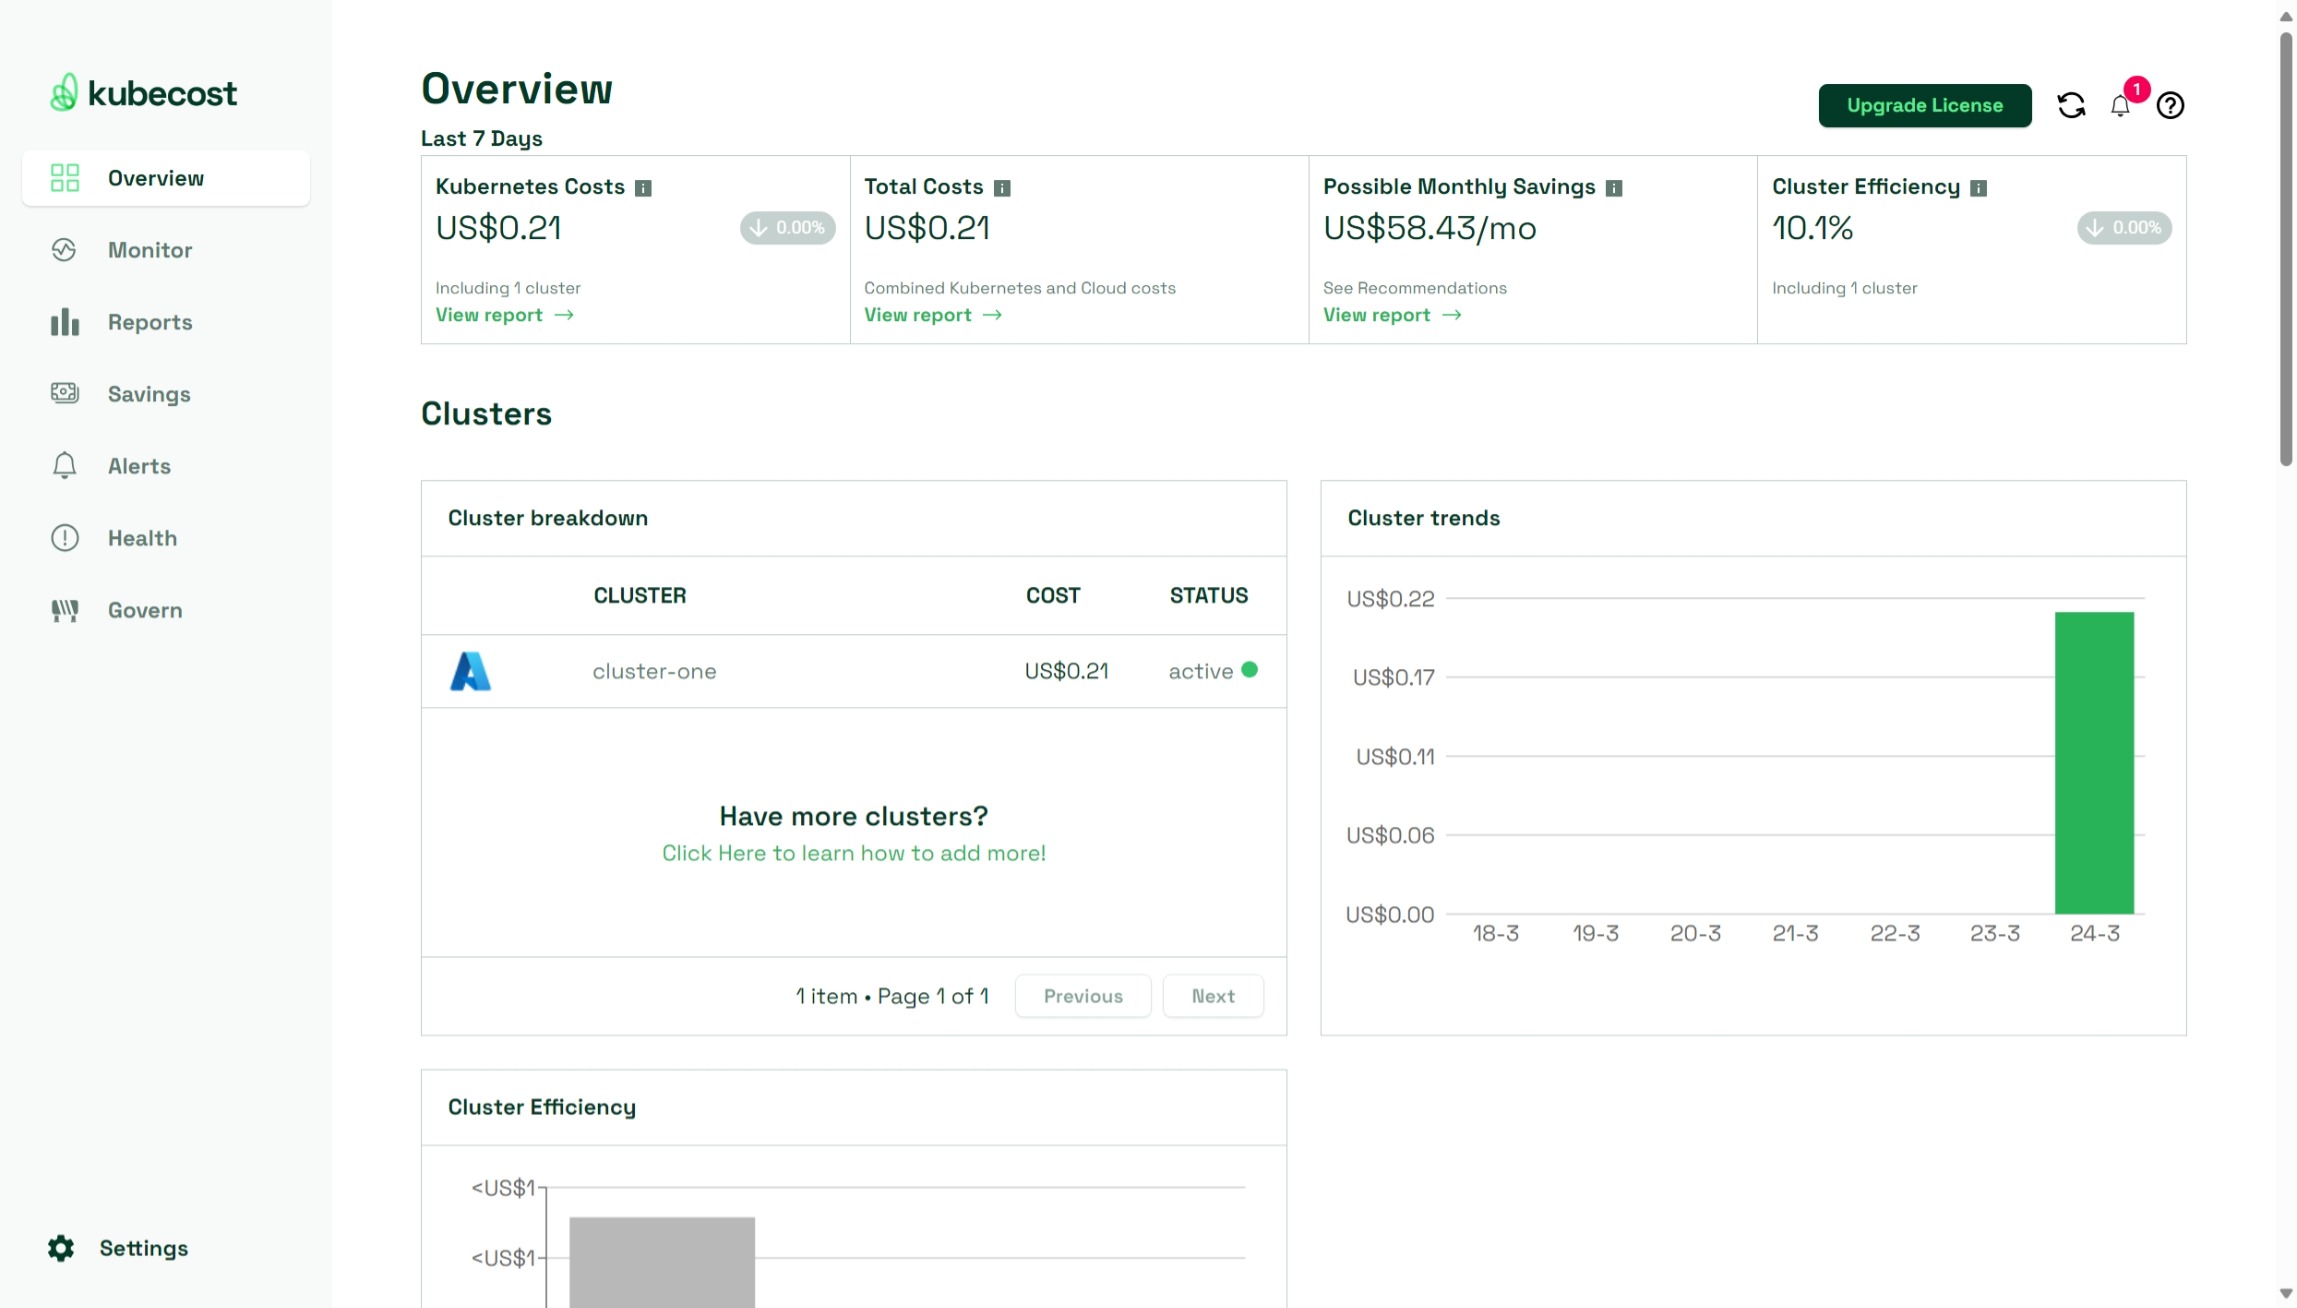
Upon landing on the Kubecost webpage, you’ll find a navigation menu at the top of the page. This menu offers access to various sections of the Kubecost application. On the main dashboard, you’ll notice a collection of summary metrics displayed. These metrics offer an overview of your Kubernetes spending and usage. Key metrics such as total cluster cost, cost breakdown by namespace, and resource utilization statistics like CPU and memory usage are typically featured here.
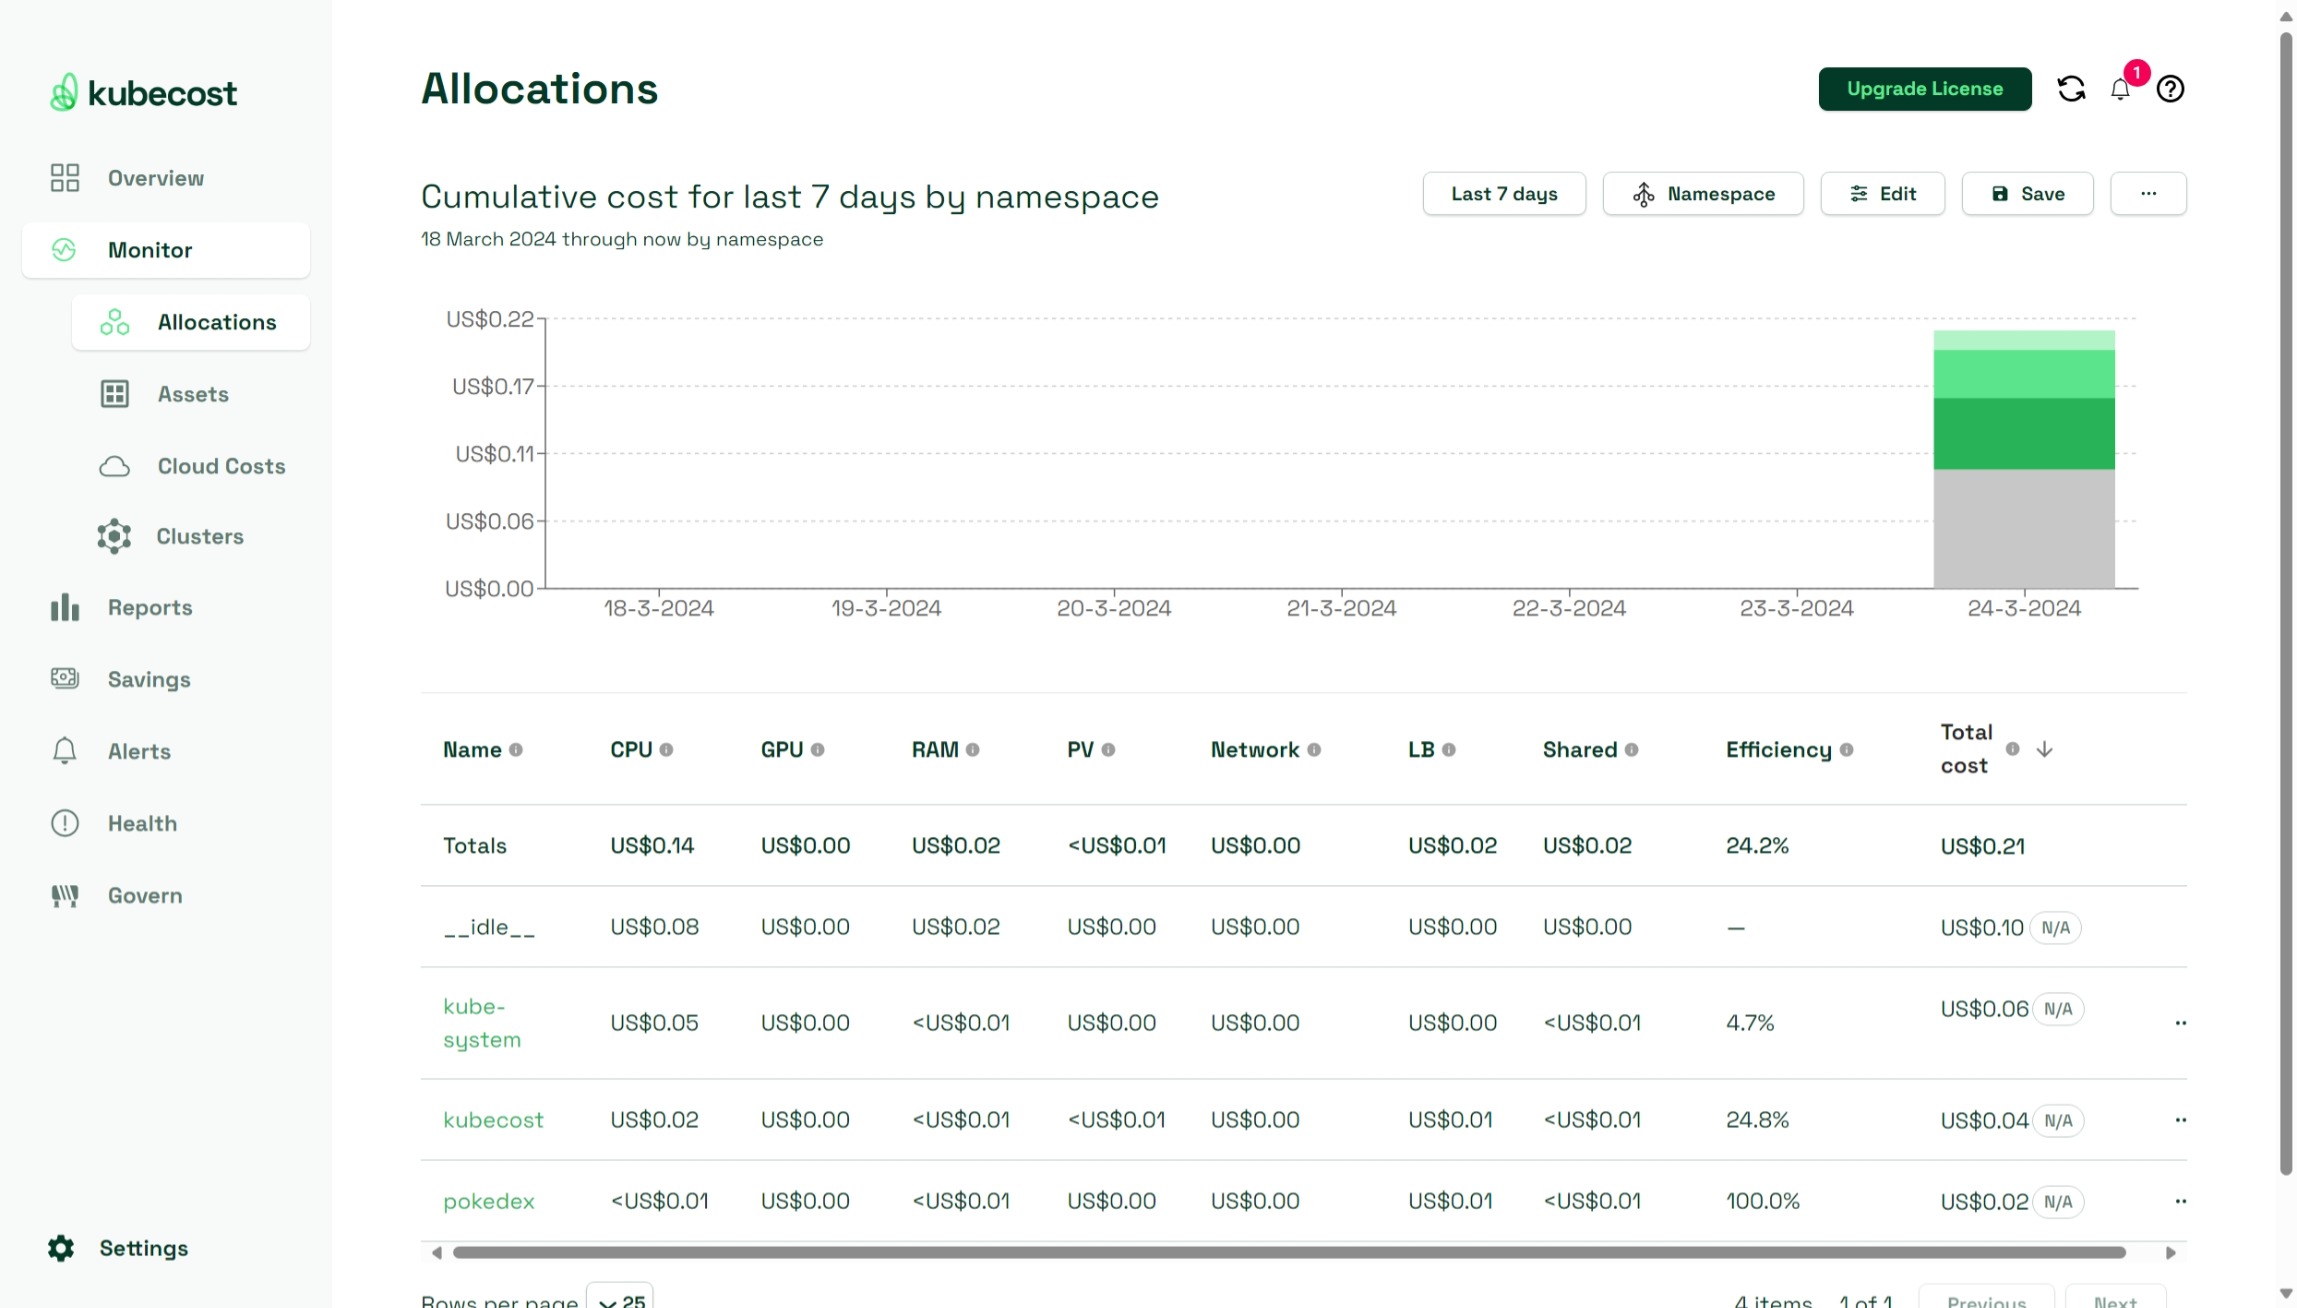
Upon navigating to the “Monitor” section of the Kubecost application and selecting “Allocations”, you’ll find the interface that is designed to provide insights into resource allocations within your Kubernetes environment. This page helps you understand how resources are allocated across different namespaces, deployments, and pods.
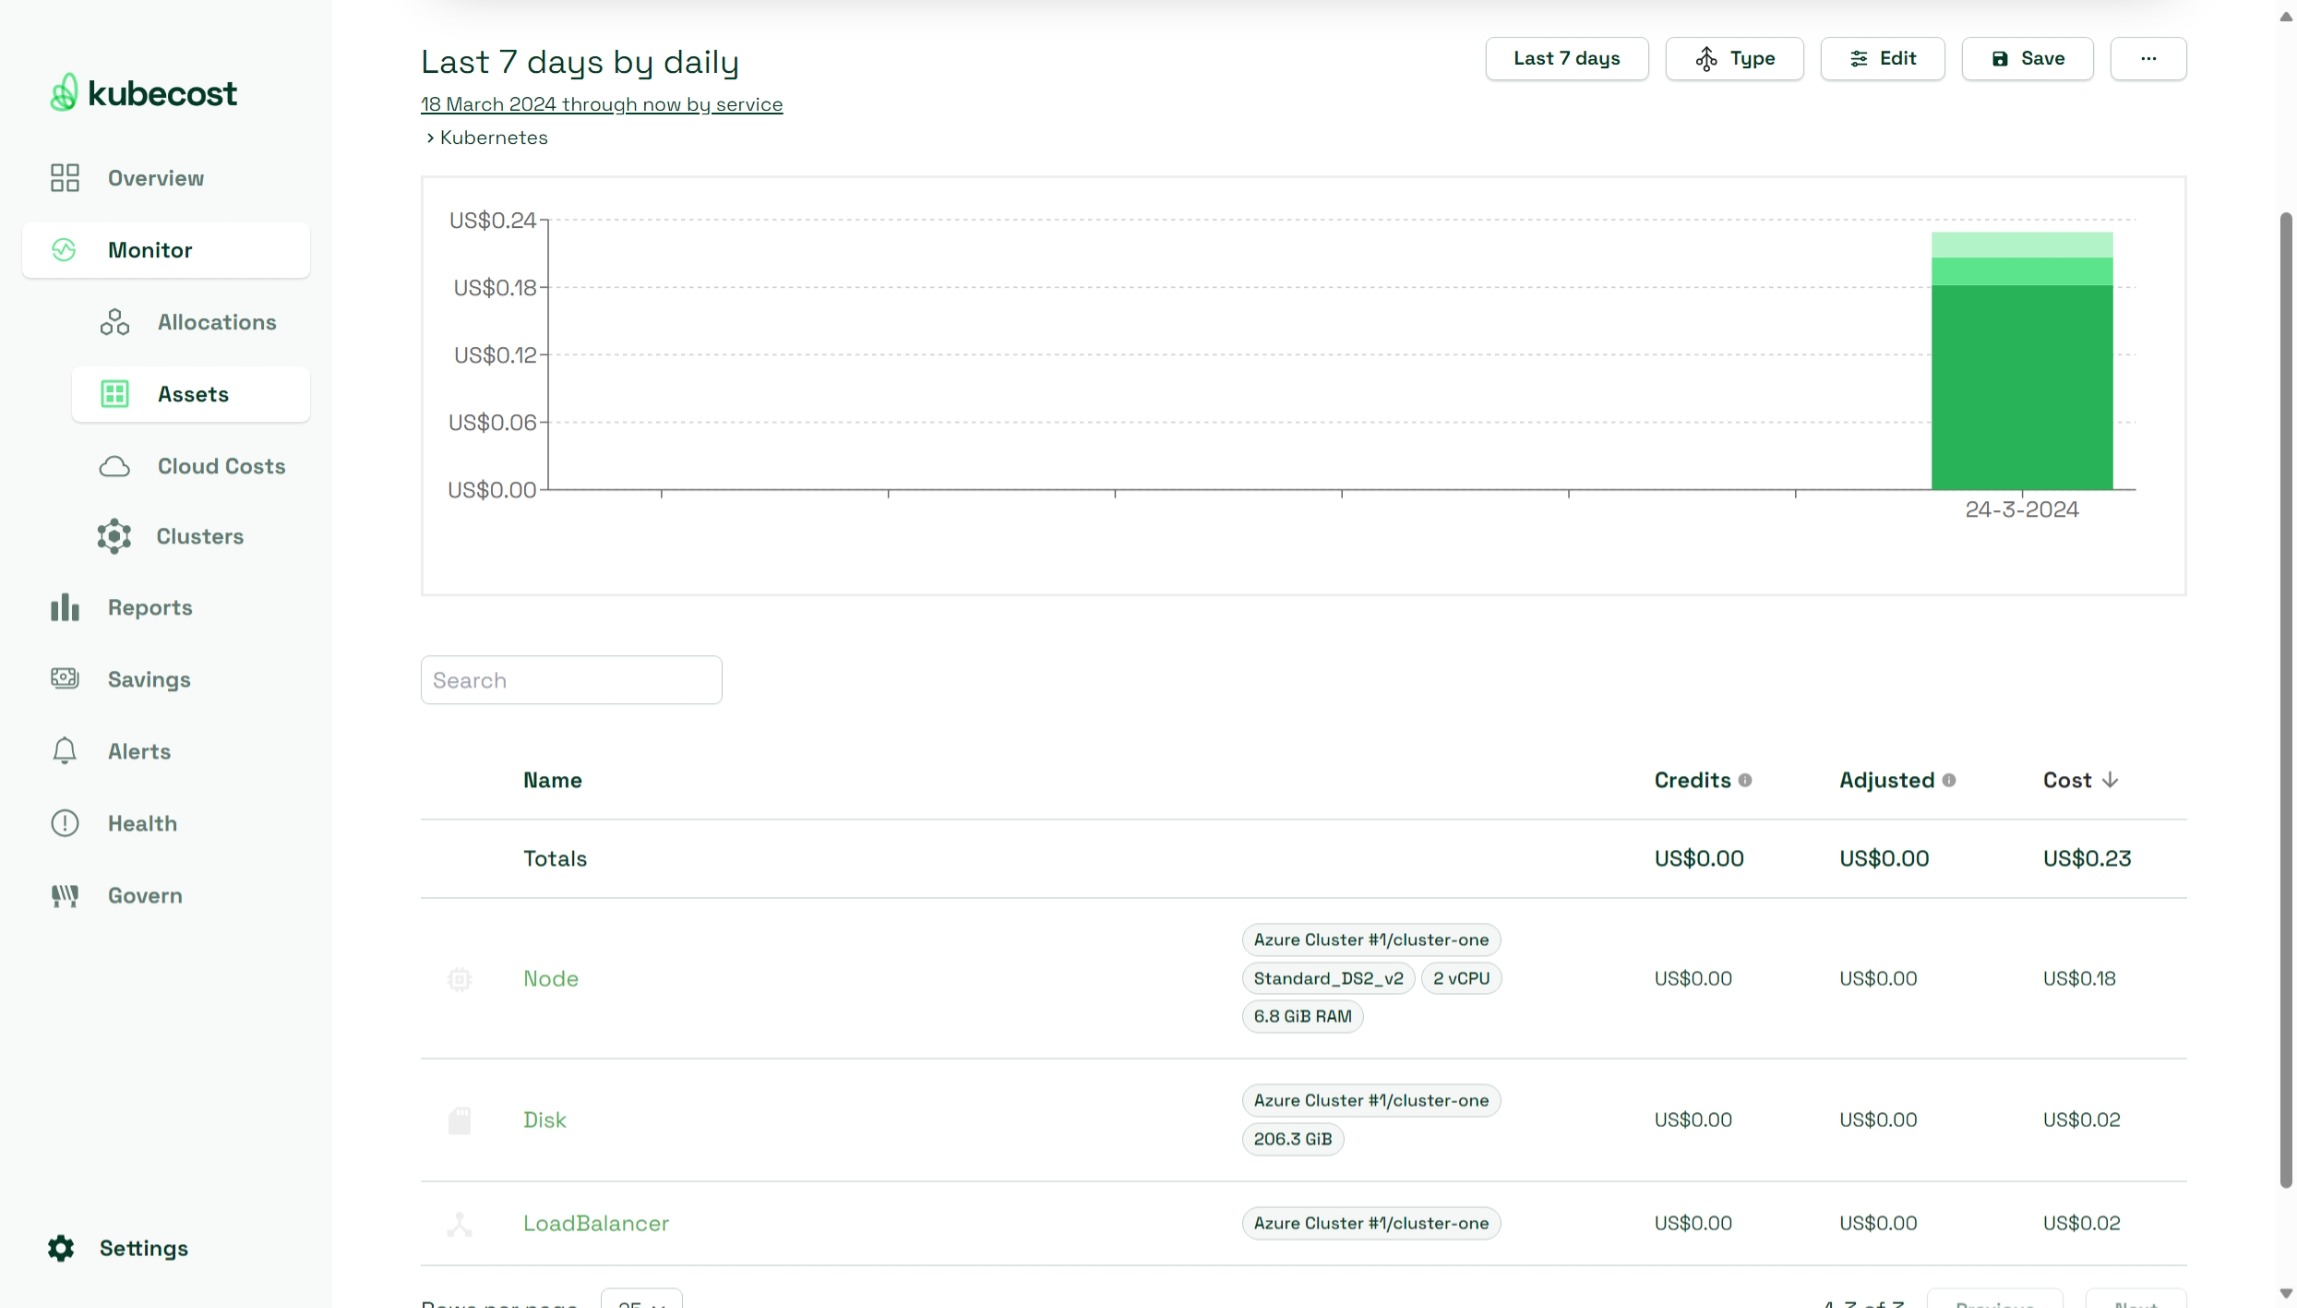
Now, navigating to the “Monitor” section and selecting “Assets”, you’ll find a dedicated interface providing insights into the assets deployed within your Kubernetes environment. This page serves as a centralized hub for managing and monitoring the various assets deployed across your clusters. On the main dashboard of the “Assets” page, you’ll find a collection of summary metrics displayed. These metrics offer an overview of the assets deployed within your Kubernetes clusters, including details such as total assets, asset breakdown by type, and resource utilization statistics.
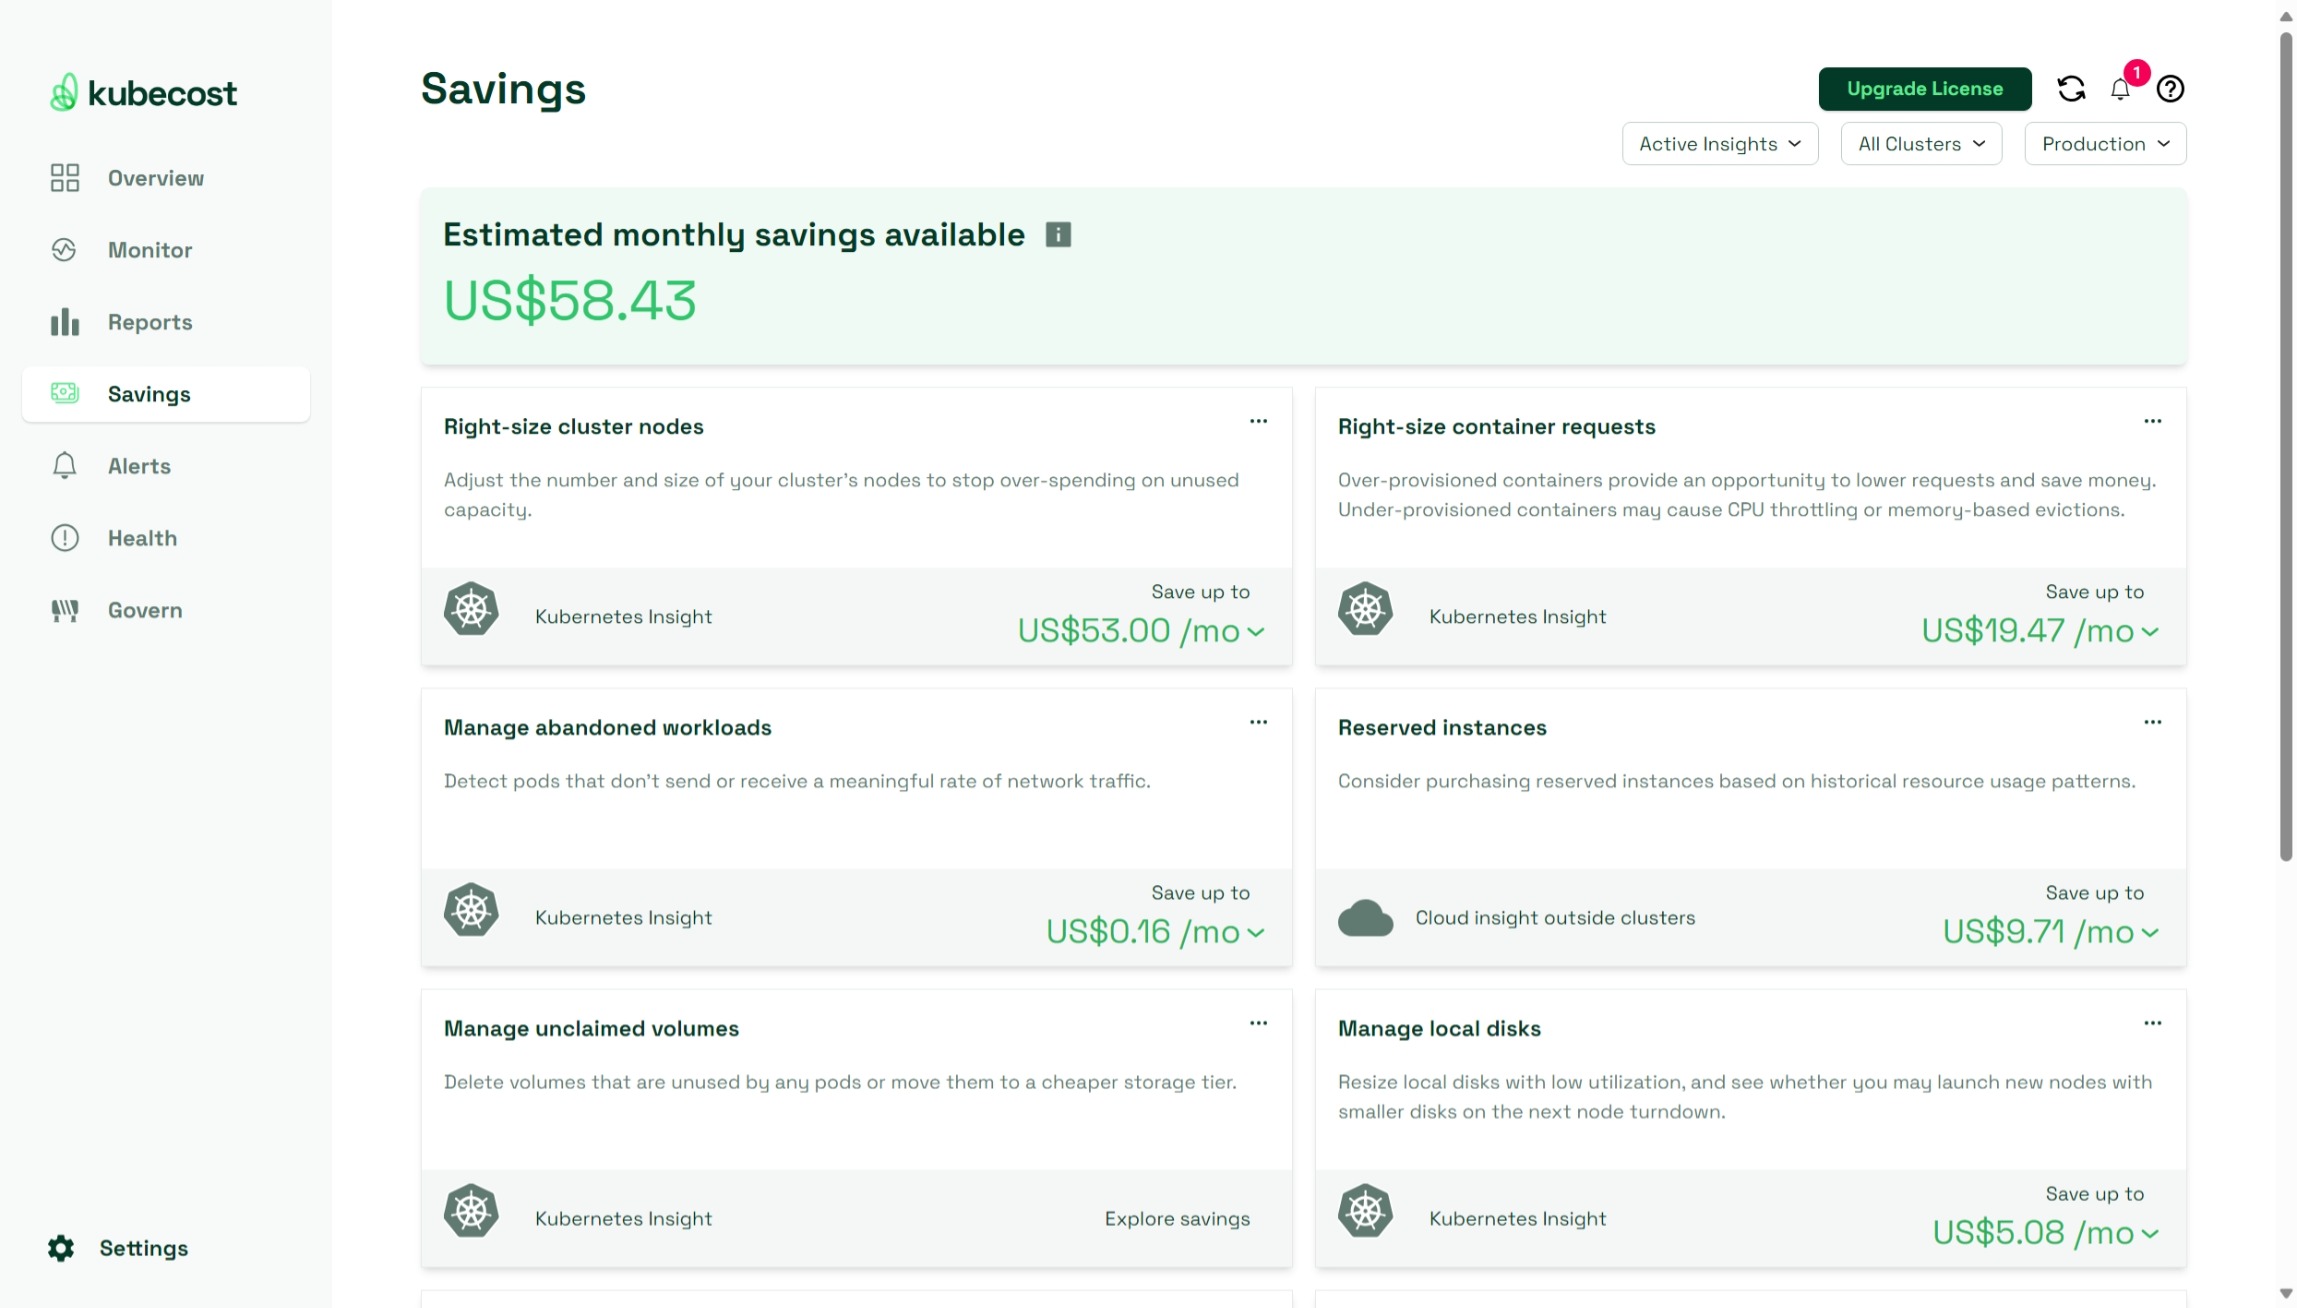
Next is the “Savings” page within the Kubecost application. This page is aimed at optimizing Kubernetes spending and maximizing cost efficiencies. This section provides insights into potential cost-saving opportunities, allowing you to identify areas for optimization and implement strategies to reduce overall spending. Through visualization tools and actionable recommendations, the “Savings” page helps you to proactively manage your Kubernetes costs and drive savings across your infrastructure.
Exploring further, the “Alerts” page within the Kubecost application provides a view of alerts and notifications related to your Kubernetes environment. This page allows you to configure and manage alerting rules, ensuring that you stay informed about critical events and potential issues affecting your infrastructure. By monitoring alerts proactively, you can address issues promptly and maintain the health and stability of your Kubernetes clusters.
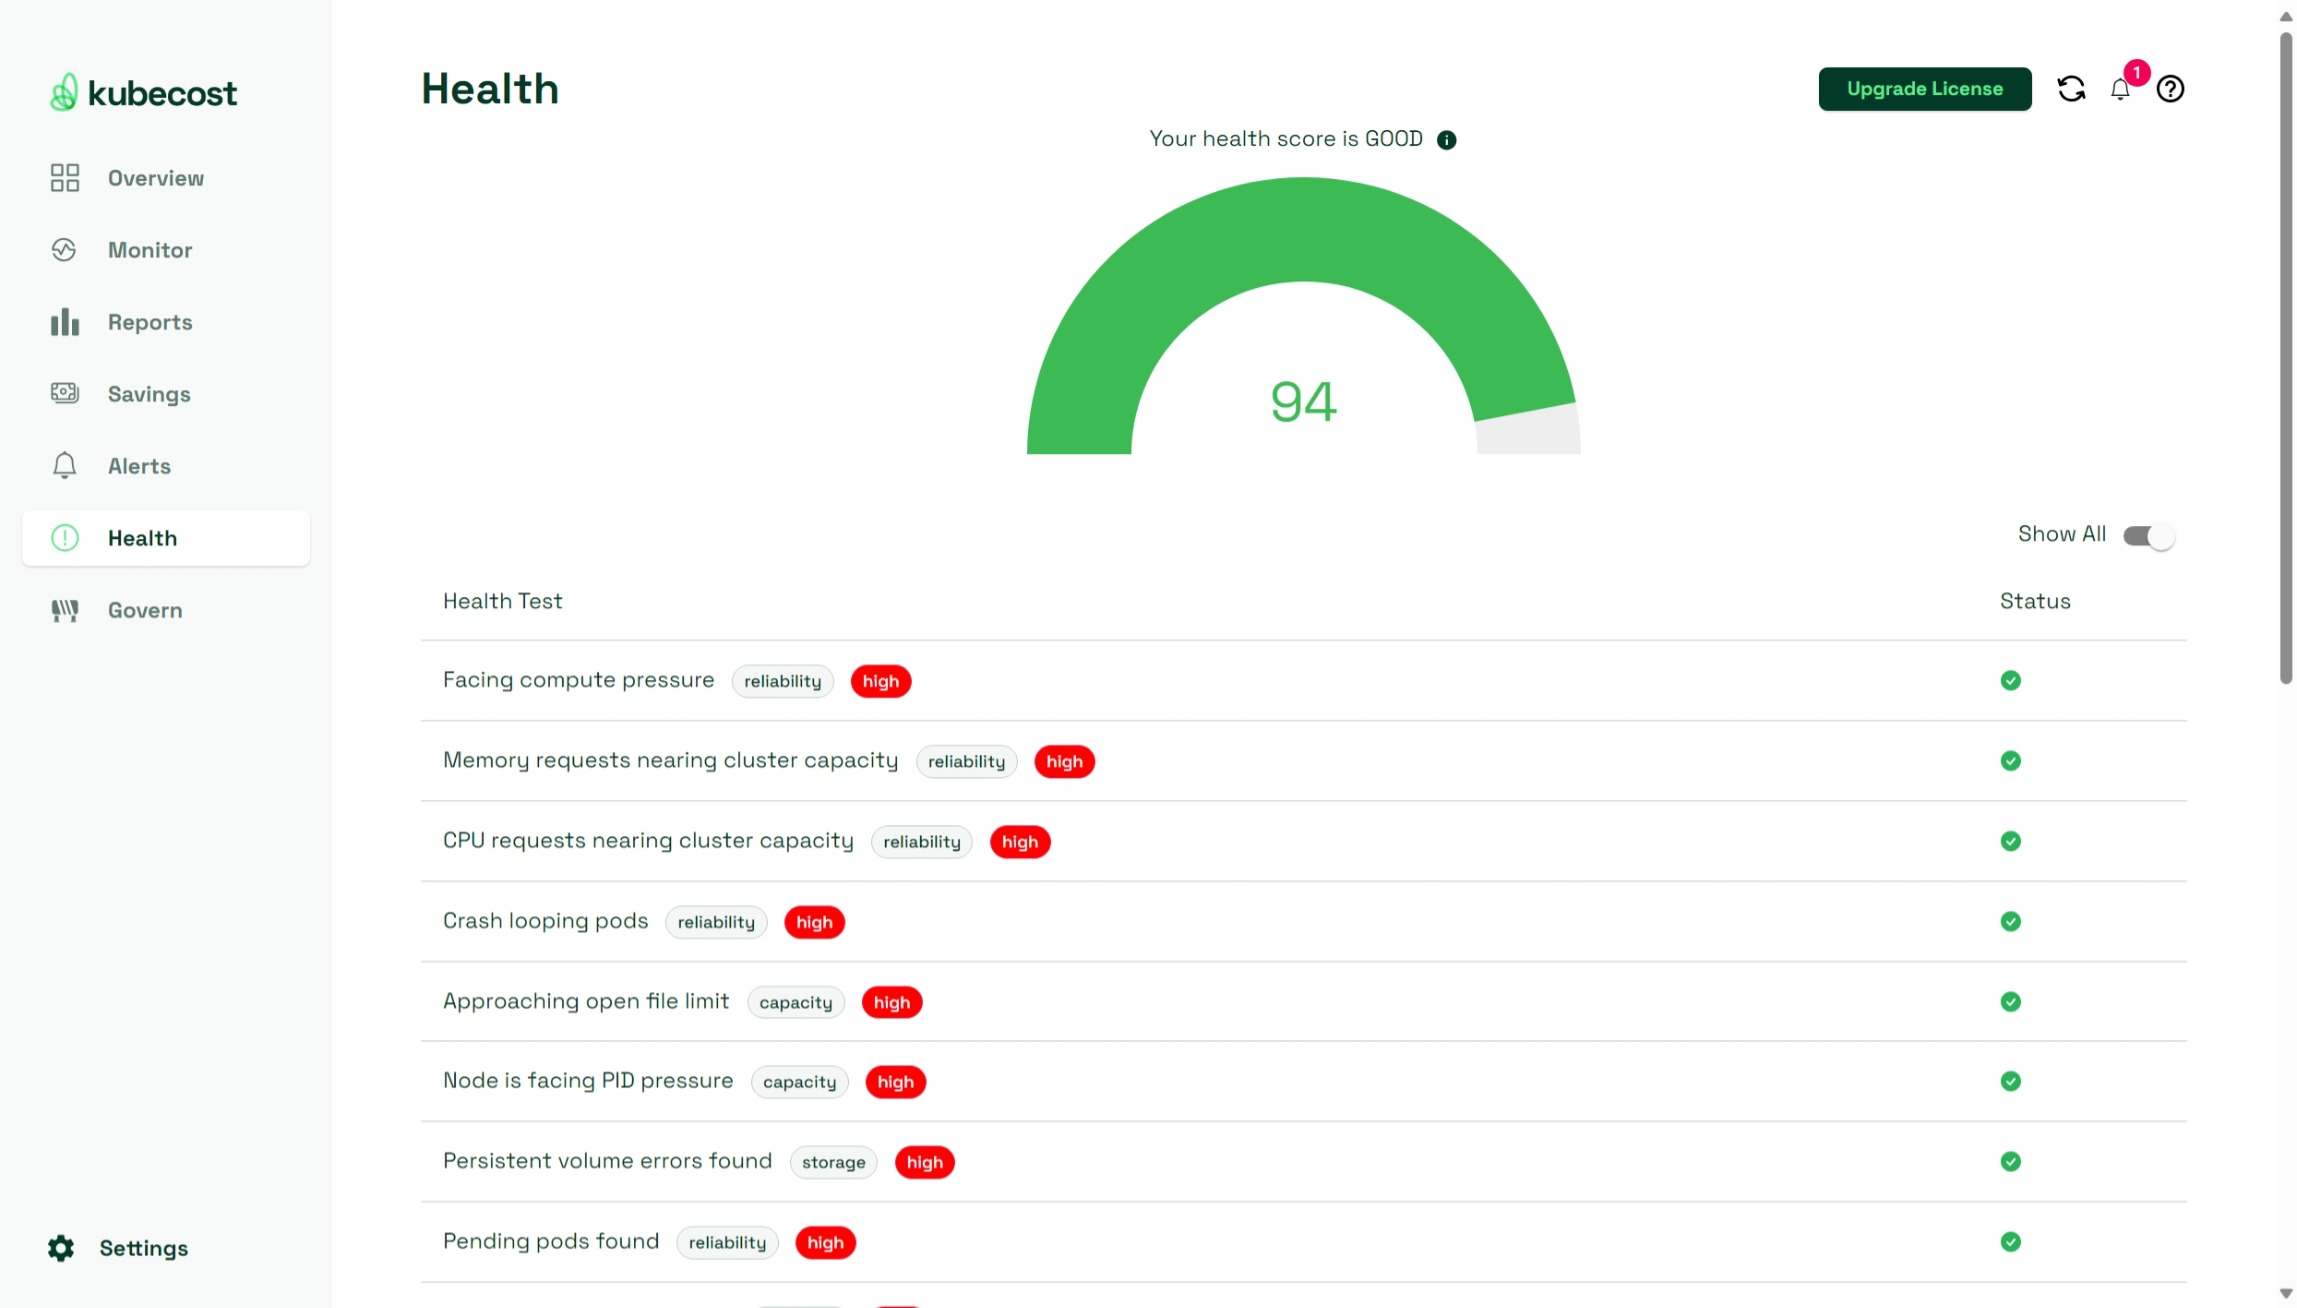
Similarly, the “Health” page offers insights into the overall health and performance of your Kubernetes environment. This page provides visualizations and metrics related to cluster health, node status, and application performance, allowing you to identify any potential issues or bottlenecks affecting your infrastructure. By monitoring the health of your Kubernetes clusters, you can ensure optimal performance and reliability for your applications.
Lastly, the “Govern” page within the Kubecost application serves as a centralized platform for implementing governance policies and best practices within your Kubernetes environment. For this feature, upgrading to an Enterprise account is mandatory. It allows you to set and manage budgets to prevent overspend. Additionally, it offers features for managing access controls, enforcing compliance policies, and tracking changes across your infrastructure. By leveraging governance tools and capabilities, you can maintain security, compliance, and operational efficiency within your Kubernetes clusters.
Integration with other tools
In addition to its standalone features, Kubecost offers integration with other tools, enabling even better cost management across Kubernetes environments. By leveraging integrations with advanced Kubernetes autoscaling solutions like Karpenter and optimization platforms like StormForge, you are able to automate resource provisioning and optimize workload placement based on cost considerations.
Automatic scaling of Kubernetes clusters based on cost-related metrics ensure optimal resource allocation, minimizing unnecessary spending on over-provisioned infrastructure. By analyzing historical usage patterns and simulating various workload configurations, you can identify opportunities to right-size resources, optimize pod placement, and implement cost-saving strategies such as spot instance usage or bin packing. These optimizations result in significant cost reductions while maintaining or even improving application performance and reliability.
Closing Words
These are the basics to Kubernetes cost management with Kubecost. There are more than a few challenges of managing costs in Kubernetes environments. With Kubecost, you have a powerful ally that helps you to optimize spending and drive operational efficiency.
With Kubecost, it’s your turn to take action. I encourage you to explore Kubecost further and consider implementing it within your Kubernetes environment. By leveraging its granular insights and seamless integration, you can proactively manage costs, optimize resource allocation, and enhance overall efficiency.
Thank you for taking the time to go through this post and making it to the end. Stay tuned, because we’ll keep continuing providing more content on topics like this in the future.