
In this blog, we’ll cover the essential steps to enable a TLS endpoint in an Nginx sidecar container, providing a straightforward guide to enhance your web application’s security.
Introduction
In modern digital infrastructures, ensuring the security of data (in transit) is a critical priority. Enabling a Transport Layer Security (TLS) endpoint has become a non-negotiable aspect of safegarding communications. This cryptographic protocol encrypts communication between clients and servers, and ensures the confidentiality and integrity of the transmitted data, protecting it from potential unauthorized access and tampering.

Integrating a sidecar container into your architecture offers a pragmatic solution for enhancing security without disrupting the core functionality of your applications. By separating the TLS-related tasks into a sidecar, you achieve modularity and maintain the agility of your primary application. This architectural pattern facilitates easier updates, scalability, and enables seamless addition of security features without imposing a heavy burden on the main application.
![]()
NGINX, loved by many professionals for its high-performance web server capabilities, stands out as a natural choice for managing TLS endpoints. Its versatility and efficiency make it well-suited for handling the complexities of encryption and decryption processes. Nginx’s robust feature set, including load balancing and reverse proxy functionalities, further strengthens its suitability as a sidecar container for implementing TLS, contributing to a more resilient and secure web infrastructure.
Enabling TLS in NGINX Sidecar
Let’s start creating a container group with an application container and a sidecar container running a TLS/SSL provider using Nginx. We’ll set up a container group consisting of two containers:
- An application container that runs a simple web app using the Microsoft aci-helloworld image.
- A sidecar container running the Nginx image, configured to use TLS.
Prerequisites
To proceed with this guide, ensure the following prerequisites are met:
- Azure Subscription: It is necessary to have an Azure subscription. If you don’t have one, you can create it for free.
- Azure CLI: You’ll need the Azure command-line interface for deploying the resources. You can find more information about the Azure CLI in the documentation.
- Terraform: You’ll need to have an understanding of Terraform, and have the Terraform command-line interface installed to deploy and manage Azure resources. You can find more information about Terraform and the used providers in the documentation.
- OpenSSL: You’ll need to have OpenSSL installed on your system to generate SSL/TLS certificates. You can refer to the official OpenSSL website for installation instructions.
- Visual Studio Code: Although any code editor and terminal will do, and this is something of personal preference, Visual Studio Code is a good (and free) choice. You can download it from the official website.
Create a self-signed certificate
In order to configure Nginx as a TLS provider, we’ll need to have a TLS/SSL certificate in place. In the following steps we’ll create and configure a self-signed TLS/SLL certificate. Keep in mind that for production environments, it’s recommended to obtain a certificate from a reputable certificate authority, like Let’s Encrypt, DigiCert, Sectigo, etc.
To create a self-signed TLS/SLL certificate, we’ll leverage the OpenSSL tool. This tool is available in the Azure Cloud Shell and various Linux distributions. Alternatively, you can use it on your local machine, or use a similar client tool compatible with your operating system.
💡 Tip: OpenSSL installation packages are available through Chocolatey and Homebrew.
Step 1: Begin by generating a certificate request (.csr file) in your local working directory using the following command in your terminal of choice:
openssl req -new -newkey rsa:2048 -nodes -keyout ssl.key -out ssl.csr
Follow the on-screen prompts to provide identification information. Your terminal will prompt you for a Country Name, State or Province Name, Locality Name, Organization Name, Organizational Unit Name, Common Name, Email Address, Password, and an Optional Company Name. When prompted for the Common Name, input the hostname associated with certificate (e.g. “Schutten.cloud”). When asked for a password, simply press Enter to skip adding one.
Step 2: Next, run the command below to generate the self-signed certificate (.crt file) from the certificate request:
openssl x509 -req -days 365 -in ssl.csr -signkey ssl.key -out ssl.crt
When done correctly, you’ll find three files in the directory: the certificate request (ssl.csr), the private key (ssl.key), and the self-signed certificate (ssl.crt). The ssl.key and ssl.crt files will be utilized in the comming steps of the configuration.
Configure Nginx for TLS
To enable TLS in Nginx, we’ll have to create a dedicated configuration file. In the next steps we’ll generate the configuration file and ensure a secure TLS setup.
Step 3: First, let’s copy the code snippet below into a new file named nginx.conf:
# nginx Configuration File
# https://wiki.nginx.org/Configuration

# Run as a less privileged user for security reasons.
user nginx;

worker_processes auto;

events {
  worker_connections 1024;
}

pid        /var/run/nginx.pid;

http {

    # Redirect to https, using 307 instead of 301 to preserve post data

    server {
        listen [::]:443 ssl;
        listen 443 ssl;

        server_name localhost;

        # Protect against the BEAST attack by not using SSLv3 at all. If you need to support older browsers (IE6) you may need to add
        # SSLv3 to the list of protocols below.
        ssl_protocols              TLSv1.2;

        # Ciphers set to best allow protection from Beast, while providing forwarding secrecy, as defined by Mozilla - https://wiki.mozilla.org/Security/Server_Side_TLS#Nginx
        ssl_ciphers                ECDHE-RSA-AES128-GCM-SHA256:ECDHE-ECDSA-AES128-GCM-SHA256:ECDHE-RSA-AES256-GCM-SHA384:ECDHE-ECDSA-AES256-GCM-SHA384:DHE-RSA-AES128-GCM-SHA256:DHE-DSS-AES128-GCM-SHA256:kEDH+AESGCM:ECDHE-RSA-AES128-SHA256:ECDHE-ECDSA-AES128-SHA256:ECDHE-RSA-AES128-SHA:ECDHE-ECDSA-AES128-SHA:ECDHE-RSA-AES256-SHA384:ECDHE-ECDSA-AES256-SHA384:ECDHE-RSA-AES256-SHA:ECDHE-ECDSA-AES256-SHA:DHE-RSA-AES128-SHA256:DHE-RSA-AES128-SHA:DHE-DSS-AES128-SHA256:DHE-RSA-AES256-SHA256:DHE-DSS-AES256-SHA:DHE-RSA-AES256-SHA:AES128-GCM-SHA256:AES256-GCM-SHA384:ECDHE-RSA-RC4-SHA:ECDHE-ECDSA-RC4-SHA:AES128:AES256:RC4-SHA:HIGH:!aNULL:!eNULL:!EXPORT:!DES:!3DES:!MD5:!PSK;
        ssl_prefer_server_ciphers  on;

        # Optimize TLS/SSL by caching session parameters for 10 minutes. This cuts down on the number of expensive TLS/SSL handshakes.
        # The handshake is the most CPU-intensive operation, and by default it is re-negotiated on every new/parallel connection.
        # By enabling a cache (of type "shared between all Nginx workers"), we tell the client to re-use the already negotiated state.
        # Further optimization can be achieved by raising keepalive_timeout, but that shouldn't be done unless you serve primarily HTTPS.
        ssl_session_cache    shared:SSL:10m; # a 1mb cache can hold about 4000 sessions, so we can hold 40000 sessions
        ssl_session_timeout  24h;

        # Use a higher keepalive timeout to reduce the need for repeated handshakes
        keepalive_timeout 300; # up from 75 secs default

        # Remember the certificate for a year and automatically connect to HTTPS
        add_header Strict-Transport-Security 'max-age=31536000; includeSubDomains';

        ssl_certificate      /etc/nginx/ssl.crt;
        ssl_certificate_key  /etc/nginx/ssl.key;

        location / {
            proxy_pass http://localhost:80; # TODO: replace port if app listens on port other than 80

            proxy_set_header Connection "";
            proxy_set_header Host $host;
            proxy_set_header X-Real-IP $remote_addr;
            proxy_set_header X-Forwarded-For $remote_addr;
        }
    }
}
Make sure the proxy_pass in location setting aligns with the correct port for your application. In my case, I am using port 80 for the aci-helloworld (application) container.
Step 4: After creating the configuration file, we’ll proceed to base64-encode the Nginx configuration file, TLS/SSL certificate, and TLS key. Run the commands below in your terminal of choice:
cat nginx.conf | base64 > base64-nginx.conf
cat ssl.crt | base64 > base64-ssl.crt
cat ssl.key | base64 > base64-ssl.key
Or if you rather use PowerShell, you can run the commands below in PowerShell:
[System.Convert]::ToBase64String([System.Text.Encoding]::UTF8.GetBytes((Get-Content -Raw -Path nginx.conf))) | Out-File -FilePath base64-nginx.conf
[System.Convert]::ToBase64String([System.Text.Encoding]::UTF8.GetBytes((Get-Content -Raw -Path ssl.crt))) | Out-File -FilePath base64-ssl.crt
[System.Convert]::ToBase64String([System.Text.Encoding]::UTF8.GetBytes((Get-Content -Raw -Path ssl.key))) | Out-File -FilePath base64-ssl.key
When done correctly, you’ll find three new files in the directory: the encoded private key (base64-ssl.key), the encoded self-signed certificate (base64-ssl.crt), and the encoded Nginx configuration file (base64-nginx.conf). These encoded files will be used in the steps for container group deployment.
Deploy the Container Group with Terraform
Now we’ll deploy the container group and configure it using Terraform.
Step 5: Copy the Terraform configuration below into a new file named main.tf. I’m using Visual Studio Code, but you can use any text editor of choice:
provider "azurerm" {
  features = {}
}

resource "azurerm_resource_group" "sidecardemo" {
  name     = "rg-p-weu-sidecardemo-001"
  location = "West Europe"
}

resource "azurerm_container_group" "sidecardemo" {
  name                = "ci-p-weu-sidecardemo-001"
  location            = azurerm_resource_group.sidecardemo.location
  resource_group_name = azurerm_resource_group.sidecardemo.name
  ip_address_type     = "Public"
  dns_name_label      = "sidecar-demo"
  os_type             = "Linux"

  container {
    name   = "application"
    image  = "mcr.microsoft.com/azuredocs/aci-helloworld"
    cpu    = "1.0"
    memory = "1.5"

    ports {
      port     = 80
      protocol = "TCP"
    }
  }

  container {
    name   = "nginx-sidecar"
    image  = "mcr.microsoft.com/oss/nginx/nginx:1.15.5-alpine"
    cpu    = "1.0"
    memory = "1.5"

    ports {
      port     = 443
      protocol = "TCP"
    }

    volume {
      name      = "nginx-config"
      mount_path = "/etc/nginx"
      read_only   = false

      secret = {
        "ssl.crt" = "<Enter contents of base64-ssl.crt here>"
        "ssl.key" = "<Enter contents of base64-ssl.key here>"
        "nginx.conf" = "<Enter contents of base64-nginx.conf here>"
      }
    }
  }
}
Step 6: Open your terminal and log into Azure using the az login command. Use the az account set --subscription "YourSubScriptionName" command to choose the target Azure subscription. Using the az account show command you can validate that the correct Azure subscription has been selected.
Step 7: In your terminal, navigate to the directory containing your Terraform configuration file, and run the following commands to deploy the resources:
terraform init
terraform plan
terraform apply
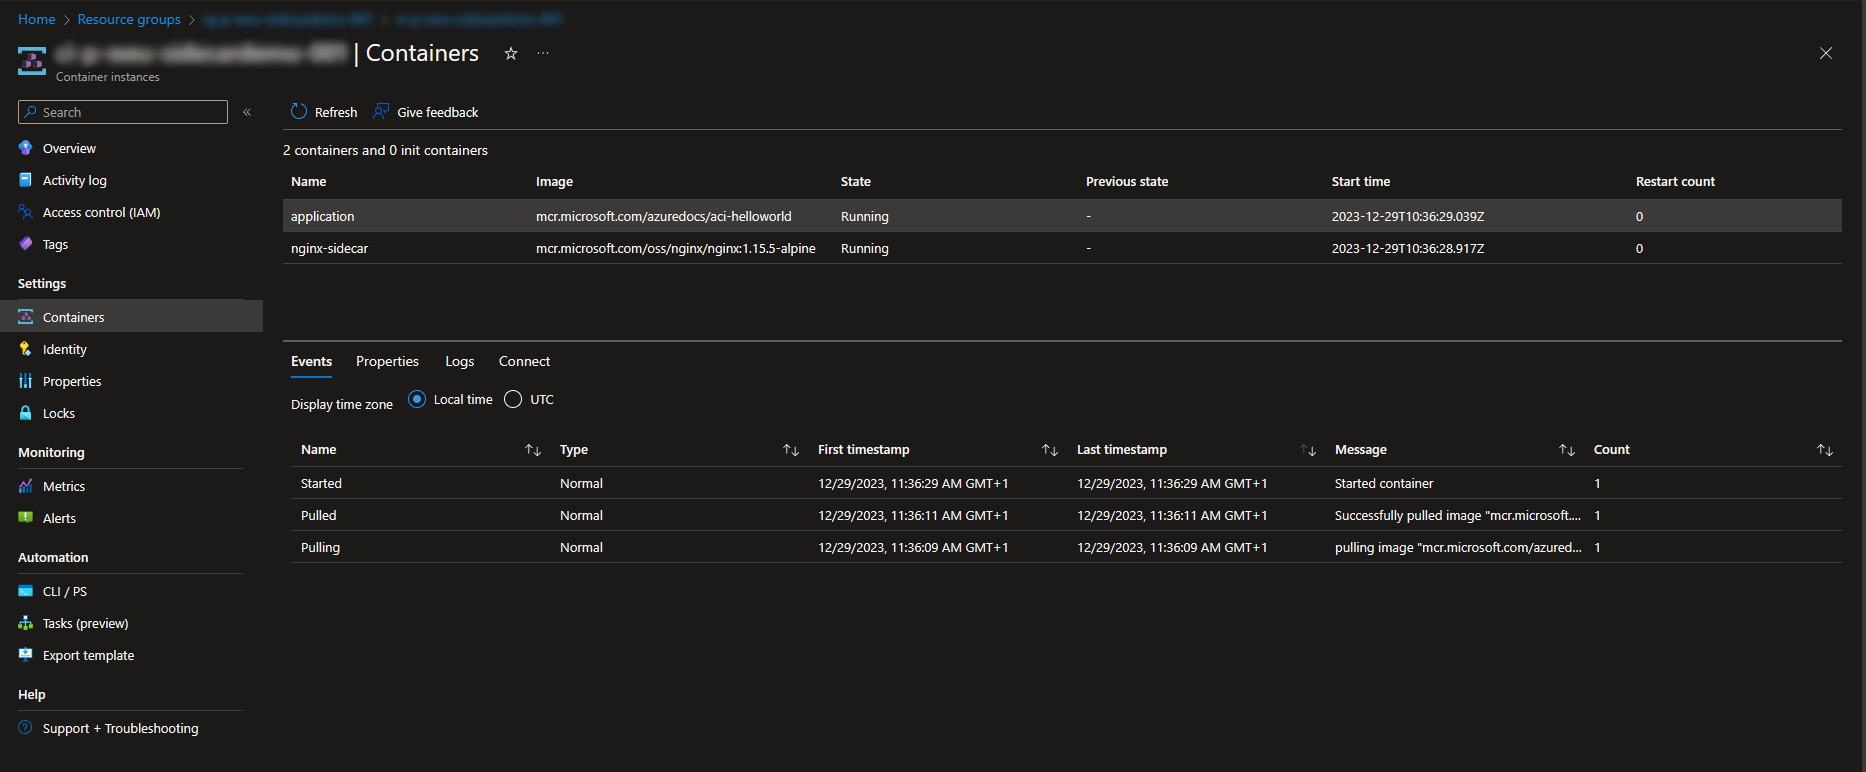
When done correctly, you’ll find the freshly created resource group, and the container instances with 2 containers, when you browse to the Azure portal.
Verifying the TLS connection
Now the deployment is succesful, you can use your browser to navigate to the public IP address or FQDN associated with the container, shown on the screenshot below.

Remember to use HTTPS, as the Nginx server configuration requires it and attempts to connect over HTTP will fail.
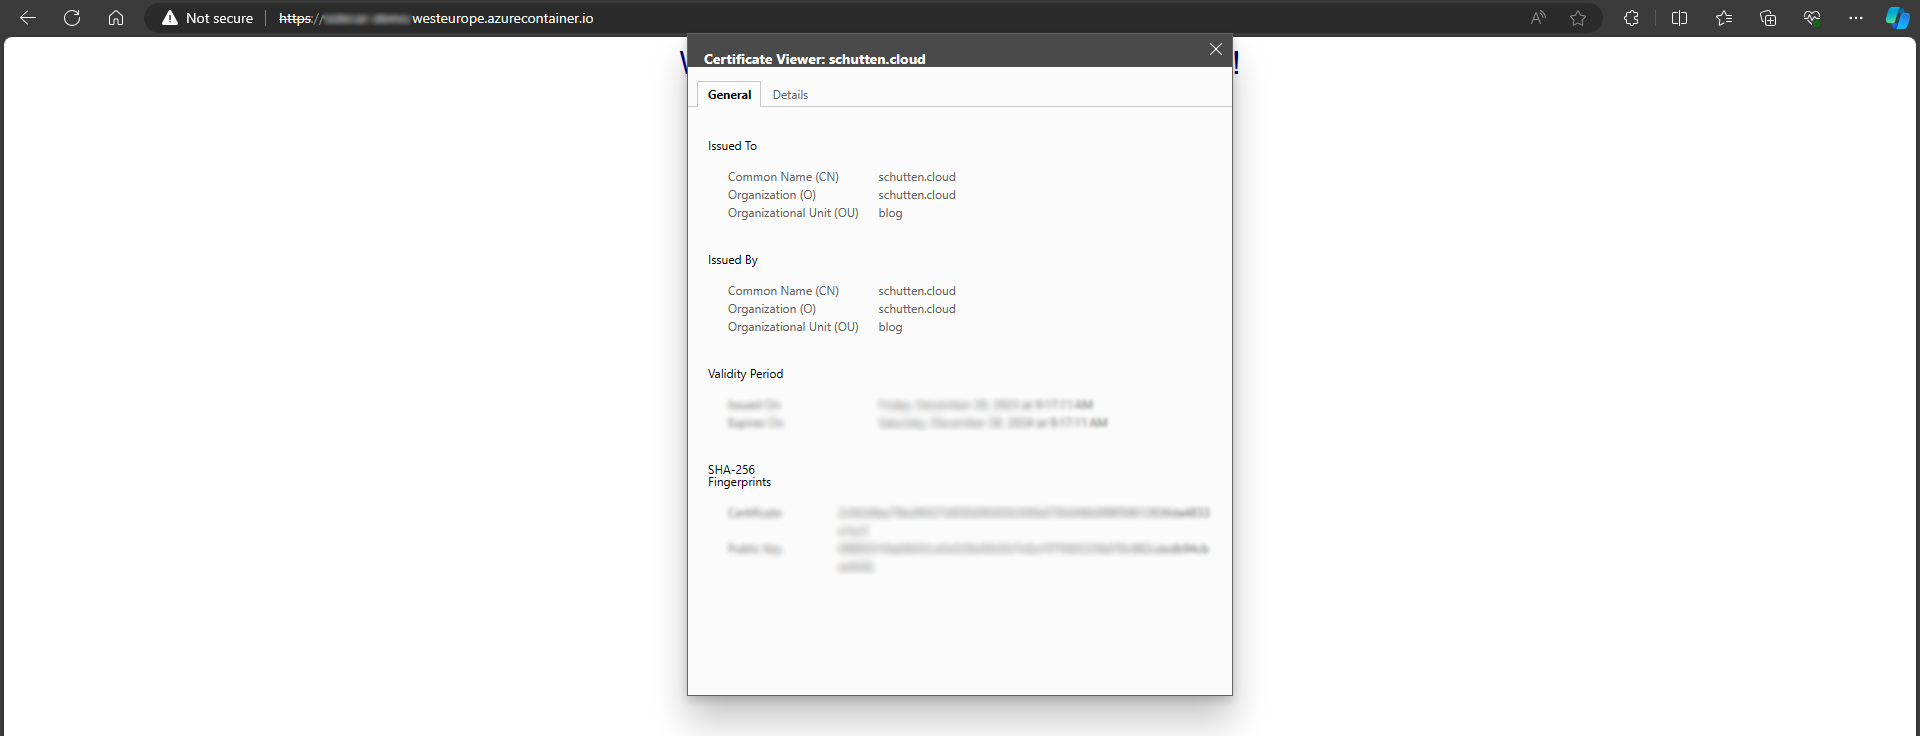
Due to the use of a self-signed certificate rather than one issued by a certificate authority, you will encounter a security warning in your browser when attempting to establish an HTTPS connection with the site. You’ll probably have to acknowledge the warning or make adjustments to your browser or certificate settings in order to proceed to the site. Don’t worry; this security warning is a normal and expected behavior in this scenario.
Cleaning Up Afterwards
Once you’re done experimenting, you might want to consider to clean up your resources afterwards. Cleaning up your Azure resources is as easy as running the terraform destroy command in your terminal. Make sure you have set the folder where you’ve placed your Terraform configuration-files as your working directory. Additionally, you can delete the resources and resource group through the Azure portal.
Closing Words
We went through the configuration of the Nginx sidecar for your Azure Container Instances, and added a layer of security and performance to your containerized application. With these first basic steps, you might want to explore advanced Nginx configurations, fine-tune settings, or even integrate additional services to further enhance your containerized environment. Here are some more resources to help you forward:
- NGINX Blog
- NGINX Documentation
- Azure Container Instances documentation - serverless containers, on demand | Microsoft Learn
Thank you for taking the time to go through this post and making it to the end. Stay tuned because we’ll keep continuing providing more content on this topic in the future.