
In this blog, we’ll explore Playwright; an open-source browser automation and testing tool developed by Microsoft. We’ll cover the basic setup, exploring the power of Playwright and its impending evolution into a managed service.
Introduction
In the rapidly changing field of web development, the importance of robust and efficient testing cannot be emphasized enough. As web applications evolve, so do the complexities of development processes, making automated testing imperative for ensuring reliability and performance. Playwright, a dynamic open-source browser automation and testing tool developed by Microsoft, promises exactly that.
Playwright stands out in the testing landscape, providing developers and testers with a comprehensive solution to automate interactions with various web browsers, including Chrome, Firefox, Safari, and Microsoft Edge. Its versatility extends to handling complex tasks such as navigating, clicking, form filling, and capturing screenshots, all crucial components in validating the functionality and user experience of web applications.

It’s no secret that Microsoft invests heavily in the developer experience. After Azure Chaos Studio, Azure Deployment Environments, Microsoft Dev Box, Azure Load Testing, and many other services and tools, Microsoft recently announced Microsoft Playwright Testing. This is a new fully managed service that uses the cloud to enable you to run Playwright tests at scale, with much higher parallelization across different operating system-browser combinations simultaneously. The promise for enhanced scalability, reliability, and seamless integration into development workflows is, to say the least, worth further investigation for any web application developer.
⚠️ Microsoft Playwright Testing is currently in preview. For legal terms that apply to Azure features that are in beta, in preview, or otherwise not yet released into general availability, see the Supplemental Terms of Use for Microsoft Azure Previews.
Microsoft Playwright Testing
Playwright is not just a testing tool; it’s a robust companion for developers and testers seeking a versatile solution for web automation. It is an open-source browser automation toolkit designed to address a spectrum of testing needs, providing an effective and adaptable testing framework. Playwright’s toolkit is geared to handle diverse testing requirements.

One of Playwright’s defining strengths lies in its extensive support for multiple browsers, including Chrome, Firefox, Safari, and Microsoft Edge. Unlike some other automation tools that provide capabilities to specific browsers, Playwright’s versatility allows users to write a single set of tests that seamlessly execute across different browsers. This not only streamlines the testing process but also ensures a more accurate reflection of how end-users will experience the application.
Key Features
Playwright spans a diverse range of capabilities, empowering developers and testers with a robust set of tools for comprehensive web automation.
- Playwright’s abilities extend to cross-browser testing, a critical aspect of ensuring that applications perform consistently across various browsers. By providing a unified API for different browsers, Playwright excels in providing cross-browser support for all modern rendering engines, including Chromium, WebKit, and Firefox. Playwright simplifies the process of creating and maintaining cross-browser tests, contributing to a more comprehensive and reliable testing strategy.
- Playwright allows you to test with confidence cross-platform on Windows, Linux, and macOS, whether locally or on CI. Playwright’s adaptability across various platforms enhances its usability, accommodating diverse development environments.
- With Playwright and its cross-language integration, language barriers are no obstacle. Developers can harness the Playwright API using TypeScript, JavaScript, Python, .NET, or Java, providing flexibility and ease of integration into existing workflows.
- Playwright goes beyond traditional web testing by offering native mobile emulation for Google Chrome on Android and Mobile Safari. This ensures that the same rendering engine works seamlessly across desktop and cloud environments, providing a comprehensive testing solution.
- Playwright offers a headless mode, enabling tests to run without a visible browser interface. This feature is particularly useful for executing tests in the background, optimizing resource usage, and expediting test execution.
- Playwright’s capability to save authentication states within the context, enables the reuse of credentials across tests. This not only streamlines testing but also maintains full isolation, bypassing repetitive login operations while ensuring independent test integrity.
- Efficiency is key in testing, and Playwright recognizes this by facilitating parallel test execution. This means that multiple tests can run concurrently, significantly reducing the overall test execution time. As applications grow in complexity, the ability to execute tests in parallel becomes instrumental in maintaining a swift and responsive development lifecycle.
- Playwright establishes a browser context for each test, like a brand-new browser profile. This ensures full test isolation with minimal overhead, as creating a new browser context takes only a few milliseconds.
- Playwright breaks limits by enabling test scenarios that span multiple tabs, origins, and users. You can create diverse contexts for different users within a single test, running against your server to cover a wide range of use cases.
- Playwright introduces an auto-wait mechanism that patiently waits for elements to be actionable before executing actions. This, coupled with a rich set of introspection events, eliminates the need for artificial timeouts – a common cause of flaky tests.
- Designed specifically for the dynamic web, Playwright’s assertions are automatically retried until the required conditions are met. This web-first approach contributes to the resilience of tests, ensuring their reliability in dynamic web environments.
- Playwright’s tracing capabilities provide valuable insights to troubleshoot and ensure the robustness of test executions. With Playwright, you can configure test retry strategies, capture execution traces, videos, and screenshots to mitigate flakiness.
- With the trace viewer you can capture a wealth of information for in-depth investigation of test failures. The Playwright trace includes a test execution screencast, live DOM snapshots, action explorer, test source, and more, ensuring a thorough analysis of test scenarios.
- Aligned with modern browser architectures, Playwright runs tests out-of-process, eliminating typical in-process test runner limitations. This ensures that browsers handle web content from different origins in separate processes, contributing to stability and reliability.
- Whether hovering over elements, interacting with dynamic controls, or producing trusted events, Playwright replicates real browser input pipelines indistinguishable from real user interactions. This capability ensures comprehensive testing of web applications.
- Playwright’s selectors handle Shadow DOM, allowing seamless interaction with frames and the ability to navigate through Shadow DOM elements. This extends the tool’s capabilities to test even the most intricate web structures.
- With Codegen for test generation, you can generate tests effortlessly by recording actions and saving them in any preferred language, facilitating quick test creation and adaptability.
- Playwright inspector empowers developers, offering a detailed view of pages, generating selectors, stepping through test executions, visualizing click points, and exploring execution logs.
Comparison with Other Tools
Playwright is a true powerhouse in the field of web testing, offering more than a few advantages that set it apart from other popular tools. It’s worth noting that Playwright is often compared to other browser automation tools like Puppeteer (for Chrome) and WebDriver (Selenium), but Playwright stands out for its multi-browser support and additional features. In the crowded landscape of automation tools, Playwright distinguishes itself through a combination of flexibility, versatility, and modern architecture.
Playwright’s versatility makes it well-suited for a range of use cases and scenarios across the web development landscape:
- Playwright’s ability to execute tests seamlessly across different browsers makes it an ideal choice for applications targeting diverse user environments. From Chrome to Firefox, Playwright ensures a consistent user experience.
- With native mobile emulation capabilities, Playwright excels in testing mobile web applications. Developers can ensure that their applications perform optimally on both desktop and mobile platforms.
- Playwright’s selectors that handle Shadow DOM elements make it suitable for testing applications with intricate web structures. Developers can navigate through Shadow DOM seamlessly, ensuring thorough coverage of their application’s functionality.
- In Agile development environments where speed is crucial, Playwright’s support for parallel test execution shines. Multiple tests can run concurrently, reducing overall test execution time and facilitating rapid iterations.
- Playwright’s Codegen and Inspector tools simplify end-to-end testing scenarios. Developers can generate tests effortlessly, step through executions, and visualize key points, streamlining the development and testing workflow.
Whether it’s ensuring cross-browser compatibility, handling complex web structures, or facilitating rapid testing cycles, Playwright proves to be a versatile and powerful tool across various web testing use cases. Perhaps that is the most obvious reason for developers to leverage Playwright; one solution for all scenarios, instead of a variation of multiple tools for the same purpose.
Unleashing Playwright’s Power
Let’s start using Playwright and create a testing script with Microsoft Playwright Testing.
Prerequisites
Before we start, there are some prerequisites to fulfil:
- JavaScript Application: You need an application to do your testing against. In this article, we use an out-of-the-box Next.js project . If you don’t have an existing application, follow the official React guide to set up a new application.
- Azure tenant and user account: You’ll need an Azure tenant, an Entra ID (formerly known as Azure AD) instance. This instance is the foundation of the environment. And it allows you to create an identity (user account) to connect to Azure, set up the environment, and deploy the resources.
- Subscriptions: You’ll need a subscription and owner permissions to deploy the resources and minimize the costs by removing the resources at the end.
- Node.js: You’ll need to have Node ≥= 16.4.0 installed on your machine. You can download it here.
- Azure CLI: You’ll need the Azure command-line interface for deploying the resources, and you can find more information about the Azure CLI in the documentation.
- Terraform: You’ll need to have an understanding of Terraform, and have the Terraform command-line interface installed to deploy and manage Azure resources. You can find more information about Terraform and the used providers in the documentation.
- Visual Studio Code: Although any code editor and terminal will do, and this is something of personal preference, Visual Studio Code is a good (and free) choice. You can download it from the official website.
Once you have fulfilled the prerequisites, we are ready to move forward and install Playwright and deploy our Playwright Testing workspace!
Playwright Installation
First, we need to be equipped with the necessary Playwright configuration and dependencies, allowing us to seamlessly integrate Playwright into our React application for testing purposes.
Step 1: Begin by installing Playwright using npm. Open your terminal, browse to your applications root folder, and run the command below. You can also kick off your testing journey and execute tests using the VS Code Extension, but we will not be covering this in this article. You’ll be prompted to choose between TypeScript or JavaScript (default is TypeScript), Name of your Tests folder (default is tests or e2e if you already have a tests folder in your project), add a GitHub Actions workflow to easily run tests on CI (default is false), and install Playwright browsers (default is true).
npm init playwright@latest
Upon initiation, Playwright will download the required browsers and generate a few files: playwright.config.ts, package.json, package-lock.json, tests/example.spec.ts, and tests-examples/demo-todo-app.spec.ts. In the playwright.config.ts, you can customize Playwright settings, including specifying the browsers you want to use. If you’re running tests within an existing project, dependencies will be directly added to your package.json. The tests folder contains an example test to facilitate your testing initiation.
Step 2: To set up your environment, you’ll have to configure the PLAYWRIGHT_SERVICE_ACCESS_TOKEN and PLAYWRIGHT_SERVICE_URL environment variables with the values you’ll obtain in later steps. Let’s prepare our source code repository with dotenv, so we can define these environment variables in a .env file later. Add the dotenv module to your Next.js project by running the command below:
npm i --save-dev dotenv
Step 3: Create a new .env file alongside the playwright.config.ts file in your project, and add the following content to it:
PLAYWRIGHT_SERVICE_ACCESS_TOKEN={MY-ACCESS-TOKEN}
PLAYWRIGHT_SERVICE_URL={MY-REGION-ENDPOINT}
⚠️ Make sure that you don’t add the .env file to your source code repository to avoid leaking your access token value.
Step 4: Create a new file, named playwright.service.config.ts, in the same folder as the playwright.config.ts file, and add the content below to it. You can also download this file directly from Microsoft’s sample repository, and place it in that same folder.
/*
* This file enables Playwright client to connect to remote browsers.
* It should be placed in the same directory as playwright.config.ts.
*/

import { defineConfig } from '@playwright/test';
import config from './playwright.config';
import dotenv from 'dotenv';

// Define environment on the dev box in .env file:
//  .env:
//    PLAYWRIGHT_SERVICE_ACCESS_TOKEN=XXX
//    PLAYWRIGHT_SERVICE_URL=XXX

// Define environment in your GitHub workflow spec.
//  env:
//    PLAYWRIGHT_SERVICE_ACCESS_TOKEN: ${{ secrets.PLAYWRIGHT_SERVICE_ACCESS_TOKEN }}
//    PLAYWRIGHT_SERVICE_URL: ${{ secrets.PLAYWRIGHT_SERVICE_URL }}
//    PLAYWRIGHT_SERVICE_RUN_ID: ${{ github.run_id }}-${{ github.run_attempt }}-${{ github.sha }}

dotenv.config();

// Name the test run if it's not named yet.
process.env.PLAYWRIGHT_SERVICE_RUN_ID = process.env.PLAYWRIGHT_SERVICE_RUN_ID || new Date().toISOString();

// Can be 'linux' or 'windows'.
const os = process.env.PLAYWRIGHT_SERVICE_OS || 'linux';

export default defineConfig(config, {
  // Define more generous timeout for the service operation if necessary.
  // timeout: 60000,
  // expect: {
  //   timeout: 10000,
  // },
  workers: 20,

  // Enable screenshot testing and configure directory with expectations.
  // https://learn.microsoft.com/azure/playwright-testing/how-to-configure-visual-comparisons
  ignoreSnapshots: false,
  snapshotPathTemplate: `{testDir}/__screenshots__/{testFilePath}/${os}/{arg}{ext}`,

  use: {
    // Specify the service endpoint.
    connectOptions: {
      wsEndpoint: `${process.env.PLAYWRIGHT_SERVICE_URL}?cap=${JSON.stringify({
        // Can be 'linux' or 'windows'.
        os,
        runId: process.env.PLAYWRIGHT_SERVICE_RUN_ID
      })}`,
      timeout: 30000,
      headers: {
        'x-mpt-access-key': process.env.PLAYWRIGHT_SERVICE_ACCESS_TOKEN!
      },
      // Allow service to access the localhost.
      exposeNetwork: '<loopback>'
    }
  }
});
Playwright Testing Workspace
Now we’re going to deploy a Playwright Testing workspace to get started running tests on cloud browsers. We’ll deploy the workspace by using Terraform, specifically the AzureRM provider for the resource group, and the AzAPI provider for the Playwright Testing resource. We assume a deployment that is initiated from your personal device. However, the use of a remote backend and/or integration into CI/CD pipelines is of course possible.
Step 5: Start your preferred terminal and connect to Azure using the Azure CLI and your identity (user account) using the az login command. Select the subscription where you want to deploy the resources using the az account set command.
Step 6: Typically, preview functionalities, such as Playwright Testing, are not yet available in the AzureRM Terraform provider. For this reason we use the AzAPI Terraform provider as well. Use the configuration below, and adjust any parameters to your liking. Use the terraform init, terraform plan, and terraform apply commands to deploy the necessary resources.
terraform {
  required_providers {
    azurerm = {
      source = "hashicorp/azurerm"
      version = "3.80.0"
    }
    azapi = {
      source = "Azure/azapi"
      version = "1.10.0"
    }
	}
}

provider "azurerm" {
  features {}
}

provider "azapi" {
}

data "azurerm_client_config" "current" {}

resource "azurerm_resource_group" "playwright" {
  name      = "rg-playwright-p-weu-001"
  location  = "west europe"
}

resource "azapi_resource" "playwright" {
  type                      = "Microsoft.AzurePlaywrightService/accounts@2023-06-01-preview"
  name                      = "ptplaywrightpweu001"
  parent_id                 = azurerm_resource_group.playwright.id
  location                  = azurerm_resource_group.playwright.location
  schema_validation_enabled = false
  response_export_values    = ["properties.dashboardURI"]
}

output "dashboard_uri" {
  value = jsondecode(azapi_resource.playwright.output).properties.dashboardURI
}
💡 Note: If you did the deployment via a pipeline or service principal, make sure that you still give your personal user account “Owner” or “Contributor” rights to the resource (group) after.
Step 7: Run the terraform output command to retrieve the value of the dashboard_uri. Copy this value into the address bar of your internet browser of choice, and go the webpage. The value should be something like “https://playwright.microsoft.com/workspaces/westeurope_x0x0000x-0xx0-0000-00x0-00000x00x000”. This will open a web page that asks you to log in. Do this by using your personal user account with the appropriate (Owner or Contributor) permissions.
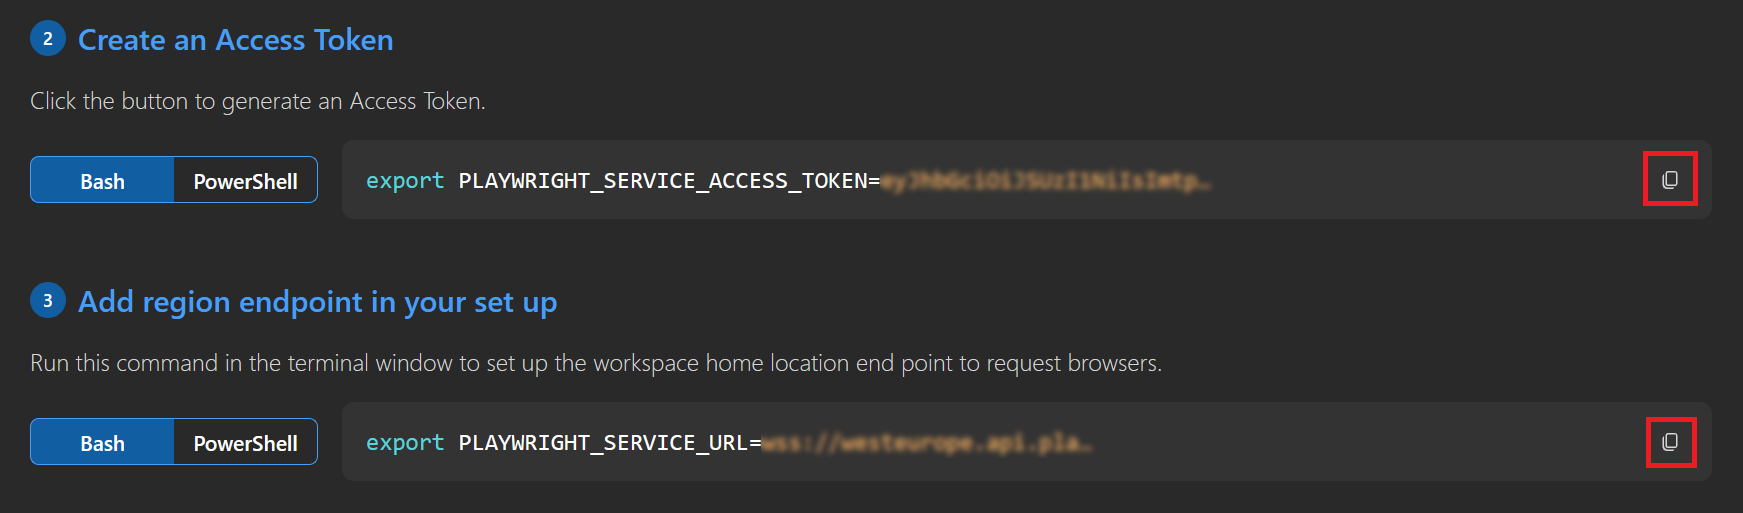
Step 8: You’ll be automatically routed to the setup guide of the Playwright Testing Workspace. Microsoft Playwright Testing uses access tokens to authorize users to run Playwright tests with the service. Firrst, we’ll generate a service access token in the Playwright portal, and then store the value in an environment variable, as previously mentioned in steps 2 and 3.
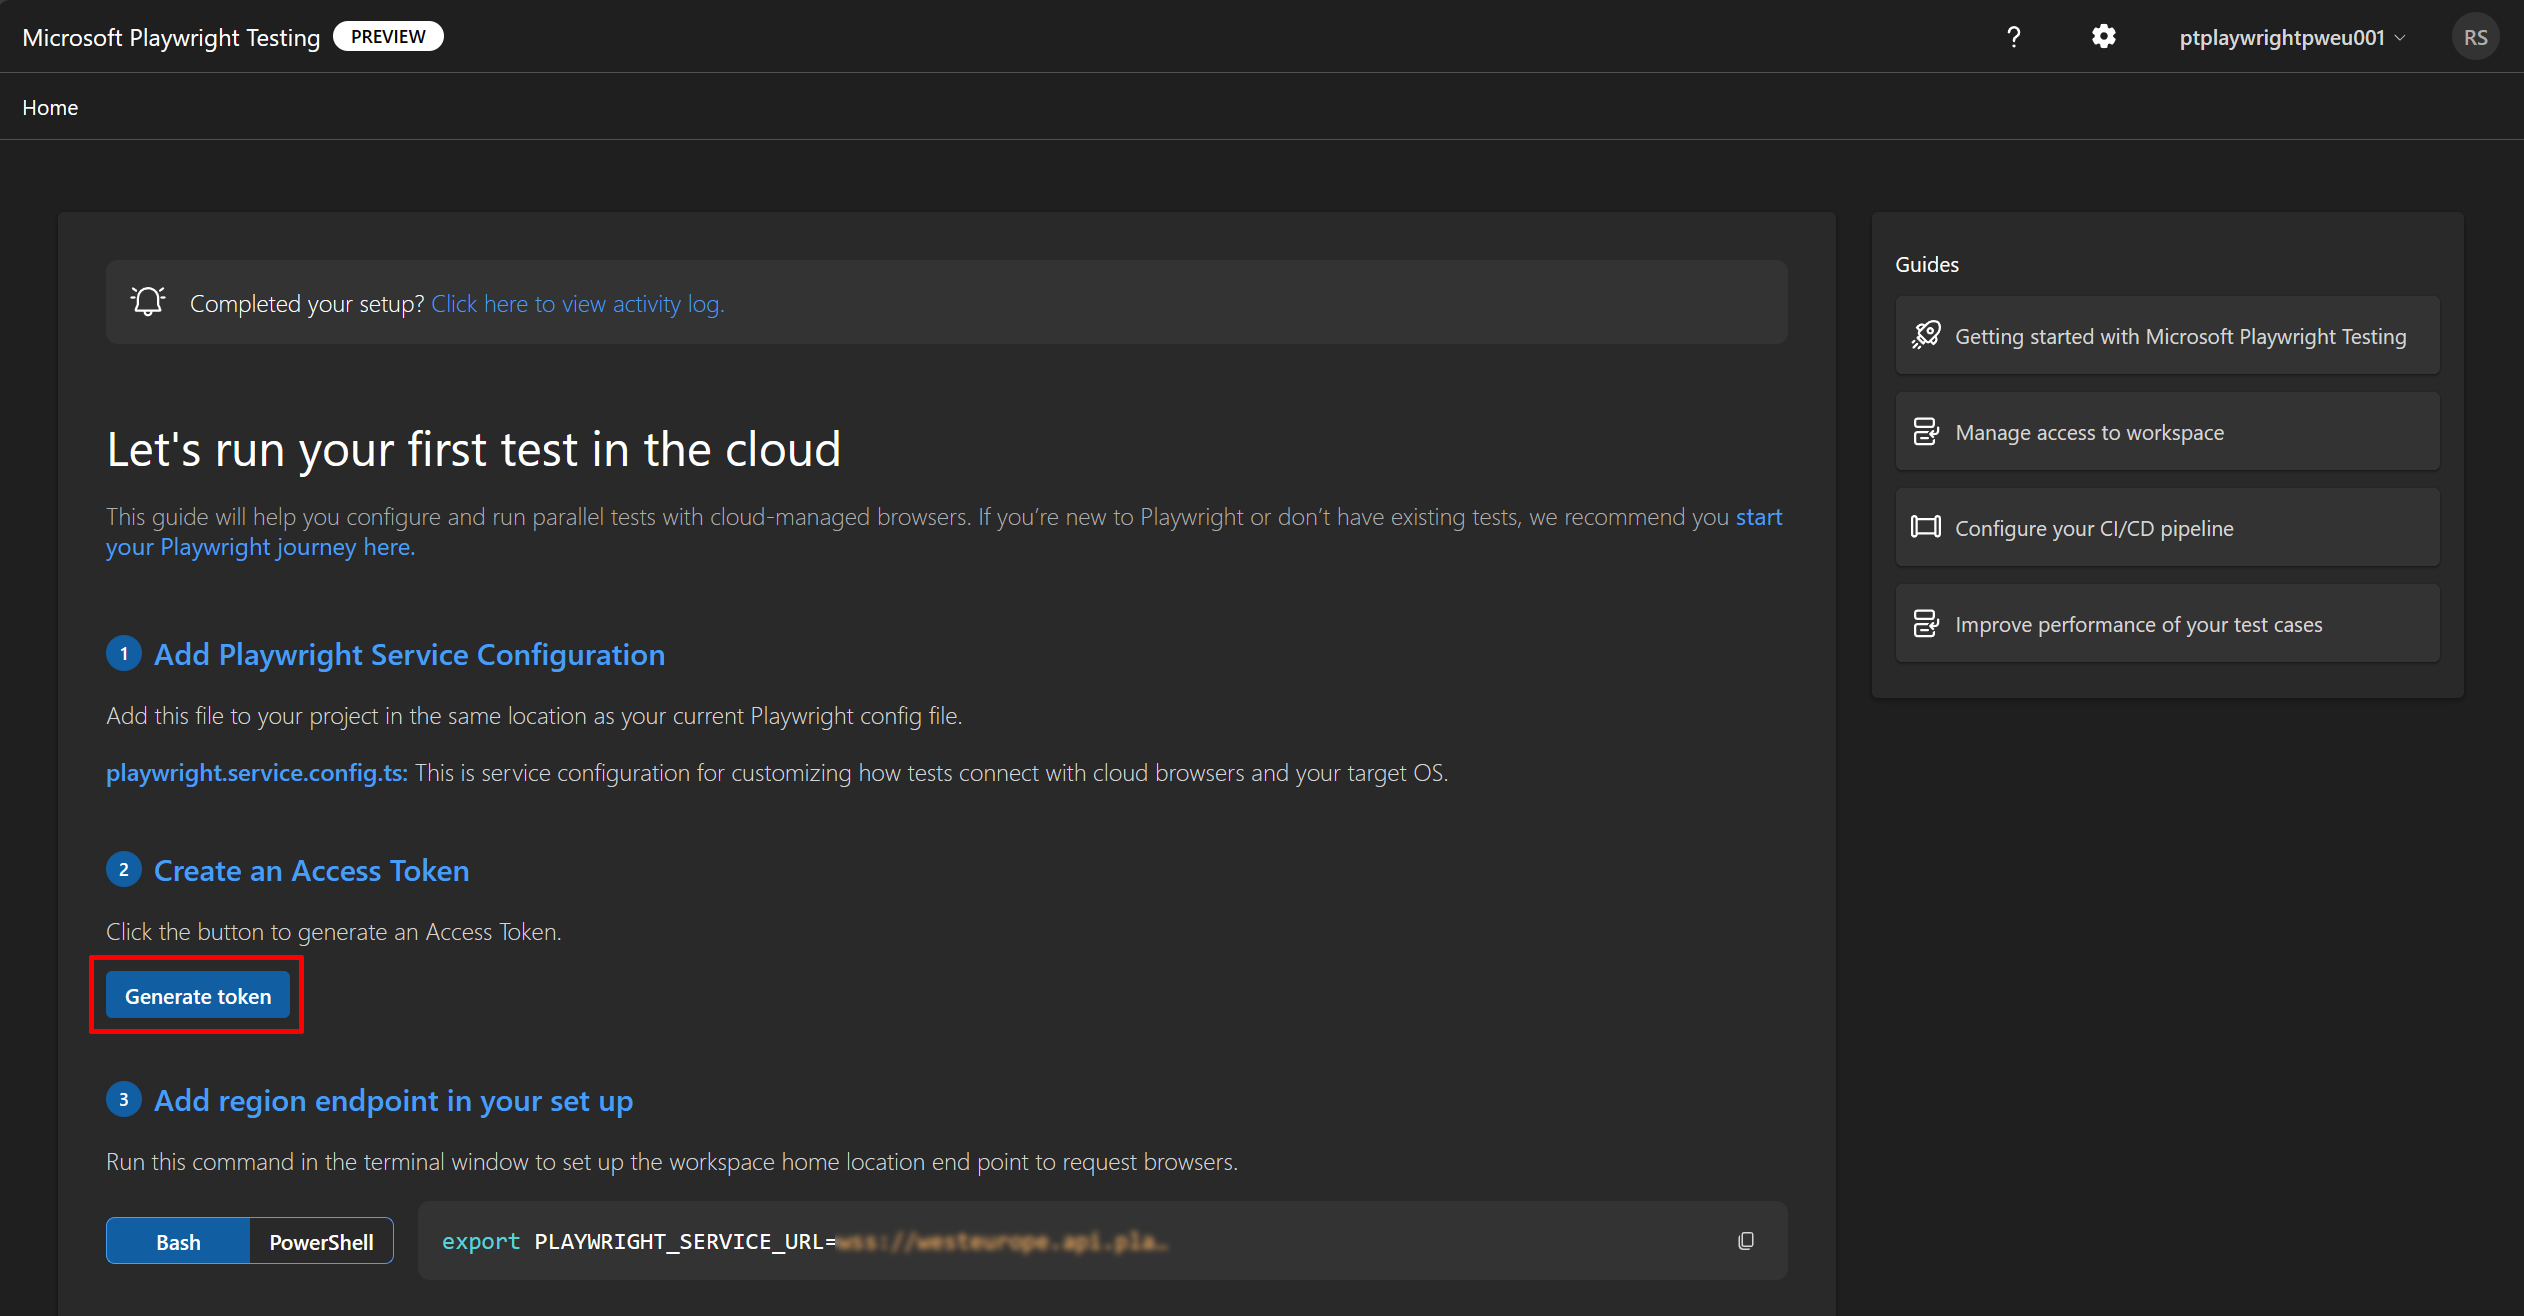
Click on the “Generate token” button as shown in the screenshot above. Copy the “access token” and “region endpoint” values, using the copy icon, as shown in the screenshot below. Paste these values, just the values and not the part before the = character, into the .env file we created in step 3.
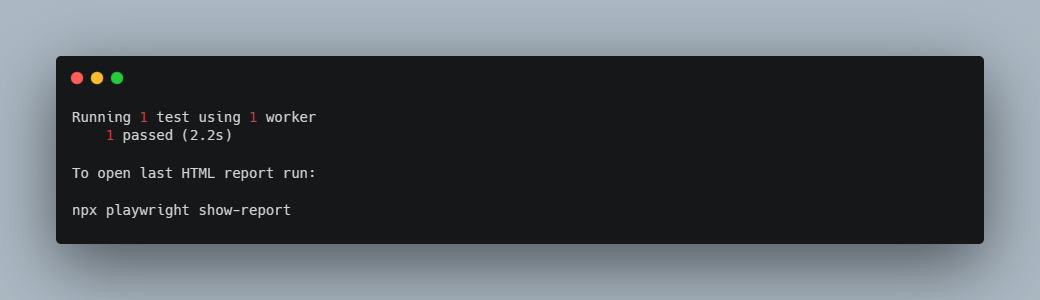
Step 9: Now, run the command below in your terminal to run your first Playwright test on remote browsers in your workspace:
npx playwright test --config=playwright.service.config.ts
After the test completes, the output of your terminal will similar to the screenshot below:
Step 10: Refresh your browser, while still on the Playwright portal, to view the test run metadata and activity log for your workspace. The activity log lists the total test completion time, the number of parallel workers, and the number of test minutes, for each test run. To view more details of the test run, run the npx playwright show-report command in your terminal.
Your First Playwright Script
Playwright tests are simple, executing actions and verifying states against predefined expectations. There’s no necessity for explicit waiting for any action, as Playwright autonomously ensures that a wide set of actionability checks is fulfilled. Also, the complexity of managing conditions during checks are eliminated. Playwright assertions are designed in a way that they describe the expectations that need to be eventually met, simplifying the testing process and enhancing reliability.
If you inspect the tests/example.spec.ts file, you will see that this sample script targets the https://playwright.dev website. In all likelihood, this is not your React project. It is therefore time to write our first Playwright script, for our own React project. Let’s write the same script from the ground up fo our own Next.js App.
Step 11: Create a new file in de tests folder, with the .spec.ts file extension. I’ve named my file playwright.spec.ts. Open this file in your code editor (e.g. Visual Studio Code) to edit it.
Step 12: Add the content below on the first line of this file. This imports the test and expect functions from the @playwright/test package, which are essential for creating and running Playwright tests.
import { test, expect } from '@playwright/test';
Now, just as in the example script, our first test will be to check the title of the page containing a specific substring. To do this, we’ll define a new test, and add two actions: a navigation action (page.goto), and a test assertion calling the expect function.
Step 13: Add the content below to your file. This defines a test named has title, which takes a page as a parameter. It navigates the page to http://localhost:3000. After, it expects the page title to contain the substring Next. If necessary, you can adjust these values to your own scenario.
// Defining a test named 'has title'.
test('has title', async ({ page }) => {
  // Navigating the page to the URL 'http://localhost:3000'.
  await page.goto('http://localhost:3000');

  // Expecting the title of the page to contain the substring 'Next'.
  await expect(page).toHaveTitle(/Next/);
});
The await keyword is used in asynchronous functions to ensure that certain actions are completed before moving on to the next line of code. For example, page.goto('http://localhost:3000') is an asynchronous operation that navigates the browser to the specified URL. The await keyword is used here to pause the execution of the script until the navigation is complete.
The example script also contained a test that clicks a specific link and check the title of the page containing a specific substring. Let’s add this to our own test as well, by defining a second test, and add three actions: a navigation action (page.goto), a click interaction on a specific link, and a test assertion calling the expect function.
Step 14: Add the content below to your file. This defines another test named Docs link, which also takes a page as a parameter. It navigates the page to http://localhost:3000. On this page it locates the link with the role link and the name Docs and clicks on it. Finally, it expects the page to have a visible heading with the name Docs. If necessary, you can adjust these values to your own scenario.
// Defining another test named 'Docs link'.
test('Docs link', async ({ page }) => {
  // Navigating the page to the URL 'http://localhost:3000'.
  await page.goto('http://localhost:3000');

  // Clicking the link with the role 'link' and the name 'Docs'.
  await page.getByRole('link', { name: 'Docs' }).click();

  // Expecting the page to have a visible heading with the name 'Docs'.
  await expect(page.getByRole('heading', { name: 'Docs' })).toBeVisible();
});
After adding the above, the entire content of your playwright.spec.ts file should look similar like the screenshot below.
.png)
Step 15: It is now time to run the tests. Execute the command below in your terminal to run the test file, created in the previous steps:
npx playwright test playwright.spec.ts --config=playwright.service.config.ts
💡 Make sure your application is running while executing the tests. If you’re using a local Next.js project like me, you can run your application in development mode using
npm run devin a different terminal.
After a few seconds the test script should complete, and the output of your terminal should look similar like the screenshot below.
.png)
Step 16: Just as we did during step 10, refresh the Playwright portal page in your browser, to view the test run metadata and activity log for your workspace. The activity log has added our most recent test job, as we can see on the screenshot below.

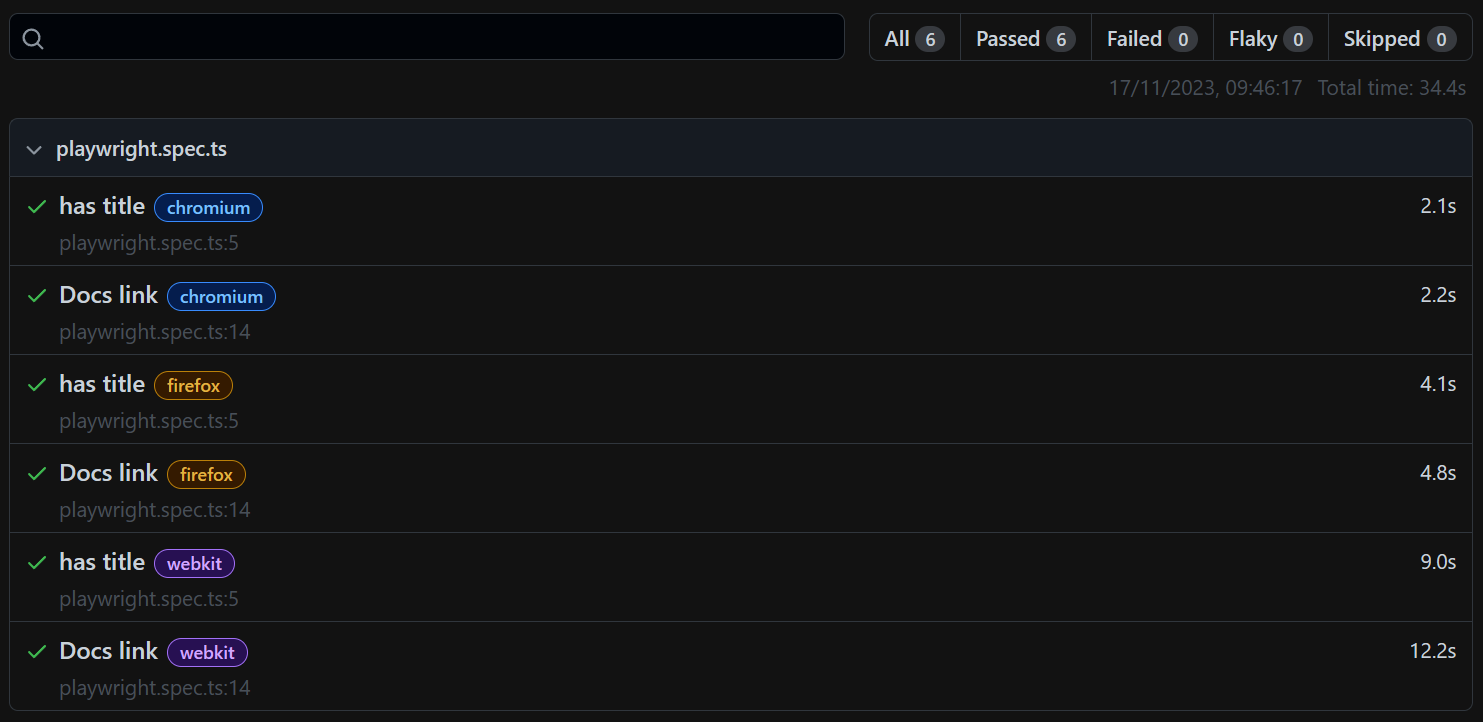
To view more details of the test run, run the npx playwright show-report command in your terminal. The npx playwright show-report command is used to display a detailed and interactive HTML report of the test results generated by Playwright tests. When you run your Playwright tests using the Playwright test runner, it automatically generates a report summarizing the test execution. This command is particularly useful when you want to review and analyze the results of your Playwright tests in a visual and interactive format. It enhances the visibility of test outcomes and supports in troubleshooting any issues that may have occurred during the test run. The report will look similar like the screenshot below.
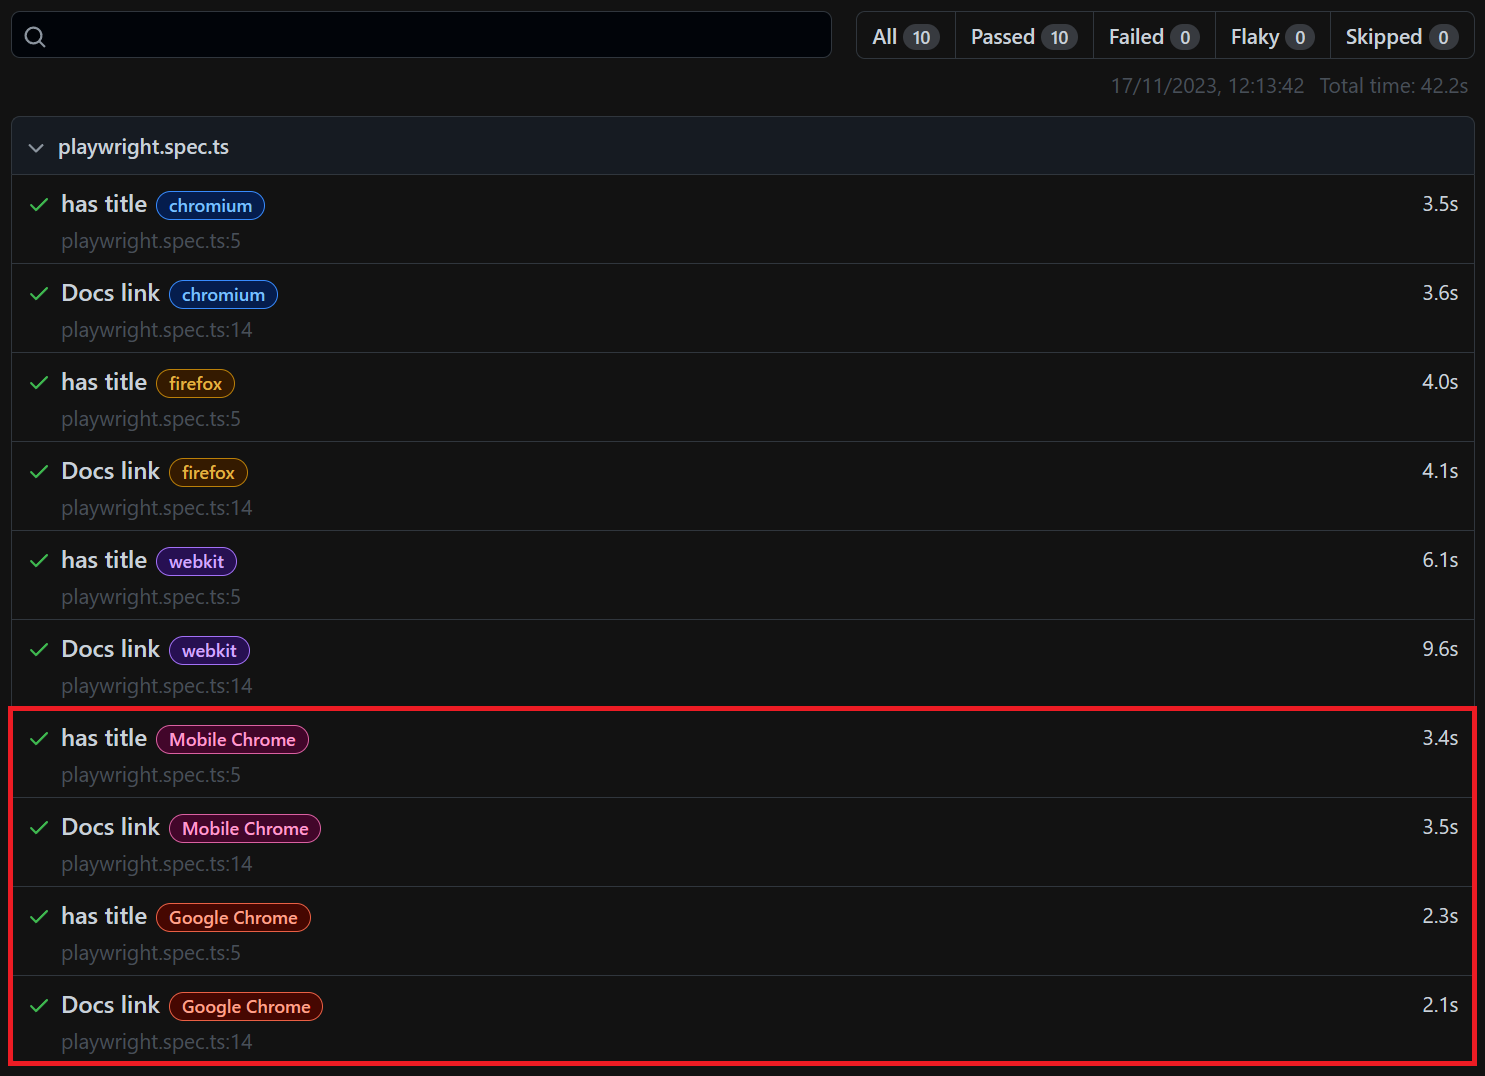
We’ve just laid the foundation and the basics of creating a Playwright script. As your testing scenarios evolve, you may require to interact with various browsers. Playwright can execute tests on a variety of browsers, including Chromium, WebKit, and Firefox, as well as branded browsers like Google Chrome and Microsoft Edge. Furthermore, it extends its functionality to run on emulated tablet and mobile devices. For a complete list of supported desktop, tablet, and mobile devices, refer to the registry of device parameters.
Step 17: Let’s add the branded Google Chrome desktop browser, and the Mobile Chrome browser on a Pixel 5 device. Open your playwright.config.ts file in the root folder of your application, and add the following code below the projects: [ part on line 34 of the file:
  	 {
       name: 'Mobile Chrome',
       use: { ...devices['Pixel 5'] },
     },
     {
       name: 'Google Chrome',
       use: { ...devices['Desktop Chrome'], channel: 'chrome' },
     },
Now, if we repeat executing the same test as we did during step 15, we’ll see that it will run 4 tests more than earlier.
.png)
If we open the HTML report, using the npx playwright show-report command, the report shows that both tests were executed for the two new browsers we’ve just added.
Cleaning Up Afterwards
Once you’re done experimenting, you might want to consider to clean up your resources afterwards. Cleaning up your Azure resources is as easy as running the terraform destroy command in your terminal. Make sure you have cd’d back into the folder where you’ve placed your Terraform configuration-files. Additionally, you can delete the resources and resource group though the Azure portal.
Closing Words
We went through the basics of Playwright, equipping you with the foundational knowledge to wield this powerful browser automation tool effectively. Use the basics explored in this guide to start testing your web applications using Playwright with confidence. As you continue working with Playwright, remember that its capabilities extend far beyond the basics. There’s so much more to learn when it comes to automating your web application test scenario’s with Playwright. Check out some of these resources to help you forward:
- Fast and reliable end-to-end testing for modern web apps | Playwright
- Playwright Testing
- Microsoft Playwright Testing Preview documentation | Microsoft Learn
Thank you for taking the time to go through this post and making it to the end. Stay tuned because we’ll keep continuing providing more content on this topic in the future.