Do you want to know how to manage and orchestrate virtual machines within Kubernetes clusters? Let’s explore KubeVirt, that allows you to integrate virtualized workloads alongside containerized applications for enhanced flexibility and resource utilization.
Introduction
In today’s software development, Kubernetes has taken its position as the de facto standard for container orchestration, offering great flexibility and scalability. However, many development teams face a dilemma: while Kubernetes excels at managing containerized workloads, what about existing Virtual Machine (VM)-based applications that are not easily containerized?
![]()
This is where KubeVirt comes to play – a technology designed to bridge the gap between traditional VM workloads and the Kubernetes ecosystem. But why would one want to run VM workloads under Kubernetes instead of opting for conventional VM hosting solutions like Azure Virtual Machines? Let’s delve into the core challenges KubeVirt addresses and the reasons why professionals are turning to Kubernetes to orchestrate and manage their VM workloads.
-
Unified Development Platform: KubeVirt provides a unified platform where developers can manage both containerized applications and traditional VM workloads within the same Kubernetes environment. This unified approach streamlines development workflows and removes the necessity for separate management systems, promoting collaboration and efficiency.
-
Containerization of Legacy Applications: Many organizations possess legacy applications that rely on VMs and cannot be easily containerized due to various dependencies and complexities. KubeVirt empowers development teams to containerize these legacy applications gradually, leveraging Kubernetes' container orchestration capabilities while retaining the functionality of existing VMs. This gradual migration approach minimizes disruptions and mitigates risks associated with transitioning to containerized architectures.
-
Flexibility and Scalability: Kubernetes offers great flexibility and scalability, allowing organizations to deploy and manage applications across hybrid and multi-cloud environments easily. By integrating VM workloads into Kubernetes clusters using KubeVirt, organizations can leverage Kubernetes' dynamic scaling capabilities to optimize resource utilization and meet evolving business demands effectively.
-
Enhanced Resource Utilization: Traditional VM hosting solutions often result in underutilized resources and inefficient resource management. In contrast, Kubernetes, coupled with KubeVirt, enables organizations to achieve higher resource utilization rates by dynamically allocating resources based on application requirements. This optimization not only reduces operational costs but also improves overall system performance and reliability.
-
Future-Proofing Infrastructure: Embracing Kubernetes for managing VM workloads future-proofs infrastructure investments by aligning with industry trends towards cloud-native technologies and microservices architectures. By adopting KubeVirt, organizations can transition towards a modern, container-centric approach while preserving the value of existing VM-based applications, ensuring long-term viability and competitiveness.
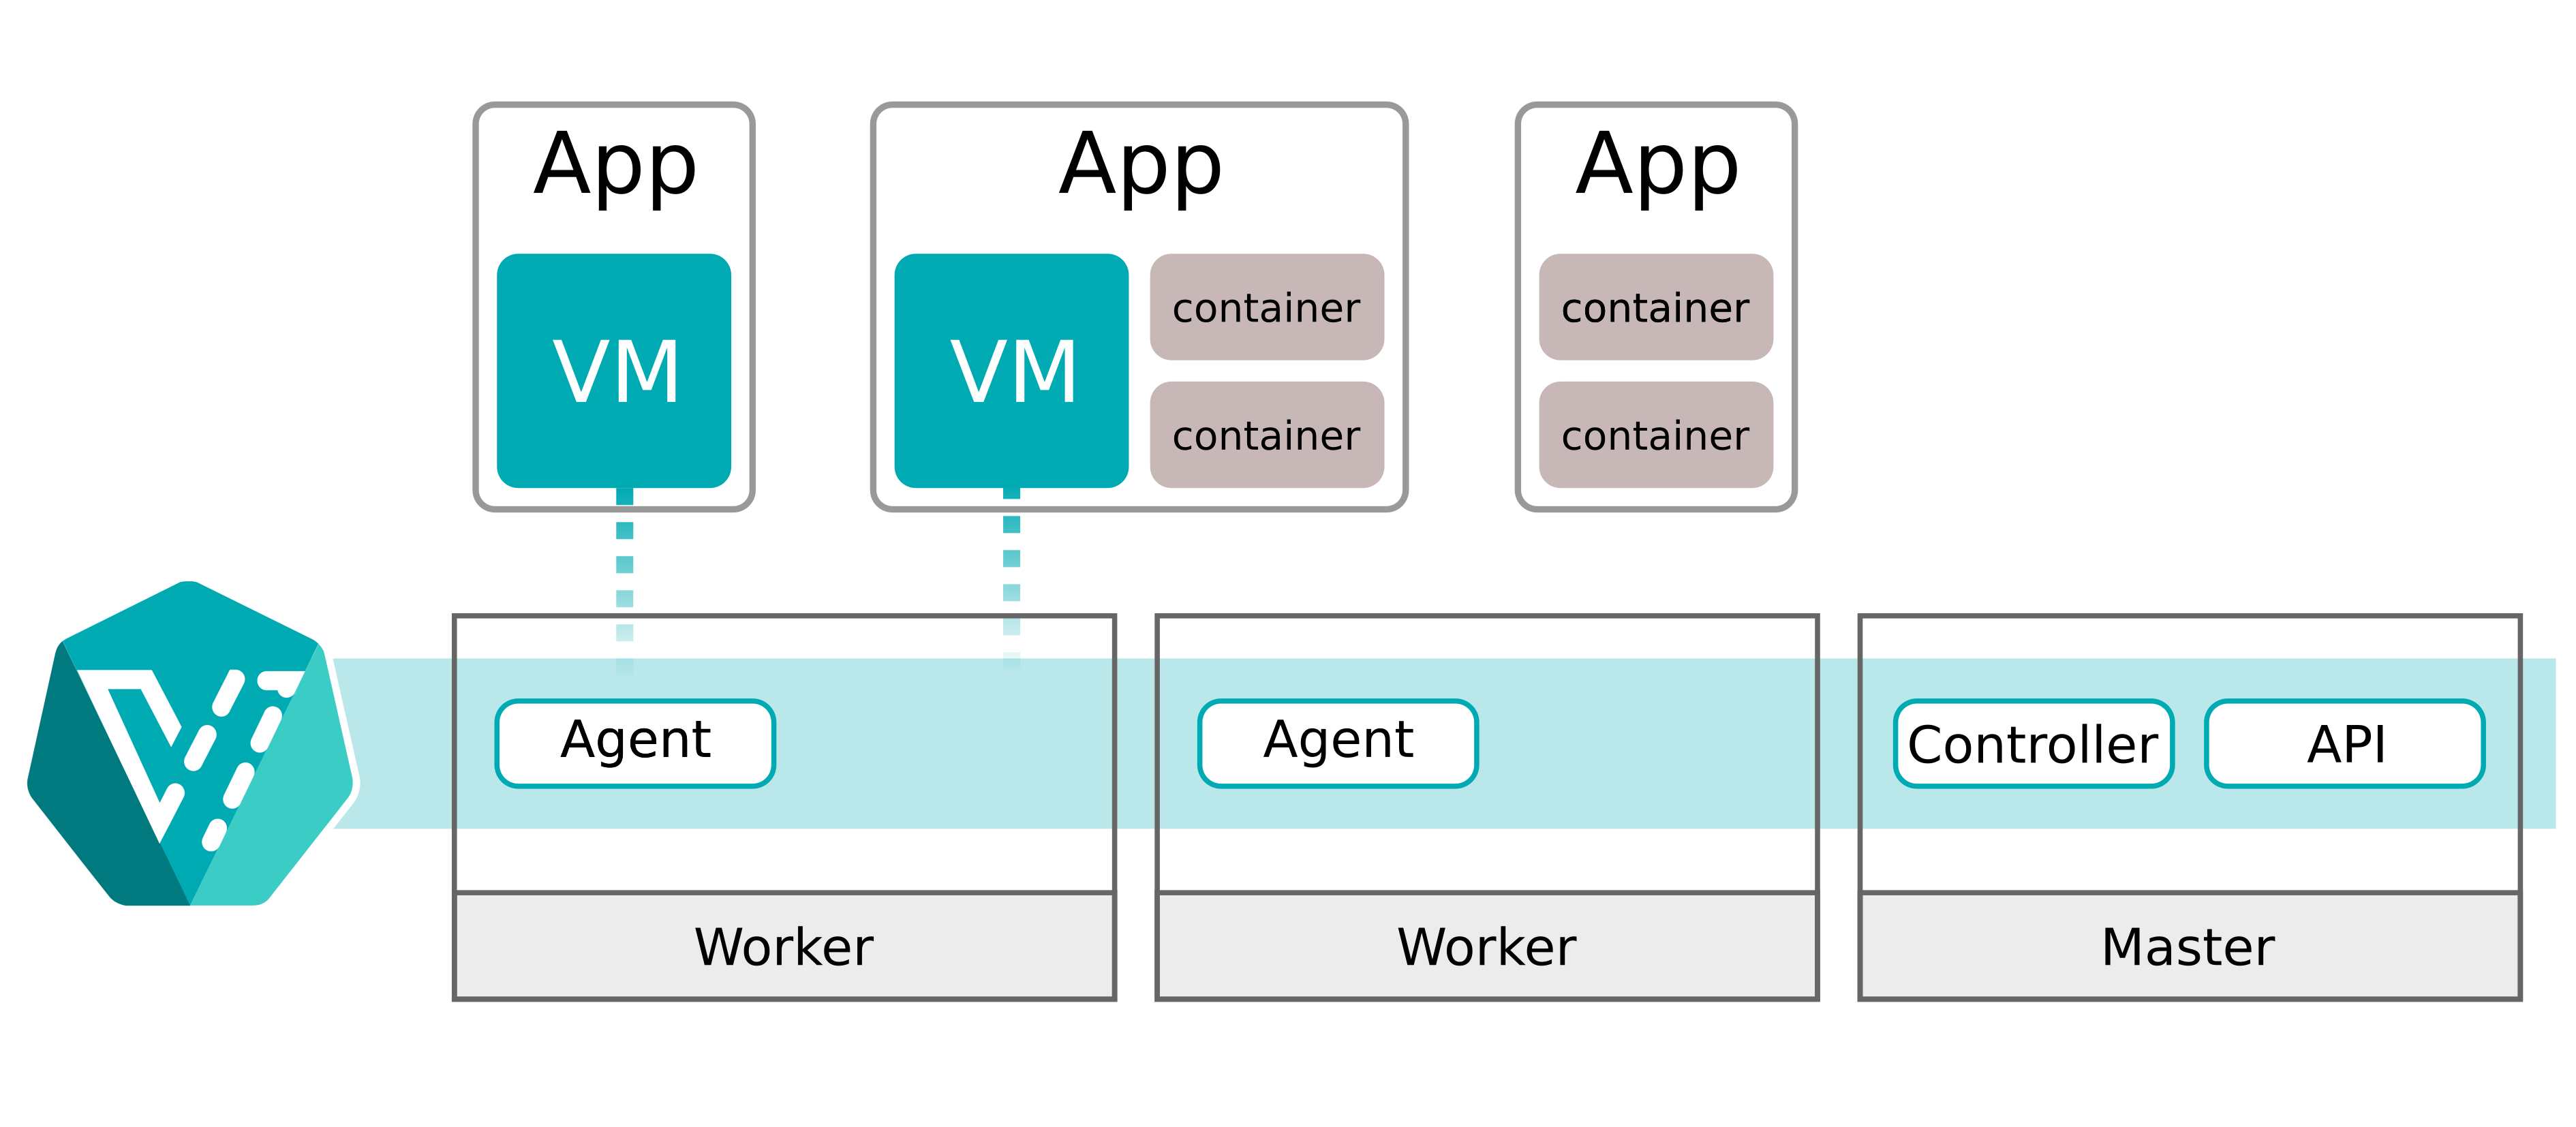
KubeVirt extends Kubernetes by adding custom resources and controllers specifically designed to handle virtual machines (VMs). At its core, KubeVirt introduces two primary components: the VirtualMachineInstance (VMI) and the VirtualMachine (VM) custom resources.
- VirtualMachineInstance (VMI): This custom resource represents a single instance of a virtual machine. It encapsulates the configuration details of the VM, such as its hardware specifications (CPU, memory, storage), networking settings, and other properties.
- VirtualMachine (VM): The VM resource represents the desired state of a virtual machine, defining the overall VM configuration and its associated resources. It serves as a template for creating multiple instances of VMIs.
KubeVirt also introduces custom controllers responsible for managing these custom resources and orchestrating VM lifecycle operations within Kubernetes clusters. These controllers monitor the state of VMIs and VMs, ensuring that the desired state specified in the resource manifests is achieved and maintained.
In terms of integration with Kubernetes architecture, KubeVirt extends the Kubernetes API server to support the creation and management of VM-related custom resources. This allows users to interact with VMs using standard Kubernetes API calls. KubeVirt deploys custom controllers as part of the Kubernetes controller manager. These controllers continuously reconcile the state of VMIs and VMs with the desired state specified by users, ensuring proper VM lifecycle management. KubeVirt integrates with the Kubernetes scheduler to determine the optimal placement of VM instances across nodes in the cluster based on resource requirements and constraints. Additionally, KubeVirt leverages Kubernetes networking and storage plugins to provide networking and storage resources to VM instances. This enables seamless integration with existing Kubernetes networking and storage solutions.
KubeVirt fundamentally changes how organizations handle VM workloads by smoothly incorporating them into the Kubernetes ecosystem. By leveraging Kubernetes' robust orchestration capabilities, KubeVirt enables organizations to improve their agility, scalability, and efficiency while preserving the investments in existing VM-based applications. As professionals increasingly recognize the transformative potential of Kubernetes for managing diverse workloads, KubeVirt plays a crucial role in facilitating this shift towards a cloud-native future.
Witness KubeVirt in action
Let’s witness KubeVirt by deploying it on an Azure Kubernetes Service (AKS) cluster.
Prerequisites
Before diving into the next steps, ensure you have the following prerequisites in place:
- Azure Subscription with Owner Permissions: You’ll need an active Azure subscription with Owner permissions to create and manage resources in Azure Kubernetes Service (AKS).
- Azure CLI: Install Azure CLI for interacting with Azure services from the command line. You can install Azure CLI by following the instructions at Microsoft’s official documentation.
- Kubectl and Kubectl Login: Ensure kubectl is installed no your system, along with kubelogin to log in to Azure Kubernetes Service (AKS) using Entra ID credentials. You can install kubectl and kubelogin by following the instructions in this documentation.
- Visual Studio Code (optional): Have Visual Studio Code installed on your system for editing files and managing your project. You can download Visual Studio Code from here.
Create the AKS cluster
Step 1: First, login using az login, and set the right subscription with the following command:
az account set --subscription "<subscription-id>"
Step 2: First, let’s create the resource group. Use the command below to create your resource group:
az group create --name rg-p-weu-kubevirt-001 --location westeurope
Step 3: Next, we’ll create a new managed Kubernetes cluster by running the command below:
az aks create --resource-group rg-p-weu-kubevirt-001 \
              --name aks-p-weu-kubevirt-001 \
              --node-count 3 \
              --node-vm-size Standard_D8ds_v5 \
              --enable-cluster-autoscaler \
              --min-count 3 \
              --max-count 10 \
              --enable-addons monitoring \
              --generate-ssh-keys \
              --location westeurope
⚠️ Note: This setup is for demonstration purposes and does not adhere to best practices for production scenarios.
The process of creating a cluster may require a few minutes. Once completed, you are ready to continue onto the next steps.
Install KubeVirt on your cluster
Step 4: Next, we need to get the credentials for the AKS cluster and login (interactively) using the command below:
az aks get-credentials --resource-group rg-p-weu-kubevirt-001 --name aks-p-weu-kubevirt-001
Step 5: We will now install KubeVirt by using the KubeVirt operator, which manages the lifecycle of all the KubeVirt core components. Run the command below to deploy the KubeVirt operator to your cluster:
kubectl create -f https://github.com/kubevirt/kubevirt/releases/download/v1.2.0/kubevirt-operator.yaml
Step 6: Now, we’ll use kubectl again to deploy the KubeVirt custom resource definitions. Run the command below to do so:
kubectl create -f https://github.com/kubevirt/kubevirt/releases/download/v1.2.0/kubevirt-cr.yaml
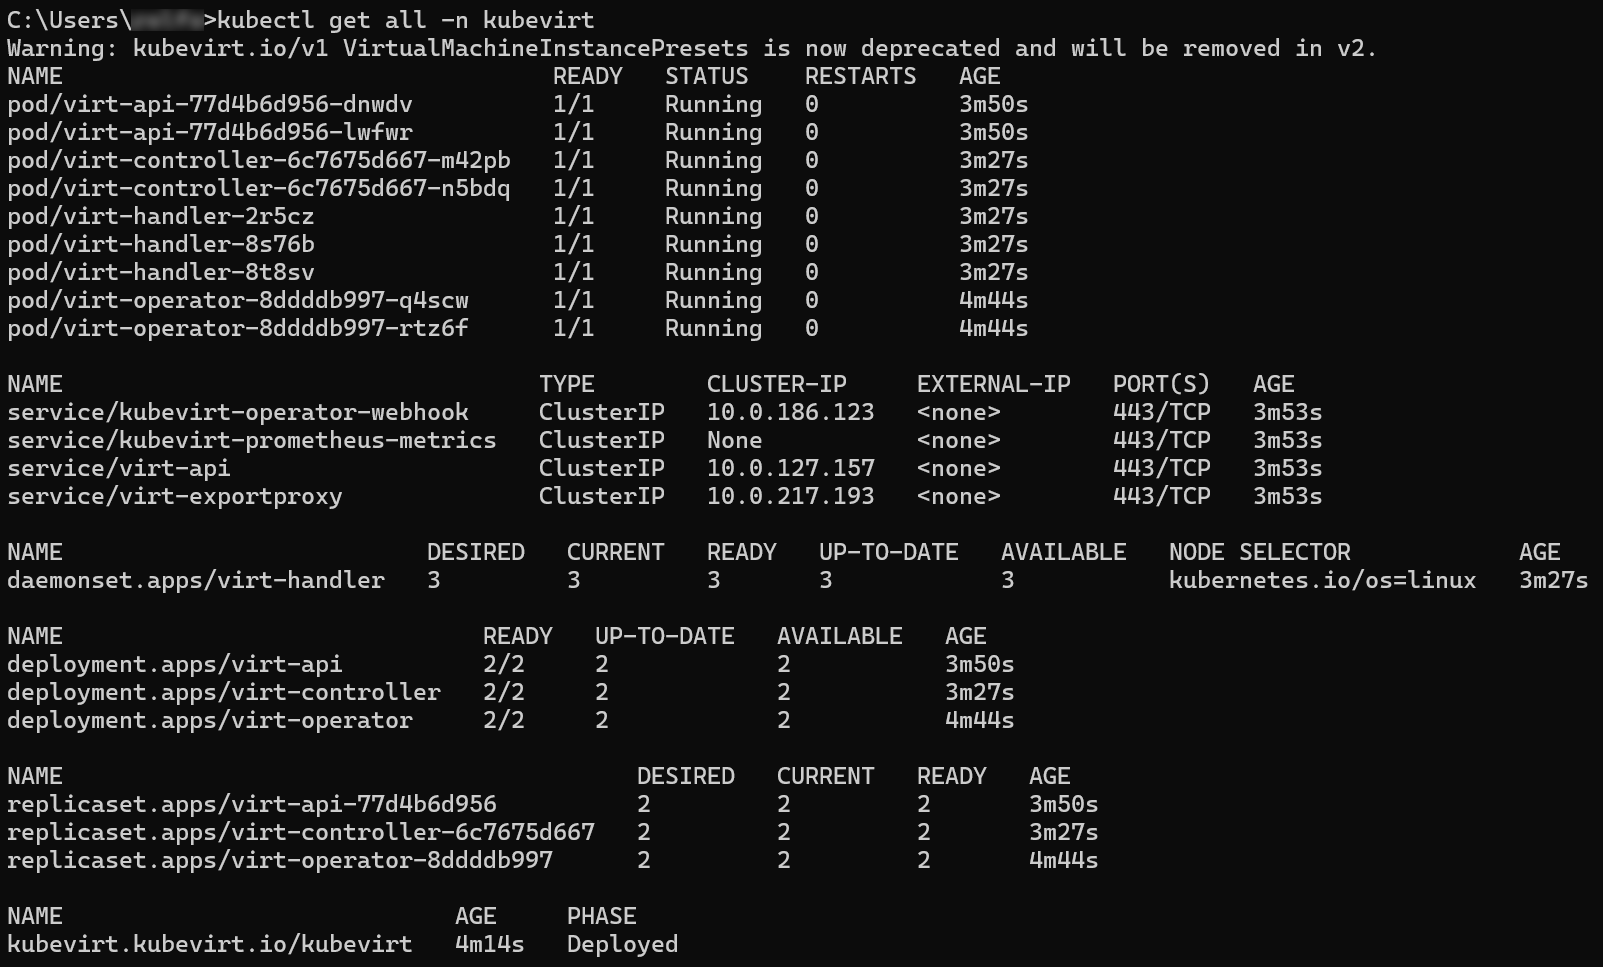
By default KubeVirt will deploy 7 pods, 3 services, 1 daemonset, 3 deployment apps, and 3 replica sets.
Step 7: Deploying KubeVirt can take a few minutes. You can verify the deployment by running the command below:
kubectl get kubevirt.kubevirt.io/kubevirt -n kubevirt -o=jsonpath="{.status.phase}"
Additionally, you can verify the components by using the following command:
kubectl get all -n kubevirt
Download and install Virtctl
Basic VirtualMachineInstance operations can be performed with the kubectl utility. However, the virtctl command line interface is required to use advanced features such as serial and graphical console access. It also provides more convenient commands for starting and stopping VirtualMachineInstances, live migrating VirtualMachineInstances and canceling live migrations, and uploading virtual machine disk images.
Installing the virtctl client on Linux or MacOS
- For Linux, download the virtctl--linux- file from the official KubeVirt release page on GitHub. For MacOs, download the virtctl--darwin- file from the official KubeVirt release page on GitHub.
- Move the downloaded file to a directory in your PATH environment variable. You can do this by using the
mvcommand. For example:
mv /path/to/the/directory/virtctl-<version>-<os>-<architecture> /usr/local/bin/virtctl
- Restart your terminal and run the
virtctlcommand to validate it is working.
Installing the virtctl client on Windows
- Download the virtctl--windows-amd64.exe file from the official KubeVirt release page on GitHub.
- Move the downloaded file to a directory in your PATH environment variable. Additionally, you can run the command below in your terminal to add a value to your PATH environment variable.
setx /m %PATH% c:\path\to\the\directory
- Restart your terminal and run the
virtctlcommand to validate it is working.
Create a Virtual Machine Instance (VMI) on Kubernetes
Step 8: Download the VM manifest from KubeVirt and explore it.
Step 9: Create a new file, called user-data.yaml file, and copy the code below to this file.
#cloud-config
users:
  - name: sysadmin
    lock_passwd: false
    passwd: somethingfun1!1234
    shell: /bin/bash
ssh_pwauth: true
Replace sysadmin and somethingfun1!1234 with your desired username and password. We’ll use this for SSH login in a later step. For the next step, option a is for Linux or MacOS and option b is for Windows.
Step 10a: Next, we’ll base64-encode the user-data.yaml script. Open your terminal and run the command below to encode the user-data.yaml content and save it to user-data-base64.txt.
cat user-data.yaml | base64 -w 0 > user-data-base64.txt
Step 10b: Next, we’ll base64-encode the user-data.yaml script. Open PowerShell and execute the following commands below. This PowerShell script reads the content of user-data.yaml, converts it to base64 encoding, and saves the encoded data to user-data-base64.txt.
$UserData = Get-Content -Raw -Path user-data.yaml
$Base64UserData = [Convert]::ToBase64String([System.Text.Encoding]::UTF8.GetBytes($UserData))
$Base64UserData | Out-File -Encoding ASCII user-data-base64.txt
Step 11: Copy the content of the user-data-base64.txt file as the value for userDataBase64 in the vm.yaml we downloaded in step 8. Now, apply the manifest to Kubernetes using the command below:
kubectl apply -f vm.yaml
Step 12: When running the kubectl get vm testvm command, you’ll notice the VM is in a Stopped state. Run the virtctl start testvm command to start the VM.
Step 13: To connect to a VirtualMachineInstance from your local machine, virtctl provides a lightweight SSH client with the ssh command, that uses port forwarding. Run the virtctl ssh <username>@<hostname> --local-ssh command to connect to your VirtualMachineInstance.
You have successfully completed the guide to create an AKS cluster, install KubeVirt, deploy a VirtualMachineInstance (VMI), and connect to the VMI using virtctl ssh. By following these steps, you have unlocked the capability to run virtual machines within your Kubernetes environment.
Closing Words
Organizations are increasingly adopting cloud-native technologies to stay competitive and agile. KubeVirt speeds up the adoption, by bridging the gap between Kubernetes and traditional virtual machine workloads. By extending Kubernetes to support VMs, KubeVirt provides a unified development platform where developers can build, modify, and deploy applications in both application containers and virtual machines. This integration supports collaboration and efficiency within development teams.
Moreover, KubeVirt helps organizations in the migration journey towards containerization. By containerizing legacy VM-based applications incrementally, organizations can minimize disruptions and risks associated with transitioning to containerized architectures. This approach allows them to leverage Kubernetes' dynamic scaling capabilities, optimizing resource utilization and meeting evolving business demands effectively.
To learn more about the material we’ve covered in this blog article, you can start with reading some of the resources below:
Thank you for taking the time to go through this post and making it to the end. Stay tuned, because we’ll keep continuing providing more content on topics like this in the future.