In this blog article, we’ll be creating a Pokédex application using ReactJS and PokéAPI, containerizing it with Azure Draft, and deploying it to Azure Kubernetes Services using GitHub Actions. We’ll go through the full process of creating and deploying a Pokédex application using the technologies mentioned.
Introduction
As a 90s kid, the Pokémon franchise has played a significant role in my childhood. With the recent announcement that Ash Ketchum, the iconic protagonist of the series, will be retiring, I wanted to pay tribute to the beloved character by creating a Pokédex application using some of the latest and greatest technologies. Especially because that my own children also watch the widely acclaimed television series every day.
For those who may not be familiar, ReactJS is a popular JavaScript library for building user interfaces and PokéAPI is a RESTful API that allows us to retrieve information about various Pokemon. By combining these technologies, we will be able to create a dynamic and interactive application that is both visually appealing and informative.
Once the application is complete, we will then containerize it using Azure Draft. Containerization allows us to package the application and its dependencies into a single, lightweight container that is easy to deploy and manage. This container can then be easily deployed to various environments, like Azure Kubernetes Services (AKS). Finally, we will use GitHub Actions to automate the deployment process. GitHub Actions is a powerful tool that allows us to automate various tasks, including building, testing, and deploying code. By leveraging GitHub Actions, we can streamline the deployment process and easily deploy our containerized application to AKS with just a few simple steps.
In this blog article, we’ll go through the full process of creating and deploying a Pokédex application using the technologies mentioned above. Let’s get started!
Prerequisites
Before you can start onboarding, there are some prerequisites to fulfill:
- Azure tenant and user account: You’ll need an Azure tenant, an Azure Active Directory (Azure AD) instance. This instance is the foundation of the environment. And it allows you to create an identity (user account) to connect to Azure, set up the environment, and deploy the resources.
- Subscription(s): You’ll need a subscription and owner permissions to deploy the resources and minimize the costs by removing the resources at the end.
- Git: You’ll need to have Git installed on your machine to track and deploy changes to your files within the source code of your app.
- GitHub account: You’ll need a GitHub account. We’ll be using GitHub Actions to streamline the deployment process and easily deploy our app to AKS.
- GitHub CLI: You’ll need to have GitHub CLI installed on your machine.
- NodeJS: You’ll need to have Node ≥= 14.0.0 and npm ≥=5.6 installed on your machine.
- Go: You’ll need to have Go ≥1.18.x installed on your machine.
- Visual Studio Code: You’ll need a code editor. Although any code editor will do and this is something of personal preference, Visual Studio Code is a good (and free) choice.
Build the React Pokédex App
First, we will go through the process of creating a new ReactJS project and setting it up for optimal code organization and flexibility. We will start by organizing our files, starting with the files that can be removed from a standard ReactJS project. We will then go through the files that should be created or moved. After, we will go through the code and explanations for creating your own Pokédex app using ReactJS. By following the steps outlined in this section, you will have your very own working Pokédex app.
Step 1: Create a new React project
Create a new React project by running the following command in your terminal:
npx create-react-app pokedex-app
This will create a new directory called “pokedex-app” with a basic React setup, including a preconfigured development environment and a package.json file with some default packages. It allows you to start building a React application without having to spend time configuring tools like webpack and Babel. You can then navigate into the directory and start the development server by running:
cd pokedex-app
npm start
This will open a new browser window with your React app running on localhost. We can now start building the app by modifying the files in the “src” directory.
Step 2: Deleting unnecessary files and creating the outline
We will make it easier and more dynamic to import/export files by moving and deleting some files, and we will create new files that we will be needing to create the Pokédex app. Move into the src directory to start modifying some of the files.
cd src
First, we’ll remove the logo.svg file. We are not going to use it. To do so, run the following command in your terminal:
rm logo.svg
Now create a test, directory, an assets directory, a components directory, and a styles directory inside the new components directory. Run the commands below in your terminal:
mkdir test
mkdir assets
mkdir components
mkdir components/styles
Move the files to the corresponding directories by running the following command in your terminal:
mv App.js components/
mv App.css components/styles/
mv App.test.js test/
For the aesthetic of the Pokédex we need the Pokémon logo and sprites of the Pokémon. Download the images here, and place them in the assets directory. To create the new files that we will need to create the Pokédex app, run the following commands below:
touch Pokemon.js
touch PokeClasses.js

cd components
touch PokeList.js styles/PokeList.css
touch PokeCell.js styles/PokeCell.css
touch DetailView.js styles/DetailView.css
After running the commands, your new file structure in the src directory will look like this:
src
|   index.css
|   index.js
|   PokeClasses.js
|   Pokemon.js
|
|__assets
|   |   logo.png
|   |   sprites.png
|
|___components
|   |   App.js
|   |   DetailView.js
|   |   PokeCell.js
|   |   PokeList.js
|   |___styles
|       │   App.css
|       |   DetailView.css
|       |   PokeCell.css
|       |   PokeList.js
|
|___test
|   |   App.test.js
Step 3: Coding the React Pokédex App
In this step, the necessary code to create your very own React Pokédex app is provided and explained. You can follow along and create your own Pokédex, and are welcome to copy and paste the code. The .css stylesheets are not described, but all necessary files can be viewed and copied from this public GitHub repository.
Index.js: Line 1 to 4 import the different objects, components and modules it needs to render out the ReactJS application. Line 5 is using the ReactDOM.render() method to render the ‘App’ component to the DOM element with an ID of ‘root’. This is the starting point of the React application.
import React from 'react';
import ReactDOM from 'react-dom';
import './index.css';
import App from './components/App';

ReactDOM.render(<App />, document.getElementById('root'));
PokeClasses.js: This code defines an array of objects called ‘pokeClasses’. Each object represents a Pokemon species and has an ‘id’ property and a ‘backgroundPosition’ property. The ‘id’ property is a unique identifier for the Pokemon species, and the ‘backgroundPosition’ property is a string that specifies the position of an image of the Pokemon in the assets/sprites.png sprite sheet. This sprite sheet is a single image file that contains multiple images of different Pokemon. The ‘backgroundPosition’ property is used to specify which part of the sprite sheet to display as the image of the Pokemon. The array has a total of 151 objects, one for each of the original 151 Pokemon species. Because it this is a file with 606 lines of code, it is not included in this blog article. You can view the file here.
Pokemon.js: This code defines the Pokemon class. The class has a constructor function that takes in an object called ‘data’ as an argument. The ‘constructor’ function is called every time a new ‘Pokemon’ object is created. Inside the constructor, the ‘this’ keyword refers to the newly created ‘Pokemon’ object. The code sets the ‘id’, ‘name’, ‘sprite’, and ‘type’ properties of the ‘Pokemon’ object to the values of the corresponding properties in the ‘data’ object. The ‘id’ property is a unique identifier for the Pokemon. The ‘name’ property is the name of the Pokemon. The ‘sprite’ property is the URL of an image of the Pokemon. The ‘type’ property is the type of the Pokemon (e.g. fire, water, grass). The ‘export default Pokemon;’ line at the end of the code makes the ‘Pokemon’ class available for other modules to import and use.
class Pokemon {
    constructor(data) {
      this.id = data.id;
      this.name = data.name;
      this.sprite = data.sprites.other.dream_world.front_default;
      this.type = data.types[0].type.name;
    }
  }

  export default Pokemon;
App.js: This code defines a React component called ‘App’ that displays a list of Pokémon and displays detailed information about a selected Pokémon. The component has a ‘pokemon’ property in its state that stores information about the selected Pokémon. When a Pokémon is clicked, the component sends a request to the PokéAPI to get information about the Pokémon and updates the ‘pokemon’ property in the state with the new information. The component renders a ‘PokeList’ component and a ‘DetailView’ component, passing them the ‘handleOnClick’ function and the ‘pokemon’ property as props, respectively. The component can be imported and used by other modules.
import React, { Component } from 'react';
import PokeList from './PokeList';
import DetailView from './DetailView';
import Pokemon from '../Pokemon';
import './styles/App.css';
import Logo from '../assets/logo.png';

class App extends Component {
  constructor() {
    super();
    this.state = {
      pokemon: {}
    };

    this.handleOnClick = this.handleOnClick.bind(this);
  }

  handleOnClick(id) {
    fetch(`http://pokeapi.co/api/v2/pokemon/${id}/`)
      .then(res => res.json())
      .then(data => {
        const pokemon = new Pokemon(data);

        this.setState({ pokemon });
      })
      .catch(err => console.log(err));
  }

  render() {
    document.title = 'Pokedex App by Schutten.cloud'
    return (
      <div className="App">
        <div className="App-header">
          <img src={Logo} alt="Pokemon" className="Logo" />
          <h1>Schutten.cloud</h1>
        </div>
        <PokeList handleOnClick={this.handleOnClick} />
        <DetailView pokemon={this.state.pokemon} />
      </div>
    );
  }
}

export default App;
DetailView.js: This code defines a functional React component called ‘DetailView’. The component is a function that takes in a single prop called ‘pokemon’ and returns a JSX element that represents the structure and content of the component. The ‘pokemon’ prop is destructured into its individual properties: ‘id’, ‘name’, ‘sprite’, and ‘type’. These properties are then used to render the ‘id’, ‘name’, and ‘type’ of the Pokemon and to display the Pokemon’s image (‘sprite’). The JSX element returned by the ‘DetailView’ component consists of a ‘section’ element with the ‘detail-view’ class and several child elements, including an ‘img’ element and a ‘div’ element. The ‘img’ element displays the Pokemon’s image using the ‘sprite’ URL, and the ‘div’ element contains the ‘id’, ‘name’, and ‘type’ of the Pokemon. The ‘export default DetailView;’ line at the end of the code makes the ‘DetailView’ component available for other modules to import and use.
import React from 'react';
import './styles/DetailView.css';

const DetailView = ({ pokemon }) => {
    const { id, name, sprite, type } = pokemon;

    return (
      <section className="detail-view">
        <img src={sprite} className='sprite-image' alt="sprite"/>
        <div className='data-wrapper'>
          <h1 className='data-name'>ID: {id} {name}</h1>
          <p className="data-char">Type: {type}</p>
        </div>
      </section>
    )
  }

export default DetailView;
PokeCell.js: This code defines a functional React component called ‘PokeCell’ that represents a single cell in a list of Pokemon. The component takes in a ‘pokeClass’ object that has an ‘id’ and a ‘backgroundPosition’ property, and a ‘handleOnClick’ function. The component renders a ‘button’ element with a background image specified by the ‘pokeClass’ object and an ‘onClick’ event handler that calls the ‘handleOnClick’ function with the ‘id’ of the Pokemon when the button is clicked. The component can be imported and used by other modules.
import React from 'react';
import sprites from '../assets/sprites.png';
import './styles/PokeCell.css';

const PokeCell = ({ pokeClass, handleOnClick }) => {
  const { id, backgroundPosition } = pokeClass;
  const style = { backgroundImage: `url(${sprites})`, backgroundPosition };

  return <button onClick={() => handleOnClick(id)} style={style} className="poke-cell"></button>
};

export default PokeCell;
PokeList.js: This code defines a functional React component called ‘PokeList’ that displays a list of Pokemon. The component takes in a ‘handleOnClick’ function and creates a list of ‘PokeCell’ components using an array of ‘pokeClass’ objects. Each ‘PokeCell’ component is passed the ‘pokeClass’ object and the ‘handleOnClick’ function as props. The component can be imported and used by other modules.
import React from 'react';
import PokeCell from './PokeCell';
import { pokeClasses } from '../pokeClasses';
import './styles/PokeList.css';

const PokeList = ({ handleOnClick }) => {
  const cells = pokeClasses.map(pokeClass => {
    return (
      <PokeCell
        key={pokeClass.id}
        pokeClass={pokeClass}
        handleOnClick={handleOnClick}
      />
    );
  });

  return (
    <section className="poke-list">
      {cells}
    </section>
  )
}

export default PokeList;
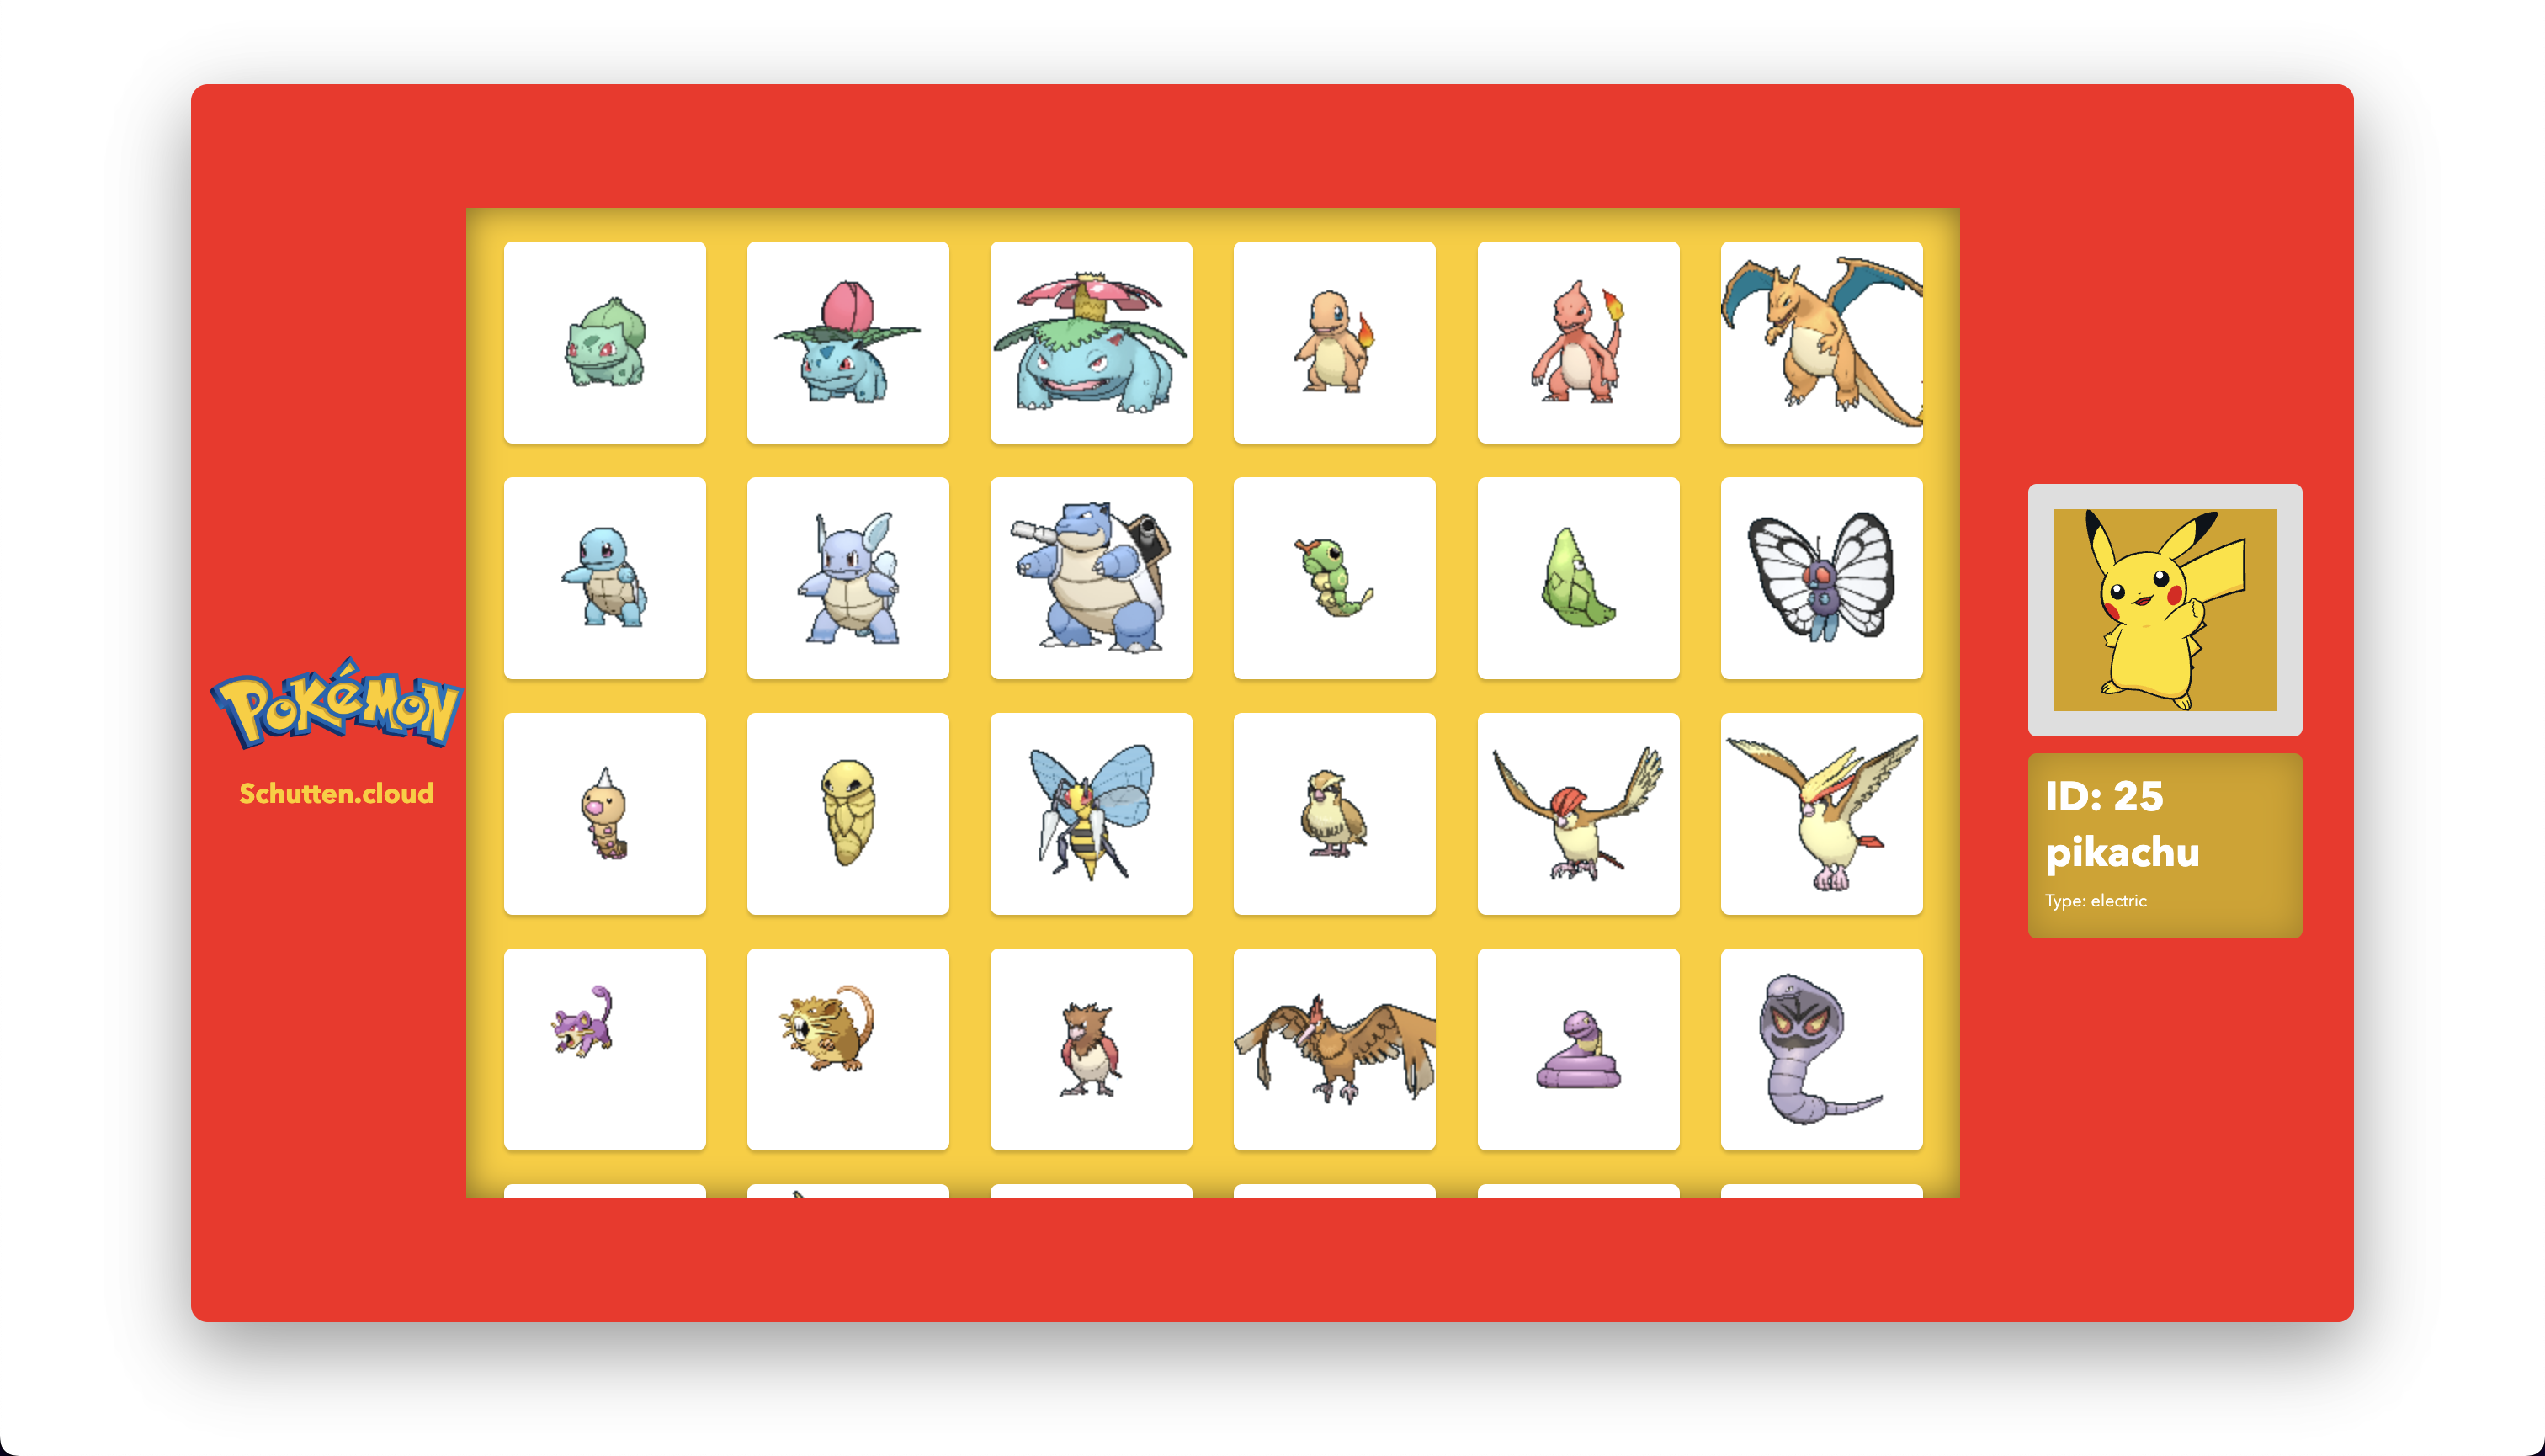
If you have followed all the steps correctly, your Pokédex app is now ready. Below is a screenshot of the Pokédex app with styling:
Creating the AKS cluster
Obviously, we need an AKS cluster to deploy our Pokédex app to, once it has been containerized. We’ll use the AKS Construction Helper for creating the needed resources. AKS Construction Helper a tool for simplifying the deployment of Azure Kubernetes Service (AKS) clusters. The AKS Construction Helper is an open-source project hosted on GitHub and available here. The AKS Construction Helper offers a variety of options to customize your AKS deployment. You can choose the region and the size of the nodes in your cluster, as well as the number of nodes and the version of Kubernetes to use. In addition, you can specify the maximum and minimum number of nodes in your cluster, as well as the maximum and minimum number of pods per node. The AKS Construction Helper also offers several deployment options. You can deploy your cluster using the Azure Portal, the Azure CLI, Terraform, ARM, Bicep, or a configuration file written in either YAML or JSON. This flexibility allows you to choose the method that best fits your workflow and your team’s needs. Overall, the AKS Construction Helper is a valuable tool for anyone looking to deploy and manage AKS clusters quickly and easily.
Step 1: Choose your principles and options
We will go with the following “Simples bare-bones cluster” and “Simple cluster with no additional access limitations” security and operations principles for demo purposes. Keep in mind that these are not configuration options you should ever use in production environments. Fill in the resource and resource group names to your liking, as well as the Azure region to deploy the resources to. Furthermore, we choose the option to create a “Basic” Azure Container Registry, and make sure that the deployment user is granted the “acrPush” role, which gives us permission to push images to the Azure Container Registry (ACR) associated with the cluster. The generated output for “Command Line” should look something like the code below:
# Create Resource Group
az group create -l WestEurope -n rg-t-pokemon-001

# Deploy template with in-line parameters
az deployment group create -g rg-t-pokemon-001  --template-uri https://github.com/Azure/AKS-Construction/releases/download/0.9.6/main.json --parameters \
	resourceName=aks-t-pokemon-001 \
	JustUseSystemPool=true \
	registries_sku=Basic \
	acrPushRolePrincipalId=$(az ad signed-in-user show --query id --out tsv) \
	enableTelemetry=false \
	fileCSIDriver=false \
	diskCSIDriver=false
This code creates an Azure resource group and then uses the Azure Deployment Manager to deploy an AKS cluster. The resource group is created using the az group create command, which creates a resource group named “rg-t-pokemon-001” in the West Europe region.
The AKS cluster is deployed using the az deployment group create command and a JSON template file hosted on GitHub. The command specifies the resource group to deploy to, the URL of the JSON template file, and a set of parameters to pass to the template. These parameters include the name of the AKS cluster, the size of the virtual machine nodes in the cluster, and various other options for configuring the cluster. The acrPushRolePrincipalId parameter is set to the ID of the signed-in user, which gives that user permission to push images to the Azure Container Registry (ACR) associated with the cluster.
The enableTelemetry and fileCSIDriver parameters are both set to false, which disables telemetry data collection and the file-based Container Storage Interface (CSI) driver. The diskCSIDriver parameter is also set to false, which disables the disk-based CSI driver.
Step 2: Deploy the resources with Azure Cloud Shell
Head over to the Azure Cloud Shell and login with your credentials. Make sure you choose the right subscription that you want to deploy to. You can validate if you’ve chosen the right subscription by running the az account show command in the Azure Cloud Shell, and you can switch to another subscription by running the az account set --subscription "SubscriptionName" command.
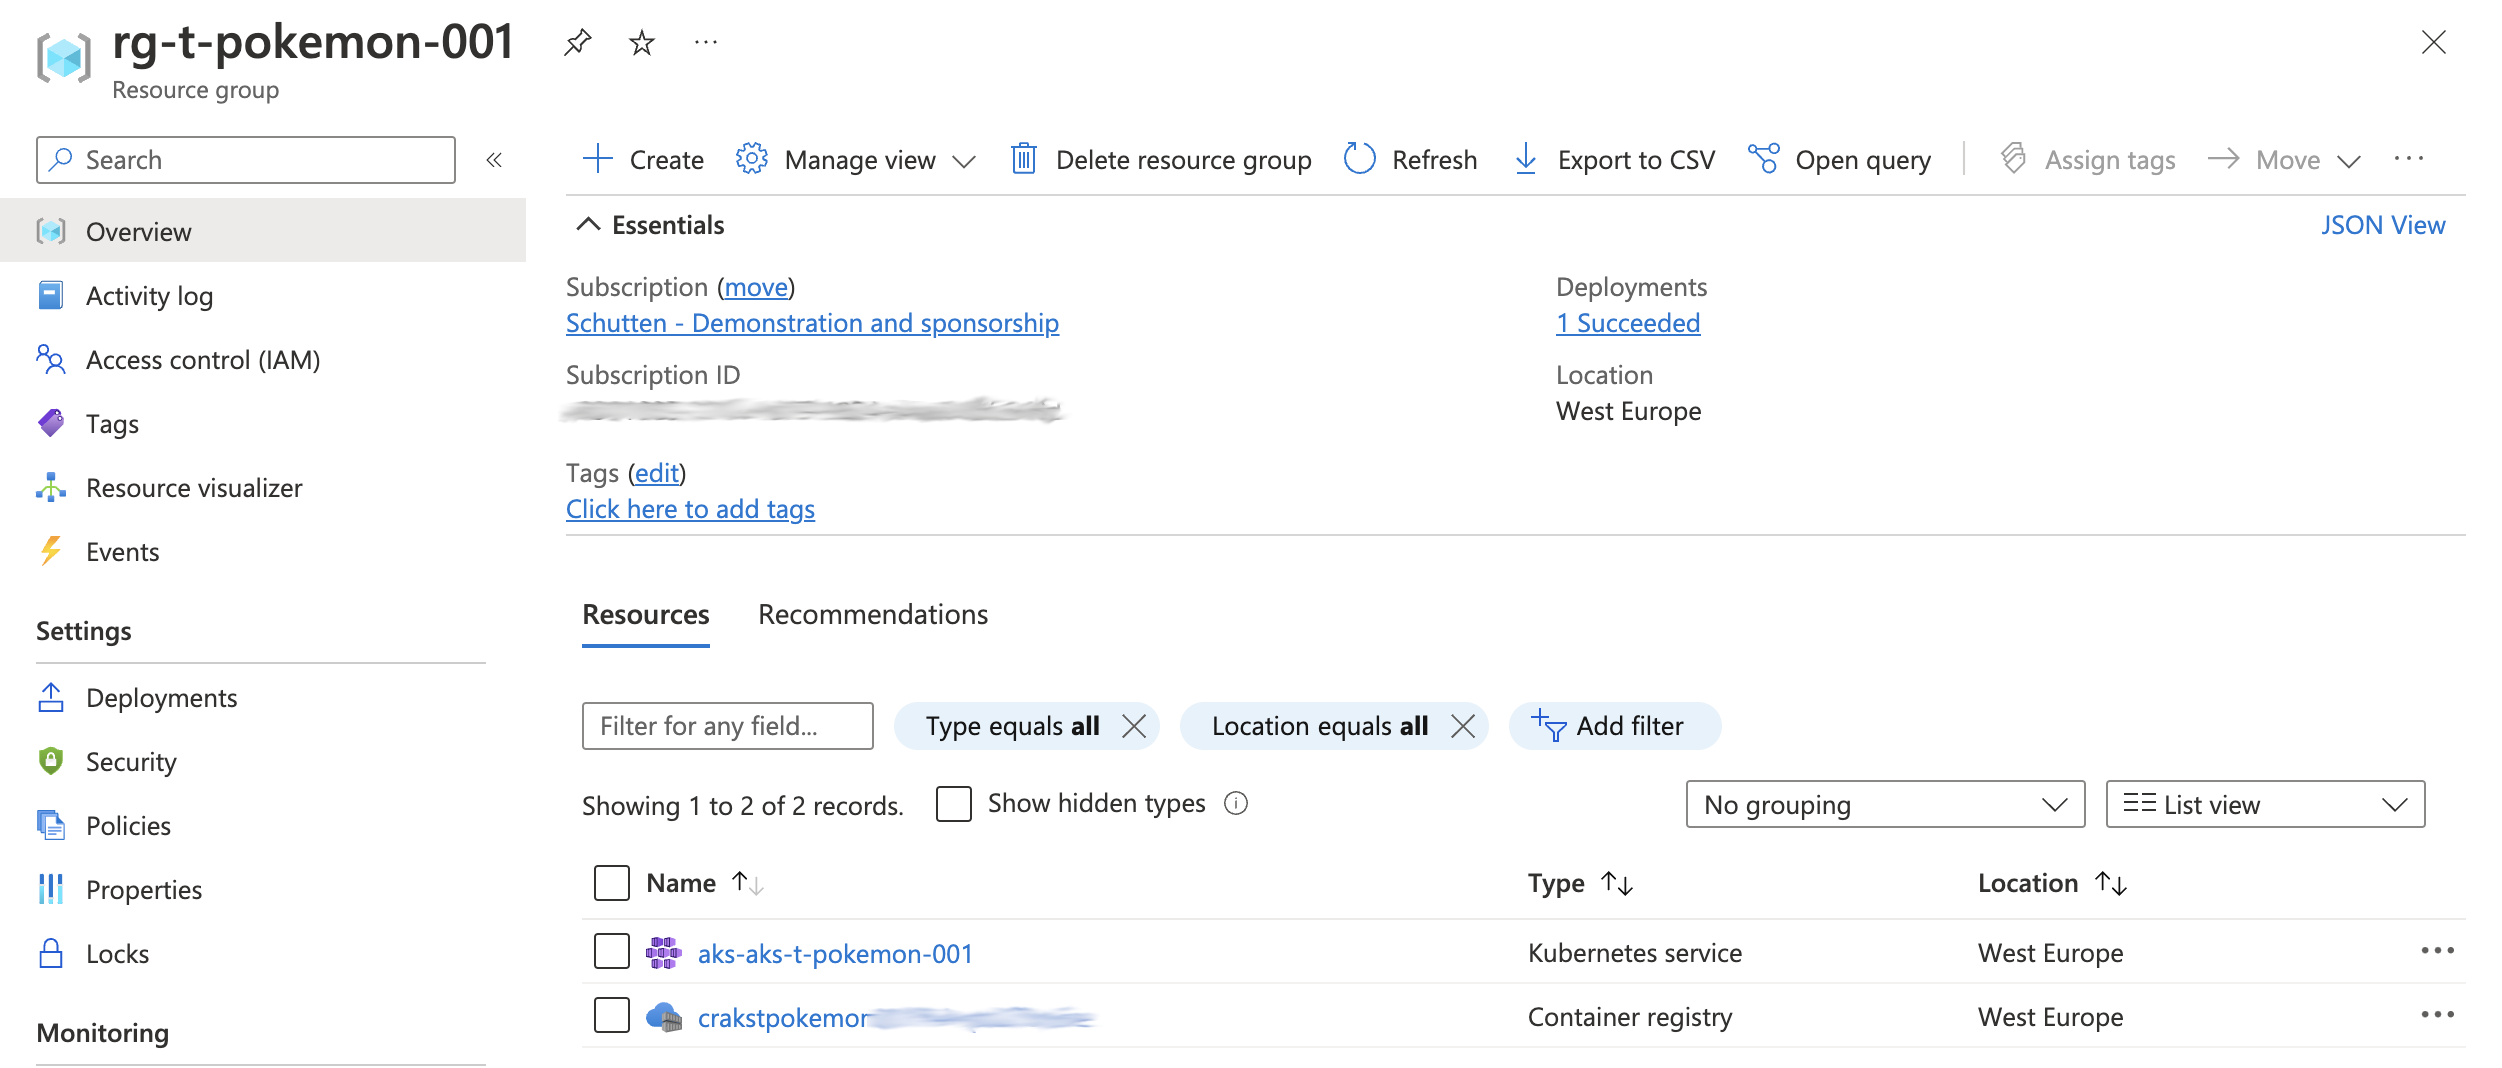
Once you’ve chosen the right subscription, run the two commands from step 1. When the deployment is done, you should’ve successfully created your AKS cluster and ACR in a new resource group.
Containerize and deploy with Azure Draft and GitHub Actions
To containerize the Pokédex app we’ve created earlier, we will use Azure Draft and deploy it using GitHub Actions. Azure Draft is a tool for simplifying the process of containerizing applications and deploying them to Azure Kubernetes Service (AKS). Azure Draft is an open-source project hosted on GitHub and can be found here. Azure Draft is designed to make it easy for developers to containerize their applications and deploy them to AKS. It does this by providing a set of tools and templates that automate common tasks, such as building Docker images, creating Kubernetes manifests, and setting up continuous delivery pipelines. To use Azure Draft, you simply need to install it on your local machine and then run a few simple commands. The tool will take care of the rest, including creating a Dockerfile and a Helm chart for your application, as well as setting up a continuous delivery pipeline using GitHub Actions.
Step 1: Install the latest release of Azure Draft
Open your terminal and cd to your directory where you want to download/install Azure Draft. Within that directory, run the following commands:
git clone https://github.com/Azure/draft.git
cd draft/
make
mv draft $HOME/go/bin/
Or install it using HomeBrew by running the following commands:
$ brew tap azure/draft
$ brew install draft
Step 2: Create the Dockerfile and Kubernetes manifests
Open your terminal and cd to the directory that holds your pokedex-app. If you followed this guide step-by-step, this folder should be called “pokedex-app”. Within that directory, run the following command:
draft create
When prompted to choose a deployment option, choose manifests. When prompted to enter the port exposed in the application, write 3000. This is the default for ReactJS. It should take a couple of seconds to run. When completed, you see that Azure Draft has created a Dockerfile file and a manifests folder, containing two YAML-files.
Open the generated files and validate them. Azure Draft is a tool to make your life easier, but you can’t fully rely on tools. In my case I had to change the node version (from 10 to 16), on the top line of my Dockerfile. Your Dockerfile should look similar as shown below:
FROM node:16
ENV PORT 3000
EXPOSE 3000

RUN mkdir -p /usr/src/app
WORKDIR /usr/src/app
COPY package.json .
RUN npm install
COPY . .

CMD ["npm", "start"]
If you want to validate the Dockerfile and make sure the app is running correctly, you could locally build and run the docker container on your device. For the build you would run the docker build command, and for running the container you would use the docker run command. Obviously, you’ll need Docker installed on your local device to do so.
Step 3: Create your Git repository and setup your OIDC connection
First, open your webbrowser and go to GitHub.com. Create a new repository.
Now, go back to your terminal and, if you aren’t within the pokedex-app directory already, cd to this directory. Within this directory, run the following command:
draft setup-gh
When prompted, choose the azure provider, fill in an app registration name, choose the subscription ID where your AKS and ACR are deployed to, fill in the resource group name (in our case rg-t-pokemon-001), and fill in your organization (or username) and repository name on GitHub. If all information was provided correctly, the OIDC (Open ID Connect) connection should be setup in a matter of seconds. You can validate this by looking up the app registration in your Azure Active Directory, and going into your Secrets>Actions, under repository settings on GitHub.
Step 4: Generate the GitHub Actions workflow
Open your terminal and, if you aren’t within the pokedex-app directory already, cd to the pokedex-app directory. Within this directory, run the following command:
draft generate-workflow
When prompted, fill in the resource names and the name of the resource group. Name the container to your liking, I named it “pokedex-front-end”. Lastly, it will prompt you to enter the name of the repository branche to deploy from. For demonstration purposes it’s allright to fill in the “main” branche.
Step 5: Push your code and trigger the workflow
Open your terminal and make sure you are within the pokedex-app directory. Within this directory, run the following commands:
git init
git add .
git commit -m "Initial commit"
git branch -M main
git remote add origin https://github.com/<organization name>/<repository name>.git
# For example:
# git remote add origin https://github.com/rolfschutten/pokedex-aks.git
git push -u origin main
If done correctly, our application files, Dockerfile, manifest files, and GitHub Actions workflow is pushed to our GitHub repository. Because the generated GitHub Actions workflow has a trigger on the branch we pushed the files to, it will automatically trigger and start running. You can validate and observe this under the “Actions” tab within your GitHub repository.
Behold your containerized application
Now that we’ve written the application, deployed the infrastructure, containerized the app with Azure Draft, and deployed it from GitHub Actions to our AKS cluster, it’s time to review the application in its new containerized form.
Head over to the Azure Cloud Shell and login with your credentials. Make sure you choose the right subscription where you’ve deployed the AKS cluster to, that holds your application. Run the following command to list all services within the default namespace:
kubectl get services
Among the values that are returned in the terminal is, among other things, a public IP address. This is the IP address of your application. This is created from the “service.yaml” manifest file. Open your web browser and go to http://. If everything went well, you should now see the Pokédex app in your web browser. Congratulations, you have successfully coded, containerized and deployed your Pokédex app to an AKS cluster.
Clean up the resources
We will remove all resources created during this guide to save costs and keep an overview of your environment. Head over to the Azure Cloud Shell and login with your credentials. Remove the resource group, including all the resources. It’ll prompt you for confirmation. When removing the AKS cluster resource, which is included in the deleted resource group, Azure will automatically delete the other resource group (containing the virtual network, load balancer, etc.).
az group delete --name rg-t-pokemon-001
You can log out of the Azure CLI after. Don’t forget to delete the GitHub repository as well, if you have no use for it anymore. You can do so by clicking the “Delete this repository” button under Settings>General of your GitHub repository.
Summary
We went through the Azure Draft tool, used it to containerize our self-made Pokédex ReactJS application, created an OIDC-connection to GitHub and created a GitHub Actions workflow with Azure Draft, and used this to deploy the app to our infrastructure. There’s so much more to learn when it comes to containerization and Kubernetes. Check out some of these resources to help you forward:
- Azure Draft: A day 0 tool for getting your app on k8s fast
- Draft for Azure Kubernetes Service (AKS)
- AKS Construction Helper
- AKS landing zone accelerator
- Kubernetes Documentation Thank you for taking the time to go through this post and making it to the end. Stay tuned because we’ll keep continuing providing more content on this topic in the future.