
We all know the struggle of switching from tenant to tenant, the endless vaults and registers with credentials, carrying out the same (management) activities over and over again in different environments, and simply missing a centralized view of all (customer) environments.
With Azure Lighthouse, multiple tenants can be managed, automated, and scaled, with improved governance in resources and tenants.
In this blog, I will explain roughly what Azure Lighthouse is, why you want to use it, and provide a quickstart on how you implement it.
What is Azure Lighthouse?
“Azure Lighthouse offers service providers a single control plane to view and manage Azure across all their customers with higher automation, scale, and enhanced governance. With Azure Lighthouse, service providers can deliver managed services using comprehensive and robust management tooling built into the Azure platform. This offering can also benefit enterprise IT organizations managing resources across multiple tenants.” — What is Azure Lighthouse? — Azure Lighthouse | Microsoft Docs
The above quote sounds great, but it is still a bit cryptic. What it’s trying to tell is that Azure Lighthouse offers several ways to simplify management and improve engagement with customers. With delegated management, the management of your customers’ Azure resources can be done securely from the service provider’s tenant, without having to switch contexts and control planes. Customer subscriptions and resource groups can be delegated to specified users and roles in the managing tenant, with the option to remove access if necessary. Lighthouse provides the ability to collect resources that sit under one Azure AD tenant and project them into another tenant.
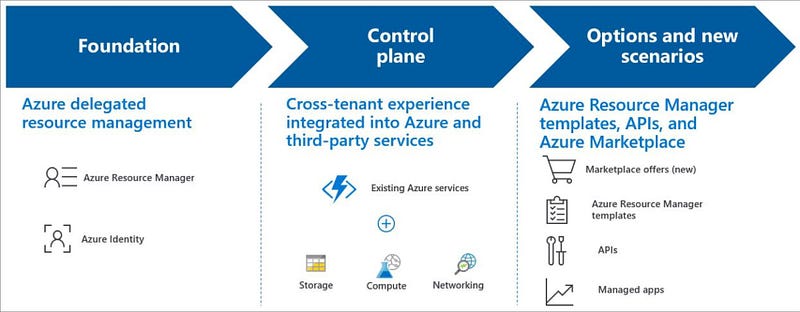 Picture by Microsoft on Microsoft Docs
The Azure portal integration with Lighthouse provides cross-tenant information on the “My Customers” page in the Azure portal. For customers, there is an associated service providers page, where they can view and manage access from their service provider.
Why should I use Azure Lighthouse?
The “What” section of this blog covered some of the reasons why you should be thrilled to use Azure Lighthouse. Azure Lighthouse helps the service provider (or shared services center) build and deliver managed services efficiently.
Azure Lighthouse eliminates the need to add guest user accounts in the customer’s Azure Active Directory. Customers are often against this because of security, privacy, and compliance requirements. With the delegated resource management capabilities the service provider is still able to access and manage the environment. This also makes it possible to manage from one view, without and instead of having to switch between tenants.
Furthermore, it enables existing APIs, management tools and workflows to be used with delegated resources, including machines hosted outside of Azure, regardless of the regions they are in. This makes customer engagement and lifecycle activities to manage customer resources simpler and more scalable.
Through Azure Lighthouse, customers enjoy the convenience of one central point to see what access service providers have to the customer’s subscription. Customers maintain visibility and precise control over the scopes they delegate for administration and the permissions they are allowed. They can monitor the actions of the service provider and remove access completely if and when desired.
There are also some other advantages, for example, the transparent provision of applications via the marketplace where the responsibility for management and support must be retained. For these and other detailed features, it is best to consult the Microsoft documents here.
And to top it all off: there is no additional cost to use Azure Lighthouse to manage Azure resources. Any Azure customer or partner can use Azure Lighthouse!
 Photo by Allen Cai on Unsplash
How can I start using Azure Lighthouse?
In this quickstart, you will setup Azure Lighthouse using PowerShell and Azure Resource Management (ARM) templates (JSON).
Before you start, here are some requirements:
- You will need a valid subscription in your admin tenant.
- You will need a native user account with the “Owner” role in the tenant you want to manage.
- You will need the Azure AZ PowerShell module.
Step 1: Retrieve information from your admin tenant.
First, we will be opening a PowerShell prompt, import the AZ module, connect to Azure, and log in to our Azure tenant, using the commands below:
Import-Module Az
Connect-AzAccount
Later on, we will need the tenant ID. To retrieve it we are using the following command and save the output for later:
Get-AzTenant
We will now set a group that will get the permissions to manage the customer subscription. I will be using the default Azure group ”AdminAgents” as an example, but you can create your own group. Execute the following command and save the output, as we will be needing this PrincipalId later on.
(Get-AzADGroup -DisplayName 'AdminAgents').id
If you consider adding multiple roles you can run this command for each group that you want to add.
We will now set the role for the subscription that we want to manage. This role will be applied to all resources in the target subscription. Execute the following and save the output, as we will be needing this roleDefinitionId later on.
(Get-AzRoleDefinition -Name 'Contributor').id
If you consider adding multiple roles you can run this command for each role that you want to add.
Good to know:* The roles “Owner” and “User Access Administrator” are not allowed!*
Step 2: Connect and select customer subscription.
We are now done in the admin tenant and will be moving on and connect to the customer using the following Azure PowerShell command:
Connect-AzAccount
Before we register a resource provider, we should make sure we have selected the right subscription. Execute the following command:
Get-AzContext
If the returned value is not the subscription you want to manage then we will need to select the right subscription first. If you do have the right subscription selected, you can skip the part below.
First, we need to lookup the current subscriptions in this tenant using the first command. Secondly, we will select it with the output (subscriptionId) from the first command, using the second command.
# First command, lookup current subscriptions in this tenant
Get-AzSubscription

# Second command, select the right subscription in this tenant
Set-AzContext -Subscription <subscriptionId>
We now have selected the right subscription and can move forward to delegate resource management.
Step 3: Link and delegate resource management.
Now we will be needing 2 files; a template file and a parameters file.
Copy or download these files to your download folder or to a folder of your choice.
Good to know:* Microsoft published this repository on GitHub containing templates/samples to help you use Azure Resource Manager to configure Azure delegated resource management and to configure monitoring and management of customer environments. These templates can be used to onboard a customer to Azure Lighthouse and can be deployed manually, or directly in the Azure portal by a click on the buttons.*
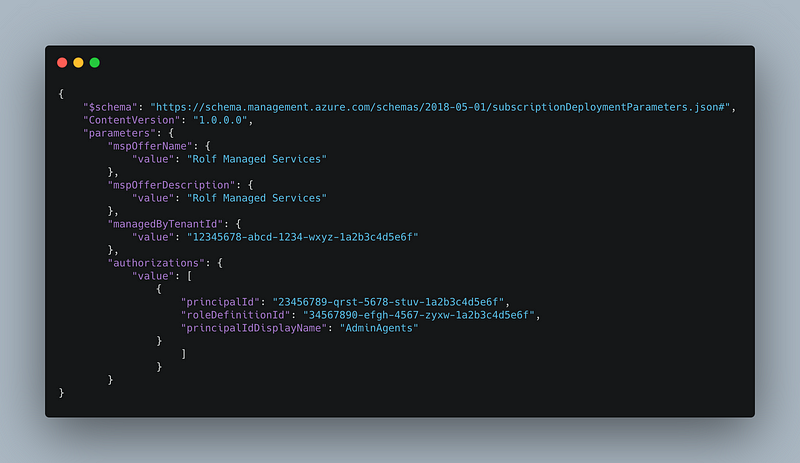
In the parameters file we need to edit the following fields:
- mspOfferName: Your company name. This will be visible to the customer.
- **mspOfferDescription: **A description of your company or services.
- managedByTenantId: Your (admin) Azure Tenant ID from step 1.
- **PrincipalId: **Your PrincipalId from step 1.
- **PrincipalIdDisplayName: **Your group name from step 1.
- **RoleDefinitionId: **Your roleDefinitionId from step 1.
After you applied your changes the parameters file should look like this:
Now it’s finally time to deploy the template file with the parameters file. Just run the following command in PowerShell. Don’t forget to change the path if you saved the files in a different folder.
New-AzDeployment `

-Name LightHouse `

-Location westeurope `

-TemplateFile "<your folder>\delegatedResourceManagement.json" `

-TemplateParameterFile "<Your folder>\DelegatedResourceManagement.parameters.json" `

-Verbose
Step 4: Verify and manage!
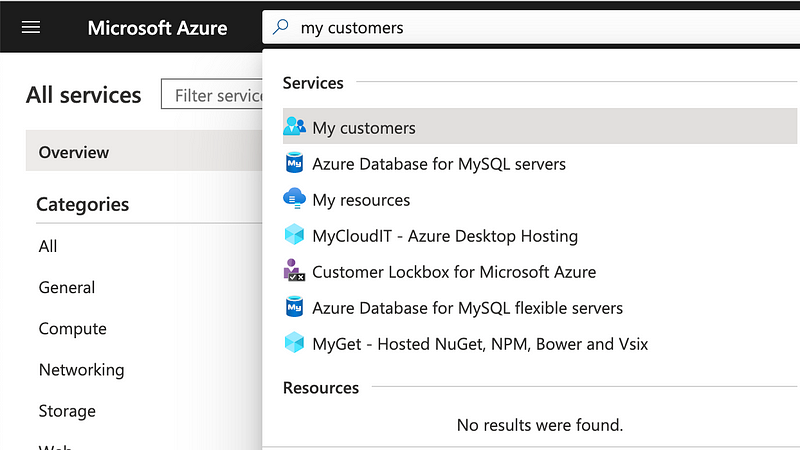
We should verify if the link has been established successfully. We can do so by going to the “My customers” section in the Azure portal by searching for it using the search bar. Here you can verify the connection.
You are now ready to start managing! You can select the subscription that you want to manage by going to the Directory + subscription button on the right top in the Azure portal and select the desired subscriptions.