
A multi-cloud strategy allows organizations to use different cloud services from different providers.
Some cloud platforms focus on certain services or have integrated solutions that may be better than others. In addition, nowadays organizations are still “bothered” by legacy applications. These applications need a conventional infrastructure and are usually still running on proprietary on-premise hardware. Or there are organizations that are still at the forefront of their cloud journey, and can’t or don’t wish to migrate in one go. All understandable and inevitable, but how does an organization keep control of all those different infrastructures, while not compromising the potential of the Azure cloud? Azure Arc may be the answer for you.
In this blog, I will explain roughly what Azure Arc is, why you want to use it, and provide a quickstart to get you going.
What is Azure Arc?
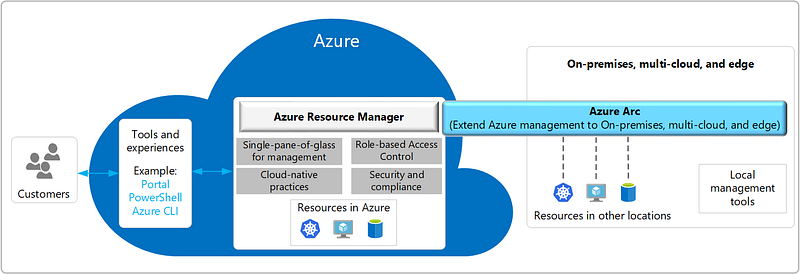
“Azure Arc simplifies governance and management by delivering a consistent multi-cloud and on-premises management platform. Azure Arc enables you to manage your entire environment, with a single pane of glass, by projecting your existing resources into Azure Resource Manager. You can now manage virtual machines, Kubernetes clusters, and databases as if they are running in Azure. Regardless of where they live, you can use familiar Azure services and management capabilities. Azure Arc enables you to continue using traditional ITOps, while introducing DevOps practices to support new cloud native patterns in your environment.” — Azure Arc overview — Azure Arc | Microsoft Docs
Azure Arc extends Azure Resource Manager, Microsoft’s deployment and management service on Azure, to on-premises, edge, and multi-cloud environments. With Azure Arc, it is possible to manage multiple clouds (for example Azure and AWS) and on-premise environments from one portal, such as the Azure Portal, Azure Lighthouse, and/or various scripting tools. Furthermore, you’ll be able to deploy Azure services to any infrastructure and extend Azure management to them.
 Picture by Microsoft on Microsoft
Docs
Picture by Microsoft on Microsoft
Docs
If you are a service provider, you will be happy to hear that Azure Arc also integrates into Azure Lighthouse. If you are not familiar with Azure Lighthouse, you can read my blog about Azure Lighthouse.
Why should I use Azure Arc?
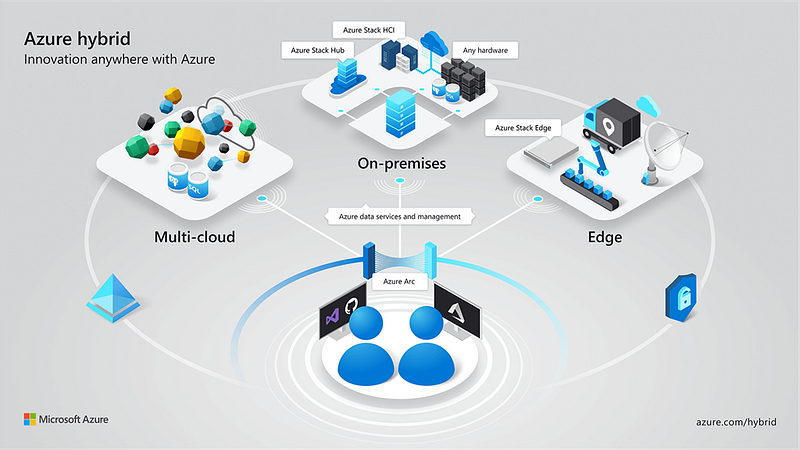
As said in the introduction of this blog, many organizations run a mix of applications on-premise, in the cloud, and at the edge. These applications and (cloud) platforms each have their own portals, management tooling, etc. This makes the IT landscape complex and therefore less manageable, less scalable, and inefficient. Azure Arc eliminates this complexity by using the single pane of glass mentioned earlier in this article. As a result, Azure Arc contributes directly to reduced complexity, improved scalability, visibility, and manageability, and indirectly to improved security, efficiency, and compliance.
 Photo by
 In addition to the aforementioned benefits, one of the main benefits of Azure Arc is the ability to take Azure services outside of Azure. This allows native Azure tools such as Azure Policy and Azure Resource Graph to be used with both traditional and cloud workloads. With Azure Arc, you benefit from the latest cloud innovation and automation, with uniform management regardless of the location in your hybrid infrastructure. During the initial release, Azure Arc included AI services, automation services, availability services, cost management, data services, DevOps services, Kubernetes management, security services, and compliance services. More Azure services will be available over time through Azure Arc.
 Picture by Microsoft on Azure.Microsoft.com
And to top it all off; Azure Arc is offered at no additional cost when managing Azure Arc enabled servers. Add-on Azure management services (Azure Monitor, etc.) may be charged differently for Azure VMs or Azure Arc enabled servers. Service by service pricing is available on the Azure Arc pricing page.
How can I start using Azure Arc?
There are many different deployment scenarios for Azure Arc. In this quickstart, we will be looking into deploying and configuring the Connected Machine agent on your Windows or Linux machine hosted outside of Azure, for educational purposes and to get some feeling with Arc’s potential. For other scenario’s there is this great website Azure Arc Jumpstart, which offers detailed guides, automation, code samples, screenshots, and everything you really need to get going with Azure Arc.
Before you start, here are some requirements:
- You need an Azure subscription. If you don’t have one, you can create one for free. You also need to be a member of the “Azure Connected Machine Onboarding” and “Azure Connected Machine Resource Administrator” roles.
- Your target machine needs to be running a supported operating system. You also need administrator permissions on the target machine.
- The Connected Machine agent for Linux and Windows communicates outbound securely to Azure Arc over TCP port 443. If the machine connects through a firewall or proxy server to communicate over the Internet, please read this article to understand the network configuration requirements.
Step 1: Generate installation script.
First, we will be opening the Azure Cloud Shell, and we will register the Microsoft.HybridCompute and Microsoft.GuestConfiguration resource providers in our subscription to Azure Arc, using the commands below:
az account set --subscription "<Your Subscription Name>"
az provider register --namespace 'Microsoft.HybridCompute'
az provider register --namespace 'Microsoft.GuestConfiguration'
Next, we will be generating an installation script to automate the download, installation, and establish the connection with Azure Arc.
Go to the “Servers — Azure Arc” section in the Azure portal by searching for it using the search bar.

Here we can generate a script to onboard the target server. Choose “Add” and pick the option “Add servers using interactive script”. You will then be asked to fill in the subscription and resource group where you want the machine to be managed within Azure and to select an Azure region where the machine metadata will be stored. This location does not have to be in the same region as the resource group’s location.
Now you can download or copy your script.
Step 2: Run the script, install the agent.
For Windows servers, it’s as easy as executing the *./OnboardingScript.ps1 *on the target server, within an elevated 64-bit PowerShell command prompt. Make sure you change to the folder or share that you copied the script to.
For Linux servers that can directly communicate to Azure, run the following command:
bash ~/Install_linux_azcmagent.sh
If the target machine communicates through a proxy server, run the following command:
bash ~/Install_linux_azcmagent.sh --proxy "<proxy-url>:<port>"
Step 3: Verify and manage!
We should verify if the server has been connected successfully to the Arc service. We can do so by going to the “Servers — Azure Arc” section in the Azure portal by searching for it using the search bar. Here you can see the connected server resources.
You have now enabled your Linux or Windows hybrid machine and successfully connected to the Arc service.