In this blog, we will learn about managing and scaling Kubernetes clusters at a large scale, using Azure Kubernetes Fleet Manager. This blog also covers the implementation of Azure Kubernetes Fleet Manager with Terraform.
Introduction
A lot of organizations face challenges when managing and scaling large-scale Kubernetes clusters. These challenges include complex cluster management, scalability and elasticity, configuration consistency, application deployment and management, monitoring and observability, and team collaboration.
Azure Kubernetes Fleet Manager is a service provided by Microsoft Azure that helps manage and scale Kubernetes clusters at a large scale. It simplifies the deployment, management, and monitoring of multiple Kubernetes clusters across different environments and regions. The goal of Azure Kubernetes Fleet Manager is to streamline the management of fleets of clusters, making it easier for organizations to operate large-scale Kubernetes deployments. Azure Kubernetes Fleet Manager is meant to solve at-scale and multi-cluster problems of Azure Kubernetes Service (AKS) clusters.
Azure Kubernetes Fleet Manager
With Azure Kubernetes Fleet Manager, organizations can efficiently manage and operate a fleet of Kubernetes clusters. It provides centralised control and visibility into the entire fleet, making it easier to deploy applications, manage configurations, and monitor the health and performance of clusters. Scaling and orchestrating Kubernetes clusters across multiple environments and regions can be complex. Azure Kubernetes Fleet Manager simplifies this process by providing a unified interface to manage cluster deployments, scaling, and updates. It allows organizations to scale clusters up or down based on demand, ensuring optimal resource utilisation. Deploying and managing multiple Kubernetes clusters manually can be time-consuming and error-prone. Azure Kubernetes Fleet Manager automates various tasks, such as cluster provisioning, configuration management, and application deployment. This automation improves efficiency, reduces human error, and allows organizations to focus on higher-value activities.
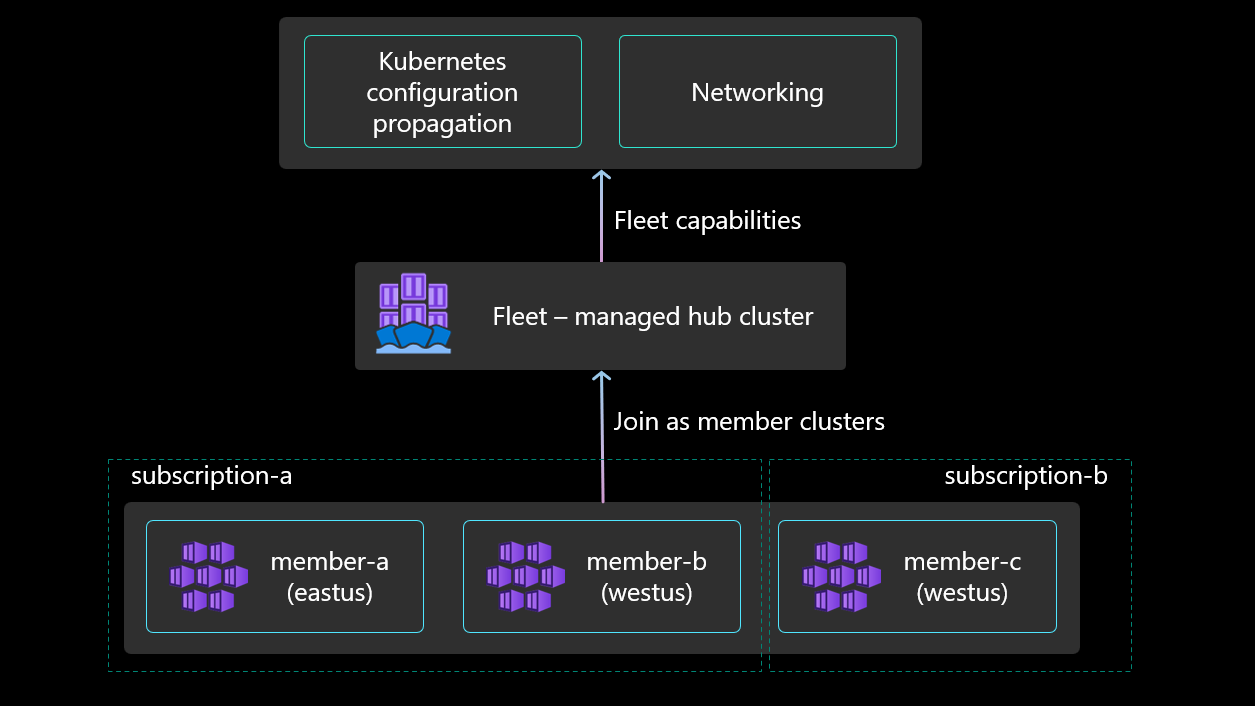
Fleet Manager supports joining various types of existing AKS clusters as member clusters. These include:
- AKS clusters within the same subscription, across the same or different resource groups.
- AKS clusters from different subscriptions within the same Azure AD tenant.
- AKS clusters from different regions, as long as they belong to the same tenant.
While Azure Kubernetes Fleet Manager provides powerful fleet management capabilities, there are a few considerations to keep in mind.
- During the preview phase, it is possible to add up to 20 AKS clusters as member clusters to a single fleet resource. When a cluster is joined to a fleet resource, a MemberCluster custom resource is automatically generated on the fleet. The scalability of Azure Kubernetes Fleet Manager is subject to the resource limits imposed by the Azure platform. It is essential to review and understand the resource limits to ensure they align with the desired fleet size and application requirements.
- Managing a fleet of Kubernetes clusters using Azure Kubernetes Fleet Manager requires familiarity with Kubernetes concepts and Azure services. Organizations may need to invest time and resources in training their teams to effectively utilise the service.
- Azure Kubernetes Fleet Manager focuses primarily on managing the lifecycle and configuration of Kubernetes clusters at scale. It can facilitate managing and orchestrating updates across multiple member clusters, but these updates typically involve the cluster-level configuration and settings rather than application-specific deployments. To propagate application deployments across different member clusters, you would still rely on other tools or mechanisms specific to Kubernetes, such as Kubernetes Deployment resources, Helm charts, or GitOps-based workflows. These trusted tools help you define and manage the desired application deployments and ensure their consistent rollout across multiple clusters.
- Like any cloud service, Azure Kubernetes Fleet Manager is subject to occasional downtime or service interruptions. It is advisable to review the Azure service-level agreements (SLAs) to understand the availability guarantees and plan for contingencies accordingly.
Multi-cluster update orchestration
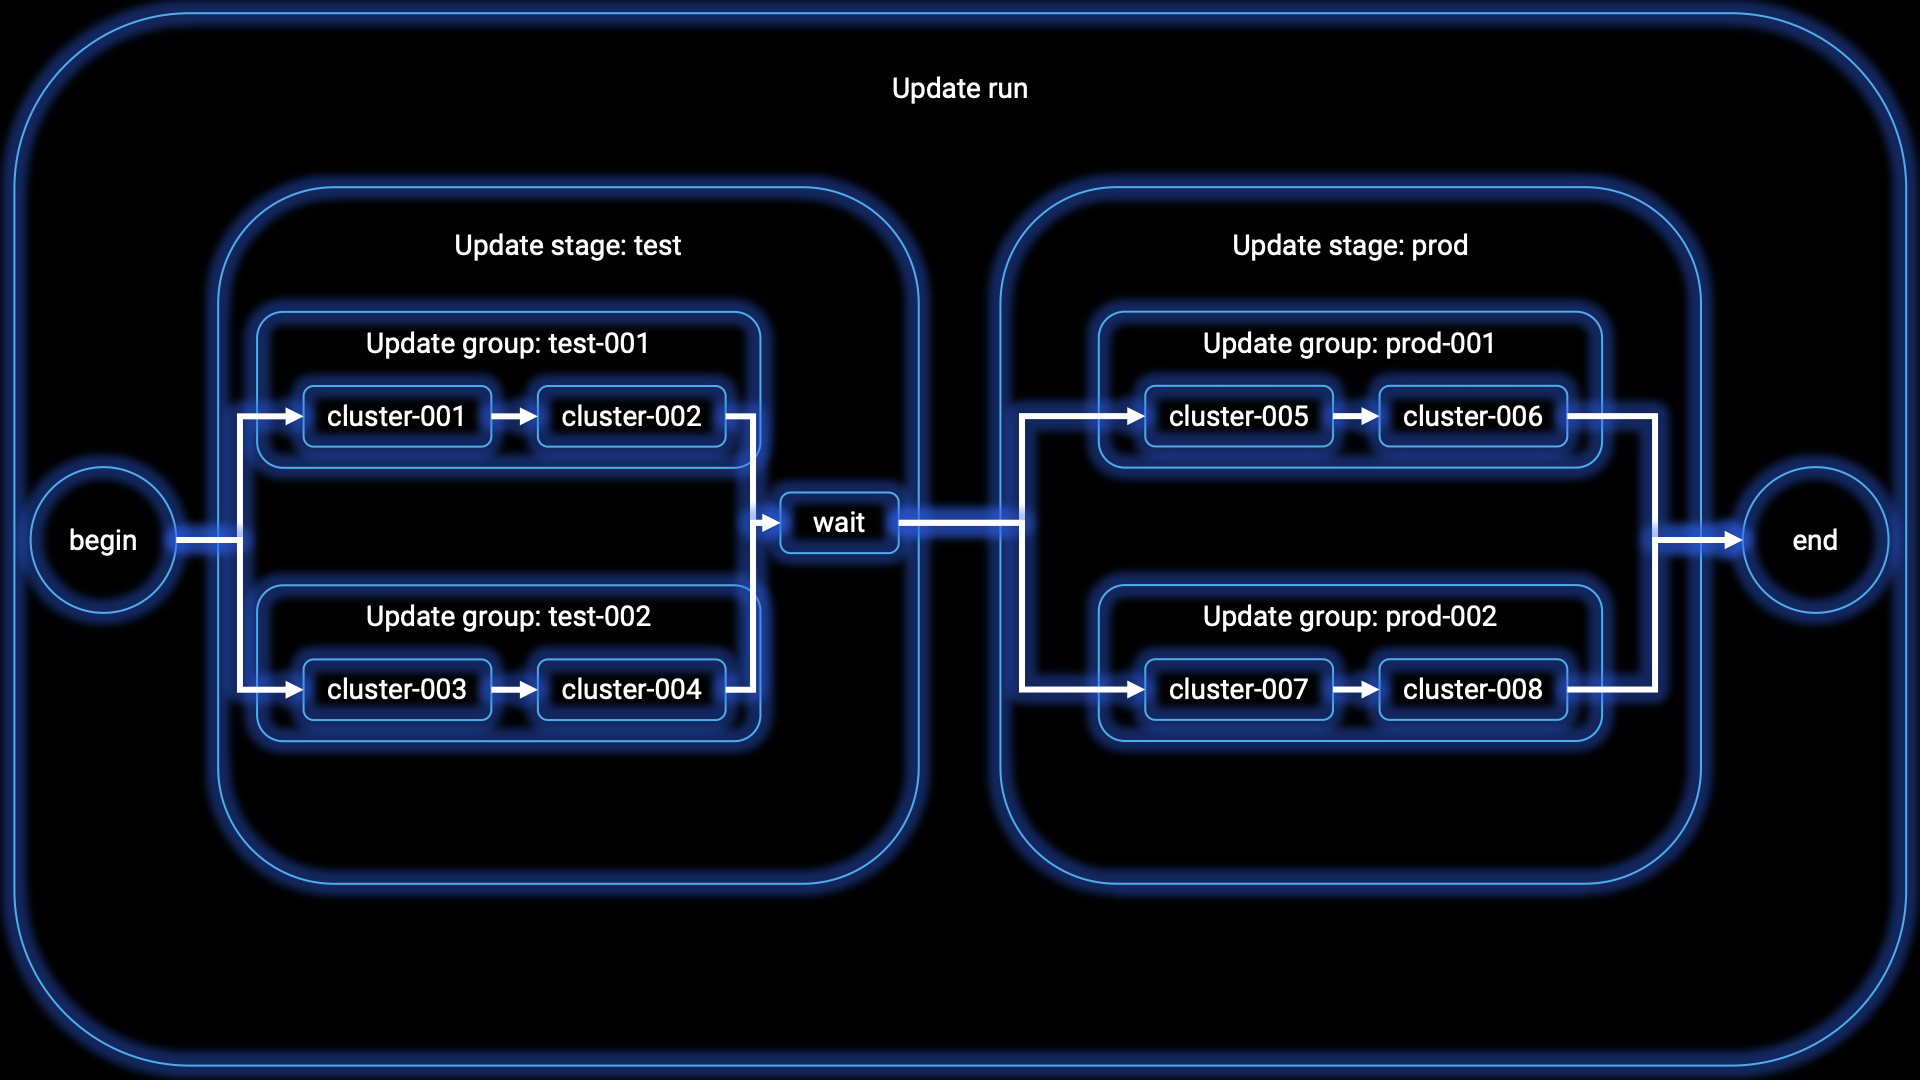
AKS and platform administrators, who are responsible for managing large Kubernetes fleets, often face challenges when it comes to safely and predictably staging updates across multiple clusters. To address this issue, Fleet Manager offers the capability to orchestrate updates through the use of update runs, stages, and groups. The following scenario’s are currently supported:
- Update Group: A group of AKS clusters where updates are performed sequentially, one after another. Each member cluster within the fleet can only belong to one update group.
- Update Stage: Update stages enable the grouping of update groups that need to be updated in parallel. They can also define the wait time between different sets of update groups.
- Update Run: An update run applies updates to a collection of AKS clusters either sequentially or in a stage-by-stage manner. An update run can be started, stopped, and managed. It allows for upgrading clusters one-by-one or using update stages and groups for a stage-by-stage upgrade process.
Currently, the only supported update operations for clusters are upgrades. Within upgrades, there are two options: upgrading both the Kubernetes control plane version and the node image, or upgrading only the node image. For node image upgrades, it is currently possible to upgrade to the latest available node image for each cluster.
These update features in Fleet Manager provide administrators with the necessary tools to efficiently manage and control the update process across their Kubernetes clusters, ensuring safe and predictable updates across the fleet.
Kubernetes configuration propagation
Before the introduction of Azure Kubernetes Fleet Manager, AKS administrators faced challenges related to Kubernetes resource propagation. Resource propagation refers to the process of distributing or replicating Kubernetes resources (such as objects and configurations) across multiple clusters or namespaces. It involves ensuring that the desired resources are consistently available and synchronised across the specified targets.
Previously, AKS administrators had to manually create Kubernetes namespaces based on application teams' requirements. Additionally, administrators had to determine which clusters could fulfil these namespace requirements and even create new clusters if necessary. With the implementation of Azure Kubernetes Fleet Manager, AKS administrators now have access to ‘ClusterResourcePlacement’, a feature that addresses these challenges. This is particularly useful in scenarios where organizations have multiple AKS clusters or namespaces and want to ensure uniformity and consistency across them. By propagating resources, organizations can simplify management, enforce consistent configurations, and achieve desired behavior across their cluster fleet.
ClusterResourcePlacement within Azure Kubernetes Fleet Manager helps administrators manage the distribution and synchronization of resources, ensuring that they are consistently propagated to the desired targets in a controlled and predictable manner. ClusterResourcePlacement consists of two key components:
- Resource selection: AKS administrators can selectively choose which resources are propagated among member clusters in the Fleet. This selection is based on metadata from each individual cluster, allowing administrators to have granular control over resource propagation.
- Target cluster selection: Administrators can also specify the member clusters to which resources should be propagated. They have the flexibility to select all clusters or a subset of member clusters based on defined characteristics, which are established as part of a policy.
By utilising Azure Kubernetes Fleet Manager’s ClusterResourcePlacement feature, AKS administrators can overcome the hurdles associated with Kubernetes resource propagation. They gain the ability to efficiently manage resource distribution among clusters, ensuring better control and alignment with application requirements.
Multi-cluster load balancing
The primary motivation behind deploying resources in cloud environments is the high level of resiliency and availability they offer. Azure Kubernetes Service (AKS) leverages the robust infrastructure resources of Azure to provide exceptional resiliency and availability. In order to enhance these capabilities, organizations that deploy large-scale AKS deployments often require the ability to distribute incoming traffic across multiple AKS clusters. These clusters are typically situated in different regions, and this setup ensures resiliency in case of cluster failures or resource unavailability in a specific region.
To address this need, Azure Kubernetes Fleet Manager offers the functionality to configure Layer 4 multi-cluster load balancing across workloads deployed across a fleet’s member clusters. This allows organizations to efficiently distribute incoming traffic across multiple clusters for their workloads and services, further enhancing the resiliency and availability of their AKS deployments.
In order to facilitate multi-cluster load balancing, Fleet Manager requires the target clusters to utilize Azure CNI networking. This networking configuration allows pod IPs to be directly reachable within the Azure virtual network, enabling routing through the Azure Load Balancer.
The propagation of the ‘ServiceExport’ from the fleet cluster to a member cluster can be achieved using the Kubernetes resource propagation feature, or it can be directly created on the member cluster. Once the ServiceExport resource is established, it triggers the creation of a ‘ServiceImport’ on the fleet cluster, as well as on all other member clusters. This process ensures that the service is acknowledged and accessible across the entire cluster fleet. Next, users can create a ‘MultiClusterService’ custom resource to indicate their intent to set up Layer 4 multi-cluster load balancing. This configuration results in the member cluster’s associated Azure Load Balancer being configured to distribute incoming traffic among the endpoints of the service, spanning multiple member clusters.
Azure Kubernetes Fleet Manager and Azure Arc
Azure Kubernetes Fleet Manager and Azure Arc provide powerful capabilities for managing and orchestrating Kubernetes clusters. While Azure Kubernetes Fleet Manager currently does not support Kubernetes clusters with Azure Arc, there is a possibility that it will be supported in the future. If this becomes a reality, it would be a significant game changer in the realm of multi-cluster management, especially in hybrid or multi-cloud scenarios.
The integration of Azure Kubernetes Fleet Manager with Azure Arc would enable administrators to centrally manage and control Kubernetes clusters across different environments, including on-premises and other cloud platforms. This unified management approach would simplify the management of diverse Kubernetes deployments, allowing organizations to efficiently scale, configure, deploy applications, and ensure consistency across their entire cluster fleet. It would provide a seamless experience for managing clusters in hybrid or multi-cloud scenarios, unlocking new possibilities for workload portability and resource optimisation.
The potential support of Kubernetes clusters with Azure Arc in Azure Kubernetes Fleet Manager would signify a significant advancement in multi-cluster management capabilities, offering organizations enhanced agility, flexibility, and control over their Kubernetes deployments. It would empower them to adopt a cohesive and unified approach to managing and orchestrating their clusters, irrespective of their underlying infrastructure, leading to streamlined operations and improved overall efficiency.
Microsoft is continuously developing features for Azure Kubernetes Fleet Manager. As Azure Kubernetes Fleet Manager is still in its Public Preview phase today, Microsoft has several upcoming features and capabilities planned for the offering. If you’re interested in following these developments closely, the public roadmap can be found on this GitHub page.
Efficient cluster management in practice
In the following steps we will familiarise ourselves with Azure Kubernetes Fleet Manager, by deploying the necessary infrastructure components with Terraform, and running some different experiments and scenario’s.
Prerequisites
The following part of this article assumes that you are familiar with the standard Terraform workflow. If you are unfamiliar with Terraform, complete the Get Started tutorials for Terraform first. Building CI/CD pipelines will not be covered in this blog article. Before we start, there are some prerequisites to fulfil:
- Azure tenant and user account: You’ll need an Azure tenant, an Azure Active Directory (Azure AD) instance. This instance is the foundation of the environment. And it allows you to create an identity (user account) to connect to Azure, set up the environment, and deploy the resources.
- Subscription: You’ll need a subscription and owner permissions to deploy the resources.
- Terraform: You’ll need the Terraform command-line interface to deploy and manage Azure resources. You can find more information about Terraform and the used providers on the HashiCorp documentation website.
- Azure CLI: You’ll need the Azure command-line interface for deploying the resources, and you can find more information about the Azure CLI in the documentation.
- Kubectl: You’ll need the Kubernetes command-line tool for deploying images and running other commands against your Kubernetes cluster. You can find more information about kubectl in the documentation.
- Kubelogin: You’ll need to install kubelogin in the Azure CLI. Refer to this page for the installation process.
- Visual Studio Code: You’ll need a code editor to inspect the files. Although any code editor will do and this is something of personal preference, Visual Studio Code is a good (and free) choice.
Once you have fulfilled the prerequisites, we are ready to move forward and deploy our Azure Kubernetes fleet with the necessary infrastructure components! We’ll cover the implementation through the example code that can be downloaded from this GitHub Repository.
Deploying the Azure Kubernetes Fleet with Terraform
Azure Kubernetes Fleet Manager offers several benefits and functionalities, even when using Terraform for Infrastructure as Code (IaC) to manage the infrastructure at scale. While Terraform focuses on infrastructure provisioning, Azure Kubernetes Fleet Manager specialises in managing the Kubernetes-specific aspects of cluster operations, including cluster lifecycle management and application deployment.
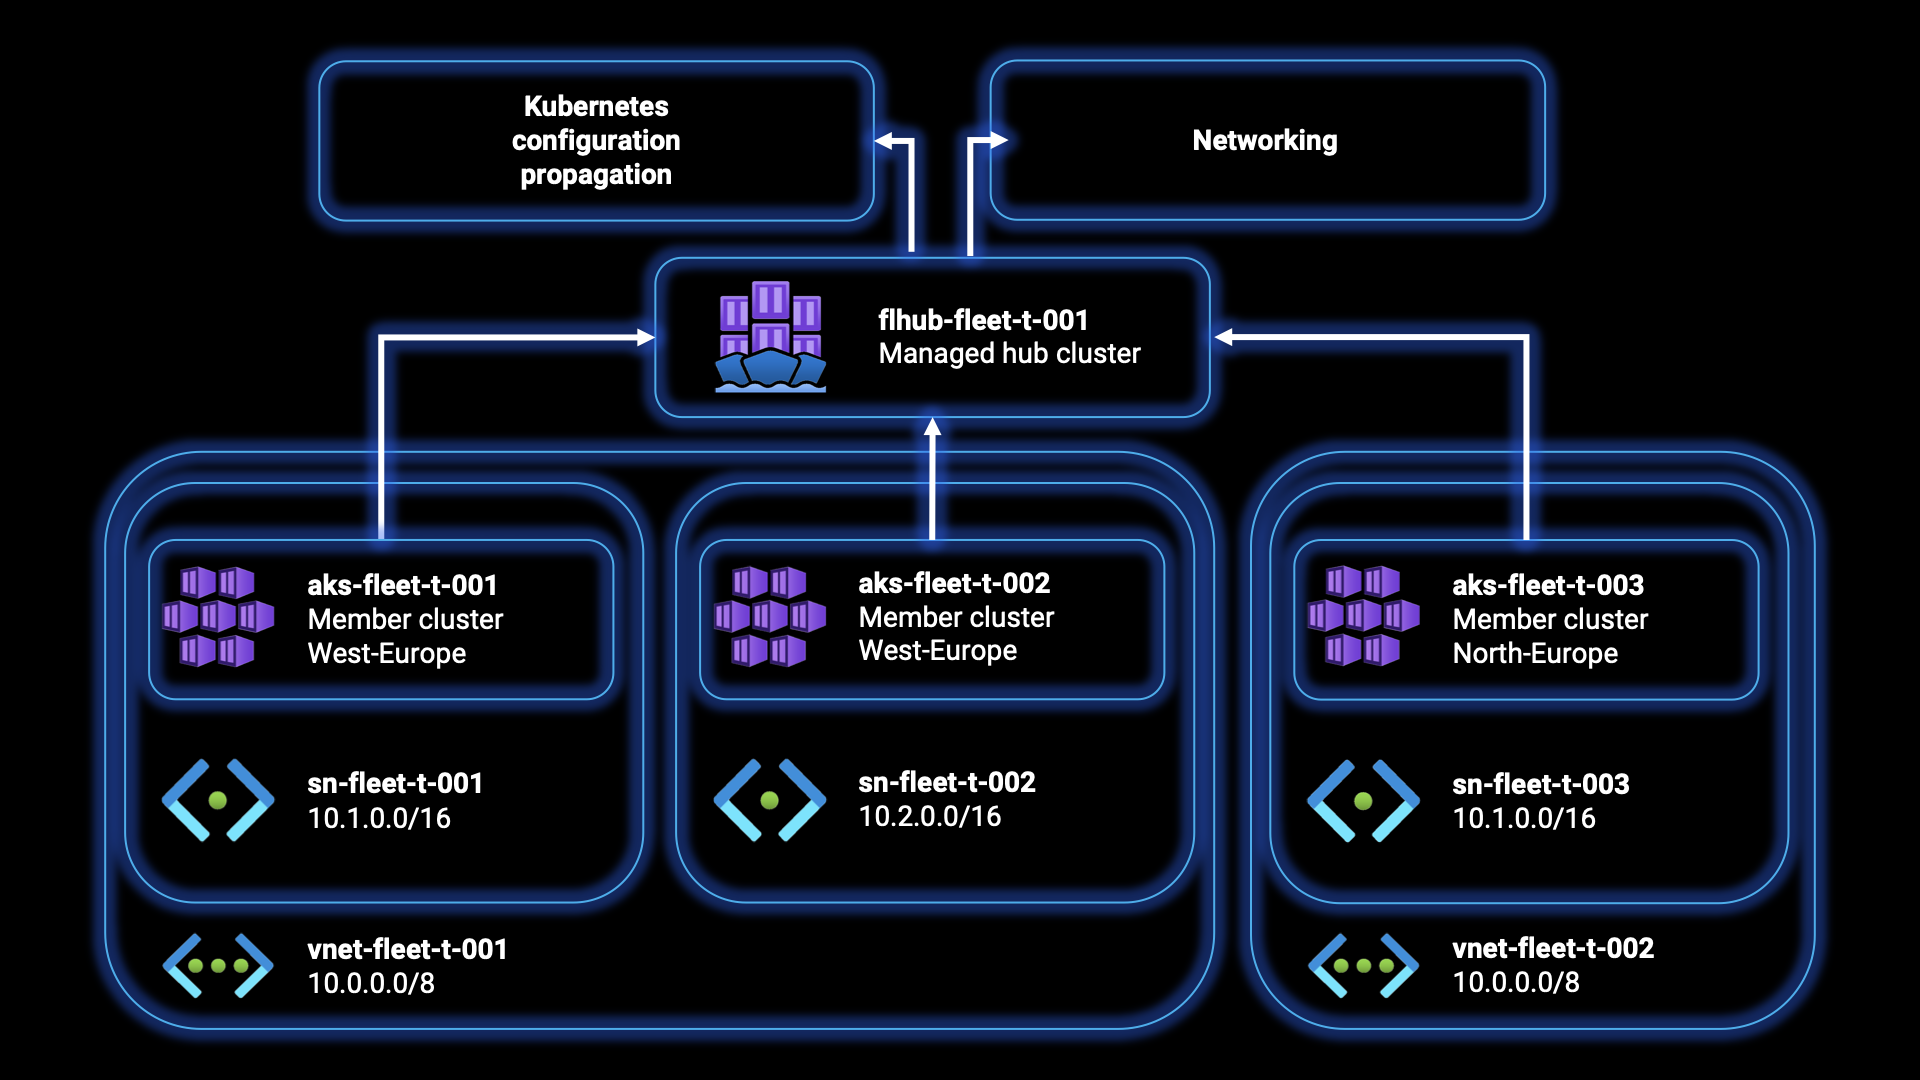
To familiarise ourselves with Azure Kubernetes Fleet Manager, we’ll start by deploying a fleet resource with three joined member clusters separated over two different virtual networks. This will give us a good overview of how the service works and how we can manage a fleet of Kubernetes clusters using Azure Kubernetes Fleet Manager.
From the downloaded files for this step-by-step guide, the Terraform folder contains the following files:
- main.tf: This file sets up the required providers for Terraform to interact with Azure and specifies the version of the providers to use. It also creates an Azure resource group (
azurerm_resource_group) that will contain the resource (azurerm_kubernetes_fleet_manager) related to the fleet. - network.tf: This file defines the networking infrastructure required for the clusters. It creates two virtual networks (
azurerm_virtual_network) with a specified address space and location. It also creates multiple subnets (azurerm_subnet) within the virtual networks to separate and isolate the clusters. Each subnet is associated with a specific AKS cluster. - clusters.tf: This file is responsible for creating the Azure Kubernetes clusters (
azurerm_kubernetes_cluster). It defines multiple AKS clusters, each with a unique name, location, and resource group. Each cluster has a default node pool and a network profile that specifies the network plugin to use. - vars.tf: This file contains variables that allow customization of the deployment. It includes variables for the service name, locations, and environment prefix. Modifying these variables will allow you to adapt the deployment to their specific requirements.
In addition to creating the infrastructure, the azapi_resource blocks in the clusters.tf file establish the association between the AKS clusters and Azure Kubernetes Fleet Manager. These resources create member clusters within the fleet, enabling centralized management of the clusters. Each azapi_resource block corresponds to a specific AKS cluster and includes the necessary configuration to link it to the fleet.
Step 1: Open a terminal or command prompt on your local machine.
Step 2: Log in to Azure using the Azure CLI by running the az login command. This will open a browser window where you can sign in with your Azure account credentials. Follow the prompts and complete the authentication process.
Step 3: After successful login, the terminal will display your Azure subscriptions. Take note of the Subscription ID associated with the desired subscription you want to use. Run the az account set -s <subscriptionId> command to switch to the desired subscription. Replace <subscriptionId> with the actual Subscription ID of the desired subscription. This command sets the specified subscription as the active one for your current session.
Step 4: Now, navigate to the working directory where the Terraform files are located. Use the cd command to change the directory. Open the vars.tf file in your code editor and adjust the variables to your liking. Modify the values of variables like ServiceName, Location, secLocation, and EnvironmentPrefix according to your requirements. Save the changes.
Step 5: Run the terraform init command to initialize the Terraform working directory and download the necessary provider plugins.
Step 6: After the initialization is complete, run the terraform plan command to preview the changes that Terraform will apply. This will show you a summary of the resources that Terraform will create, modify, or delete.
Step 7: If the plan looks satisfactory, run the terraform apply command to deploy the Azure resources. Terraform will ask for confirmation before proceeding. Type “yes” and press Enter to proceed with the deployment. After, you can sit back and wait for Terraform to provision the Azure Kubernetes clusters, virtual networks, subnets, and other associated resources. The deployment process may take several minutes. Once the deployment is complete, Terraform will display a summary of the resources created. Take note of any important information or outputs provided by Terraform.
Awesome! You have successfully logged in to Azure, switched to the desired subscription, and deployed the Azure Kubernetes clusters and associated resources using Terraform. Remember to always properly manage and secure your resources following best practices. This example deployment is in no way a representation of following these best practices, and should only be used for learning purposes, and never be used in (mission-critical) production environments!
Orchestrate updates across multiple clusters
When it comes to upgrading your clusters, we have a few options to choose from: full upgrade or node image only, and doing the upgrade in a specific order or one-by-one.
Step 8: Run the az extension add --name fleet command to add the Azure Kubernetes Fleet CLI extension to the Azure CLI. This extension provides additional functionality for managing Azure Kubernetes Fleet resources.
Step 9: Run the following commands to set the environment variables adjusted to your specific situation, where the SUBSCRIPTION_ID value should contain your subscriptionId from step 3, the GROUP value should contain your resource group name, and the FLEET value should contain your Azure Kubernetes Fleet hub resource name:
export SUBSCRIPTION_ID=<subscriptionId>
export GROUP=<resourceGroupName>
export FLEET=<azureKubernetesFleetHubName>
By using environment variables, you can easily reference and reuse these values in subsequent commands or scripts without having to hardcode them each time. These specific environment variables are being used in further commands in this guide.
Upgrade clusters one-by-one
In the following steps, we’ll be covering the commands to upgrade your clusters one-by-one. If you rather want to update your clusters in a specific order, skip to step 11.
Step 10a: Run the command below to update the Kubernetes version and the node image version for all clusters of the fleet one-by-one:
az fleet updaterun create --resource-group $GROUP --fleet-name $FLEET --name run-1 --upgrade-type Full --kubernetes-version 1.27.0
Note that we’re upgrading to Kubernetes version 1.27.0. You can find the latest supported Kubernetes versions on AKS on this Microsoft Learn page.
Step 10b: If you only want to update the the node image versions for all clusters of the fleet one-by-one, run the command below instead:
az fleet updaterun create --resource-group $GROUP --fleet-name $FLEET --name run-1 --upgrade-type NodeImageOnly
Step 11: Run the command below to start this update run:
az fleet updaterun start --resource-group $GROUP --fleet-name $FLEET --name run-1
Congratulations! You’ve now successfully upgraded your clusters one-by-one. You can now resume this guide from step 16.
Upgrade clusters in specific order
In the following steps, we’ll be covering the commands to upgrade your clusters in a specific order. If you already updated your clusters or don’t need to, skip to step 16.
Step 12a: First, we need to add the member cluster(s) to an update group. Update groups and stages provide more control on the sequence followed by update runs when updating the clusters. You can assign a member cluster to a specific update group by running the following command:
az fleet member update --resource-group $GROUP --fleet-name $FLEET --name <memberName> --update-group <updateGroupName>
Make sure you adjust the memberName, and updateGroupName to your situation. In this example I’ll add each cluster in a different group. If you haven’t changed the variables from the example files, you can run the commands as below:
az fleet member update --resource-group $GROUP --fleet-name $FLEET --name flmem-fleet-t-001 --update-group flug-fleet-t-001
az fleet member update --resource-group $GROUP --fleet-name $FLEET --name flmem-fleet-t-002 --update-group flug-fleet-t-002
az fleet member update --resource-group $GROUP --fleet-name $FLEET --name flmem-fleet-t-003 --update-group flug-fleet-t-003
Step 12b: You can also assign a member cluster to a specific update group when adding the member cluster to the fleet, running the following command:
az fleet member create --resource-group $GROUP --fleet-name $FLEET --name <memberName> --member-cluster-id <clusterId> --update-group <updateGroupName>
Make sure you adjust the memberName, clusterId, and updateGroupName to your situation.
Step 13: Now, we can define an update run by using update stages to pool together update groups for whom the updates need to be run in parallel. We can also specify a wait time between the update stages. First, run the following command to create the update run:
az fleet updaterun create --resource-group $GROUP --fleet-name $FLEET --name run-2 --upgrade-type Full --kubernetes-version 1.27.0 --stages exampleStages.json
Step 14: We’ll have to create a JSON configuration to define a deployment workflow where rthe updates are rolled out in stages, with the groups of clusters being targeted in each stage. Create a new file named exampleStages.json in your code editor, and fill it with the content below:
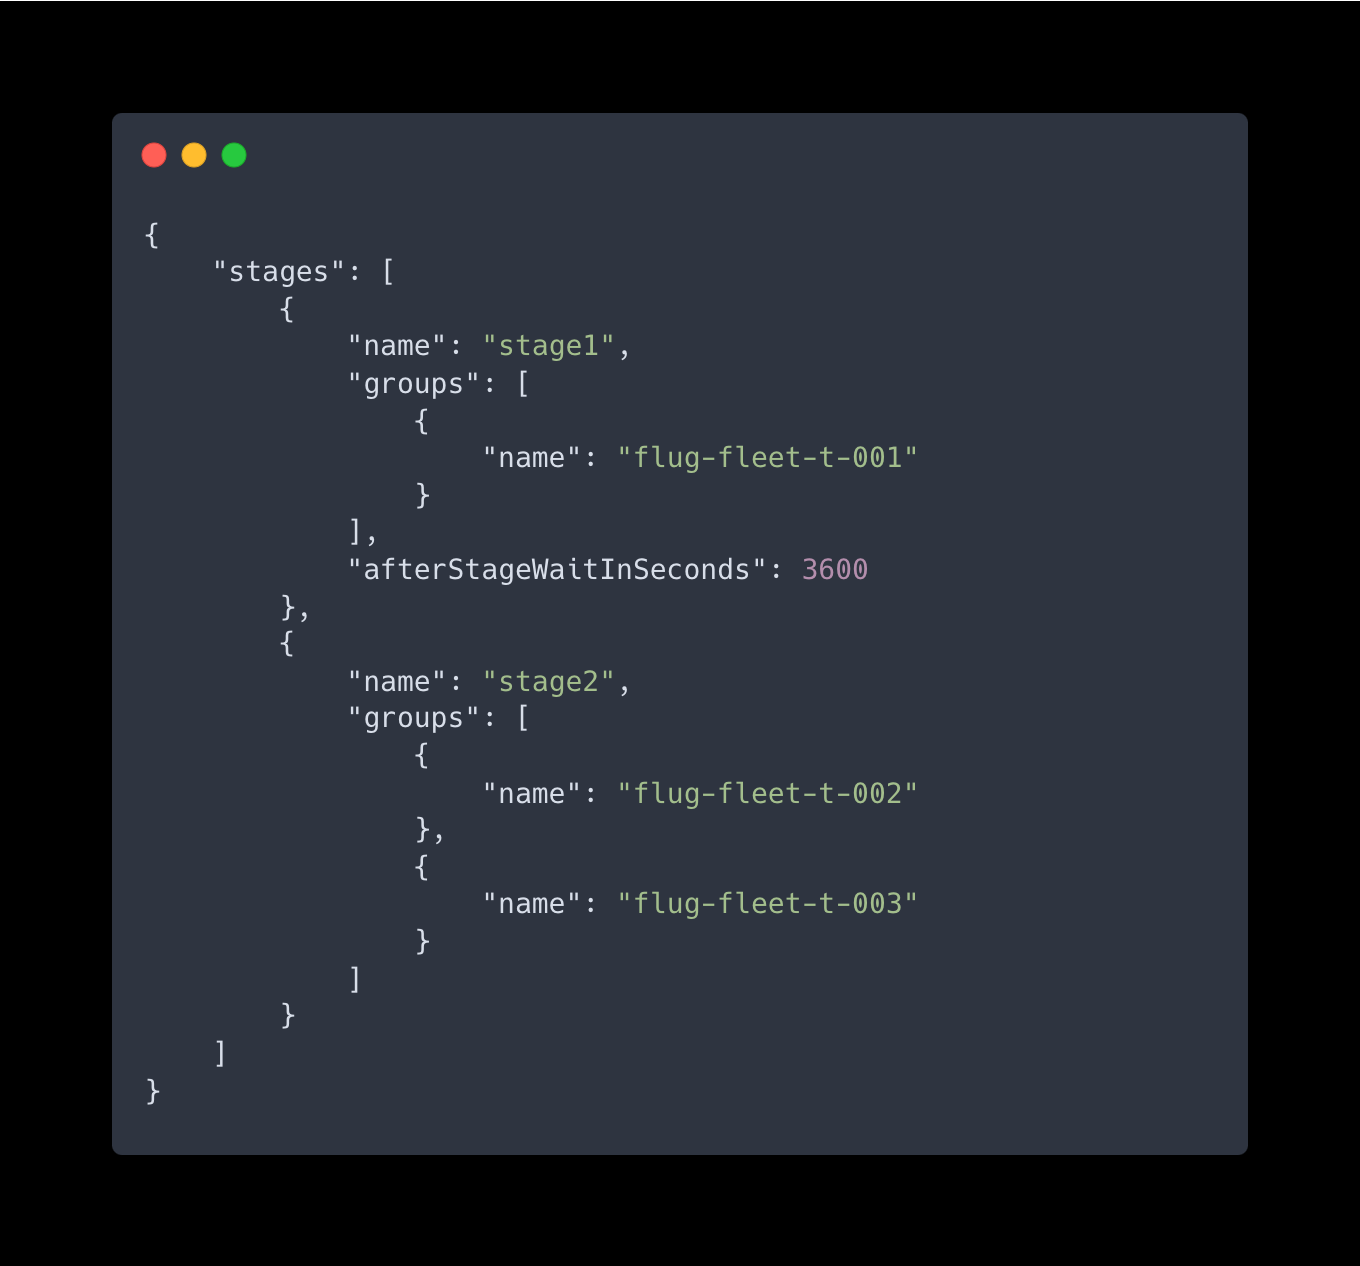
The name property is used to identify and reference each stage, and the groups property identifies the groups of clusters to be updated within each stage. The afterStageWaitInSeconds property can be used to introduce a delay between stages if necessary. Make any necessary adjustments to your liking and save it.
Step 15: Run the command below to start this update run:
az fleet updaterun start --resource-group $GROUP --fleet-name $FLEET --name run-2
Great! You’ve now successfully upgraded your clusters in a specific order.
Kubernetes configuration propagation with ClusterResourcePlacement
As described earlier in this article, there are two main ways to control the propagation of Kubernetes resource objects from a Fleet Manager resource to member clusters: resource selection, and target cluster selection. In the following steps we’ll get familiar with both.
ClusterResourcePlacement via resource selection
In the following steps, we propagate a Kubernetes namespace named “hello-world” to all clusters within the West-Europe region.
Step 16: Run the following commands to set the environment variables adjusted to your specific situation, where the SUBSCRIPTION_ID value should contain your subscriptionId from step 3, the GROUP value should contain your resource group name, and the FLEET value should contain your Azure Kubernetes Fleet hub resource name. The MEMBER_CLUSTER_# should contain the resource name of each of your AKS clusters:
export SUBSCRIPTION_ID=<subscriptionId>
export GROUP=<resourceGroupName>
export FLEET=<azureKubernetesFleetHubName>
export MEMBER_CLUSTER_1=<aksClusterMemberName1>
export MEMBER_CLUSTER_2=<aksClusterMemberName1>
export MEMBER_CLUSTER_3=<aksClusterMemberName1>
Step 17: Run the following commands to retrieve the credentials for the Azure Kubernetes Fleet Manager and member clusters:
az fleet get-credentials --resource-group ${GROUP} --name ${FLEET} --file fleet
az aks get-credentials --resource-group ${GROUP} --name ${MEMBER_CLUSTER_1} --admin --file aks-member-1
az aks get-credentials --resource-group ${GROUP} --name ${MEMBER_CLUSTER_2} --admin --file aks-member-2
az aks get-credentials --resource-group ${GROUP} --name ${MEMBER_CLUSTER_3} --admin --file aks-member-3
These commands fetch and save the credentials required to authenticate and access the Azure Kubernetes Fleet Manager and member clusters.
Step 18: Run the following commands to assign the “Azure Kubernetes Fleet Manager RBAC Cluster Admin” role to the current user for the Azure Kubernetes Fleet Manager resource:
export FLEET_ID=/subscriptions/${SUBSCRIPTION_ID}/resourceGroups/${GROUP}/providers/Microsoft.ContainerService/fleets/${FLEET}
export IDENTITY=$(az ad signed-in-user show --query "id" --output tsv)
export ROLE="Azure Kubernetes Fleet Manager RBAC Cluster Admin"
az role assignment create --role "${ROLE}" --assignee ${IDENTITY} --scope ${FLEET_ID}
These commands assign the necessary role to the user to manage the Azure Kubernetes Fleet Manager.
Step 19: Create the “hello-world” namespace within the Azure Kubernetes Fleet Manager cluster:
KUBECONFIG=fleet kubectl create namespace hello-world
Step 20: We’ll have to create a YAML file to define the desired configuration for the ClusterResourcePlacement object in Azure Kubernetes Fleet Manager, and specify that the “hello-world” Namespace resource should be propagated to clusters in the “westeurope” location based on a label selector. Create a new file named crp-1.yaml in your code editor, and fill it with the content below:
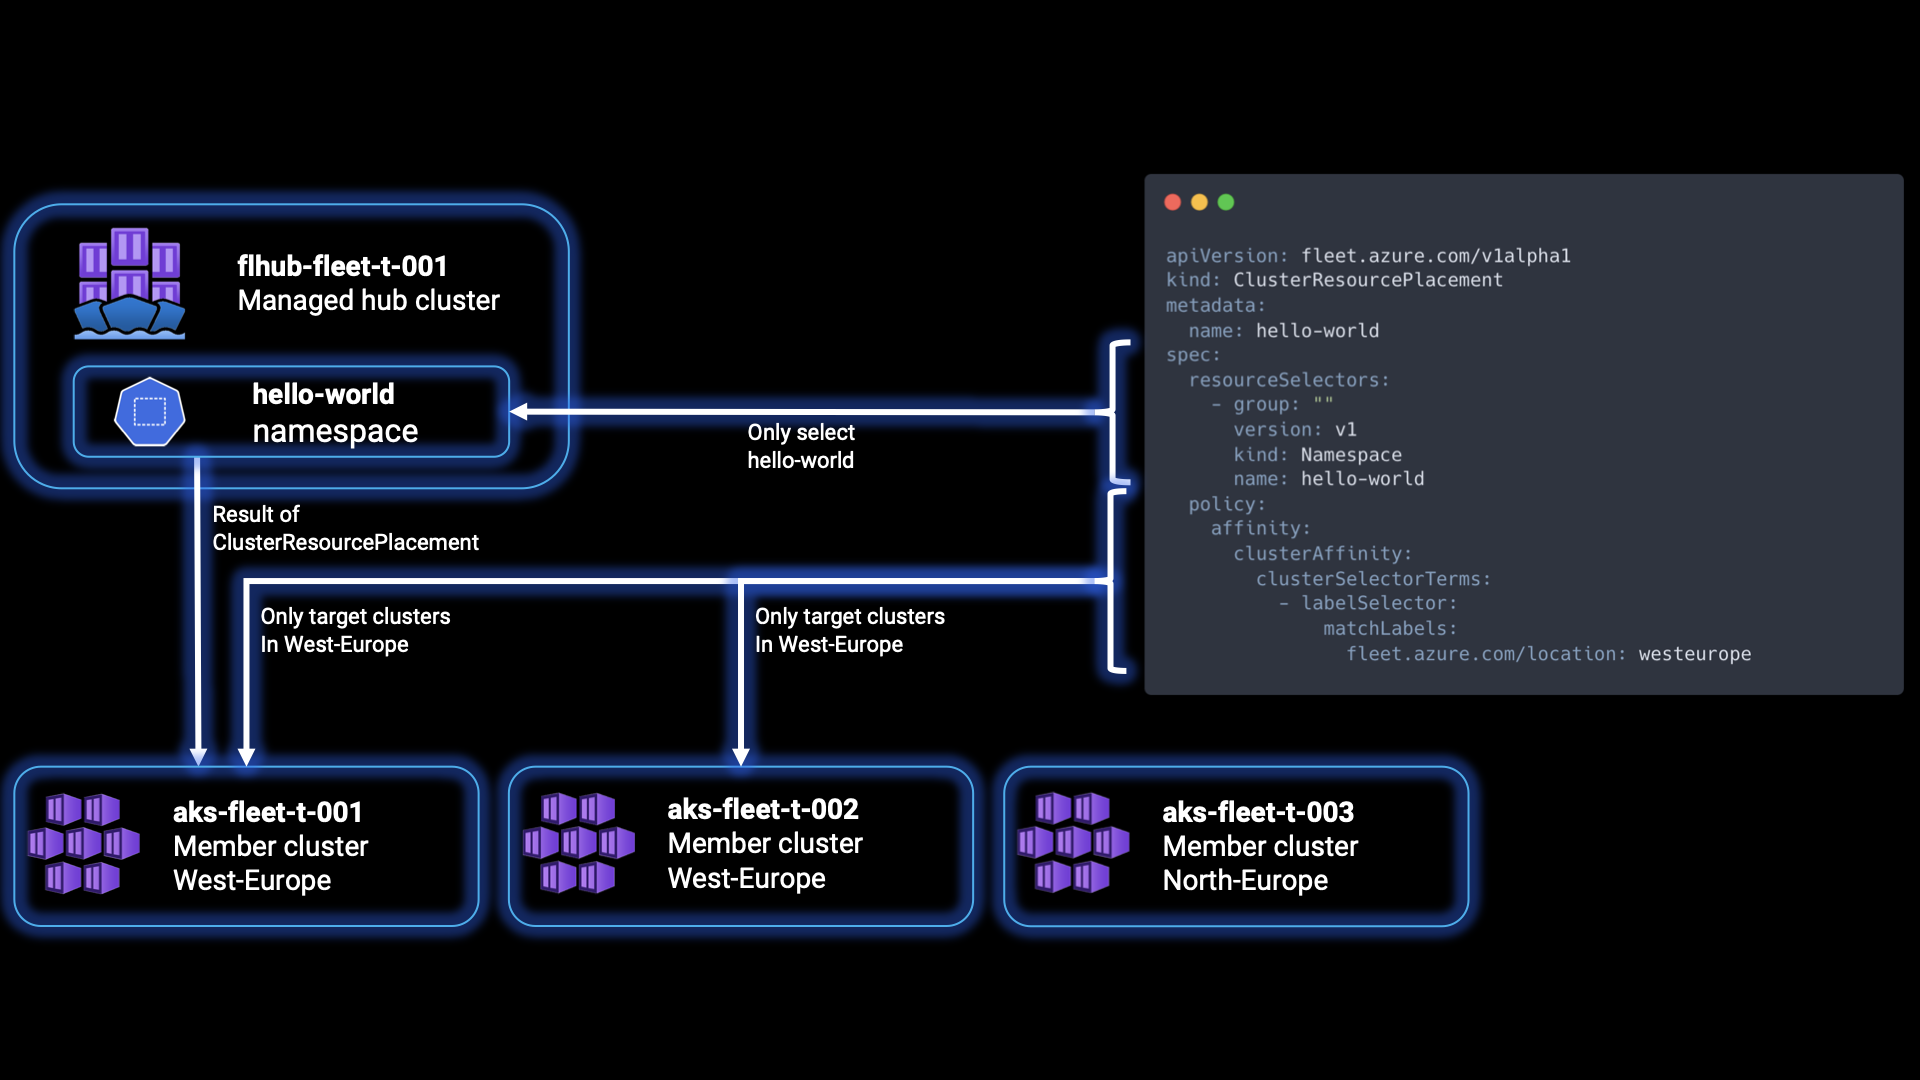
This is a Kubernetes manifest file written in YAML format. It describes a ClusterResourcePlacement object used in Azure Kubernetes Fleet Manager to specify how Kubernetes resource objects should be propagated to member clusters. The apiVersion specifies the API version of the custom resource definition being used. In this case, it is fleet.azure.com/v1alpha1, indicating the version of the Azure Kubernetes Fleet Manager API. The kind value specifies the type of Kubernetes resource. Here, it is ClusterResourcePlacement, which is a custom resource provided by Azure Kubernetes Fleet Manager. The metadata value contains metadata about the resource, such as the name. The spec value defines the specifications for the ClusterResourcePlacement object, containing the resourceSelectors specifying the criteria for selecting the resource objects to be propagated to member clusters. In this example, the group, version, kind, name values specify the properties of the resource to be selected, selecting the Namespace resource with the name hello-world in the v1 version of the core Kubernetes API.
The defined policy settings for propagating the selected resources consists of the specification of the affinity rules for resource placement; in our case clusterAffinity, related to cluster selection. The clusterSelectorTerms specifies the terms for selecting clusters based on labels, and the labelSelector definies the selector itself to match against the labels of the cluster. Lastly, the matchLabels value specifies the labes and their values to match against the labels of clusters. In our case, it selects clusters that have the label fleet.azure.com/location with a value of westeurope. If a policy is unspecified, the deployment will be done to all the member clusters by default.
Step 21: Apply the Kubernetes manifest file crp-1.yaml to propagate the resource objects to the member clusters, by running the following command:
KUBECONFIG=fleet kubectl apply -f crp-1.yaml
Step 22: Run the following commands to verify the presence of the “hello-world” namespace in each member cluster:
KUBECONFIG=fleet kubectl get clusterresourceplacements
KUBECONFIG=aks-member-1 kubectl get namespace hello-world
KUBECONFIG=aks-member-2 kubectl get namespace hello-world
KUBECONFIG=aks-member-3 kubectl get namespace hello-world
The first command display the cluster resource placements in the Azure Kubernetes Fleet Manager, and the following commands check if the “hello-world” namespace exists in each member cluster. In our case, aks-member-1 and aks-member-2 will show the namespace, but aks-member-3 won’t, as it is not in the westeurope region.
ClusterResourcePlacement via target cluster selection
Another way to propagate a Kubernetes resource object is to specifically target the resource to target member clusters. The propagation is then based on the names of the member clusters. In the following steps we will use a set of commands to perform the steps to create the goodbye-world namespace to one specific target member cluster.
Step 23: If you haven’t already, run the following commands to set the environment variables adjusted to your specific situation. These are the same as in step 16. The SUBSCRIPTION_ID value should contain your subscriptionId from step 3, the GROUP value should contain your resource group name, and the FLEET value should contain your Azure Kubernetes Fleet hub resource name. The MEMBER_CLUSTER_# should contain the resource name of each of your AKS clusters:
export SUBSCRIPTION_ID=<subscriptionId>
export GROUP=<resourceGroupName>
export FLEET=<azureKubernetesFleetHubName>
export MEMBER_CLUSTER_1=<aksClusterMemberName1>
export MEMBER_CLUSTER_2=<aksClusterMemberName1>
export MEMBER_CLUSTER_3=<aksClusterMemberName1>
Step 24: If you haven’t already, run the commands below to retrieve the credentials for the Azure Kubernetes Fleet Manager and member clusters. These are the same as in step 17:
az fleet get-credentials --resource-group ${GROUP} --name ${FLEET} --file fleet
az aks get-credentials --resource-group ${GROUP} --name ${MEMBER_CLUSTER_1} --admin --file aks-member-1
az aks get-credentials --resource-group ${GROUP} --name ${MEMBER_CLUSTER_2} --admin --file aks-member-2
az aks get-credentials --resource-group ${GROUP} --name ${MEMBER_CLUSTER_3} --admin --file aks-member-3
These commands fetch and save the credentials required to authenticate and access the Azure Kubernetes Fleet Manager and member clusters.
Step 25: If you haven’t already, run the commands below to assign the “Azure Kubernetes Fleet Manager RBAC Cluster Admin” role to the current user for the Azure Kubernetes Fleet Manager resource. These are the same as in step 18:
export FLEET_ID=/subscriptions/${SUBSCRIPTION_ID}/resourceGroups/${GROUP}/providers/Microsoft.ContainerService/fleets/${FLEET}
export IDENTITY=$(az ad signed-in-user show --query "id" --output tsv)
export ROLE="Azure Kubernetes Fleet Manager RBAC Cluster Admin"
az role assignment create --role "${ROLE}" --assignee ${IDENTITY} --scope ${FLEET_ID}
These commands assign the necessary role to the user to manage the Azure Kubernetes Fleet Manager.
Step 26: Create the “goodbye-world” namespace in the Azure Kubernetes Fleet Manager cluster:
KUBECONFIG=fleet kubectl create namespace goodbye-world
Step 27: We’ll have to create a YAML file to define the desired configuration for the ClusterResourcePlacement object in Azure Kubernetes Fleet Manager, and specify that the “hello-world” Namespace resource should be propagated to specific clusters. In our case we will target the flmem-fleet-t-001 cluster. If you haven’t made changes to the Terraform configuration files earlier, your first AKS cluster should still be targeted by this. Create a new file named crp-2.yaml in your code editor, and fill it with the content below:
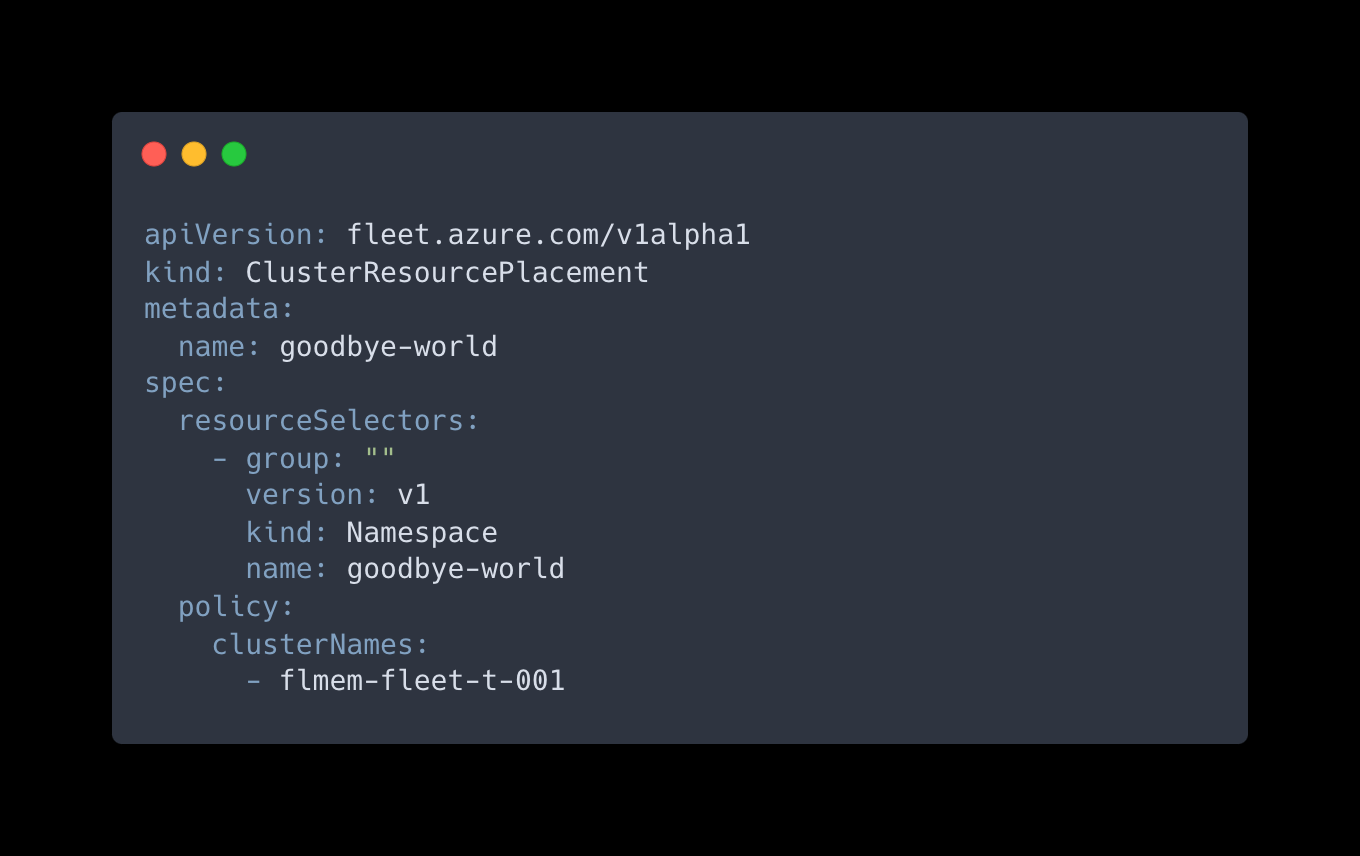
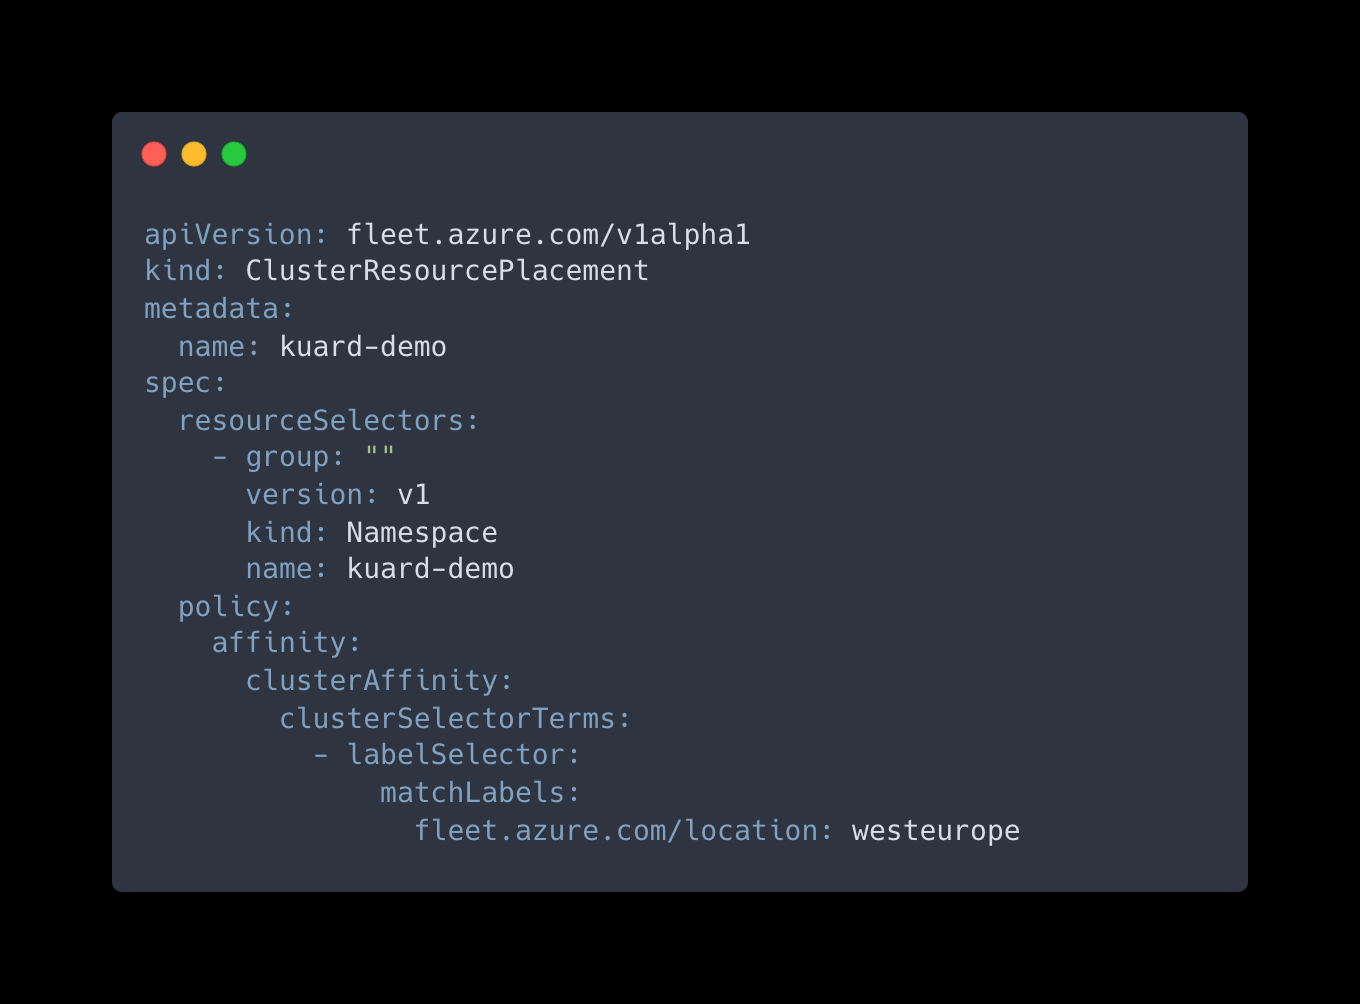
This is a Kubernetes manifest file written in YAML format. It describes a ClusterResourcePlacement object used in Azure Kubernetes Fleet Manager to specify how Kubernetes resource objects should be propagated to member clusters. The apiVersion specifies the API version of the custom resource definition being used. In this case, it is fleet.azure.com/v1alpha1, indicating the version of the Azure Kubernetes Fleet Manager API. The kind value specifies the type of Kubernetes resource. Here, it is ClusterResourcePlacement, which is a custom resource provided by Azure Kubernetes Fleet Manager. The metadata value contains metadata about the resource, such as the name. The spec value defines the specifications for the ClusterResourcePlacement object, containing the resourceSelectors specifying the criteria for selecting the resource objects to be propagated to member clusters. In this example, the group, version, kind, name values specify the properties of the resource to be selected, selecting the Namespace resource with the name goodbye-world in the v1 version of the core Kubernetes API.
The defined policy settings for propagating the selected resources consists of the specification of the target cluster names where the resource should be propagated. In this example, it targets the cluster with the name flmem-fleet-t-001.
Step 28: Apply the ClusterResourcePlacement YAML configuration file crp-2.yaml to specify the propagation rules, by running the following command:
KUBECONFIG=fleet kubectl apply -f crp-2.yaml
Step 29: Run the following commands to verify the presence of the “goodbye-world” namespace in each member cluster:
KUBECONFIG=fleet kubectl get clusterresourceplacements
KUBECONFIG=aks-member-1 kubectl get namespace goodbye-world
KUBECONFIG=aks-member-2 kubectl get namespace goodbye-world
KUBECONFIG=aks-member-3 kubectl get namespace goodbye-world
The first command display the cluster resource placements in the Azure Kubernetes Fleet Manager, and the following commands check if the “goodbye-world” namespace exists in each member cluster. In our case, only aks-member-1 will show the namespace, but aks-member-2 and aks-member-3 won’t, as they weren’t matched to the clusterNames value.
Congratulations! You’ve now familiarized yourself with ClusterResourcePlacement resource selection and **target cluster selection, and propagated namespaces in your clusters using this feature.
Configuring layer 4 multi-cluster load balancing with Fleet Manager
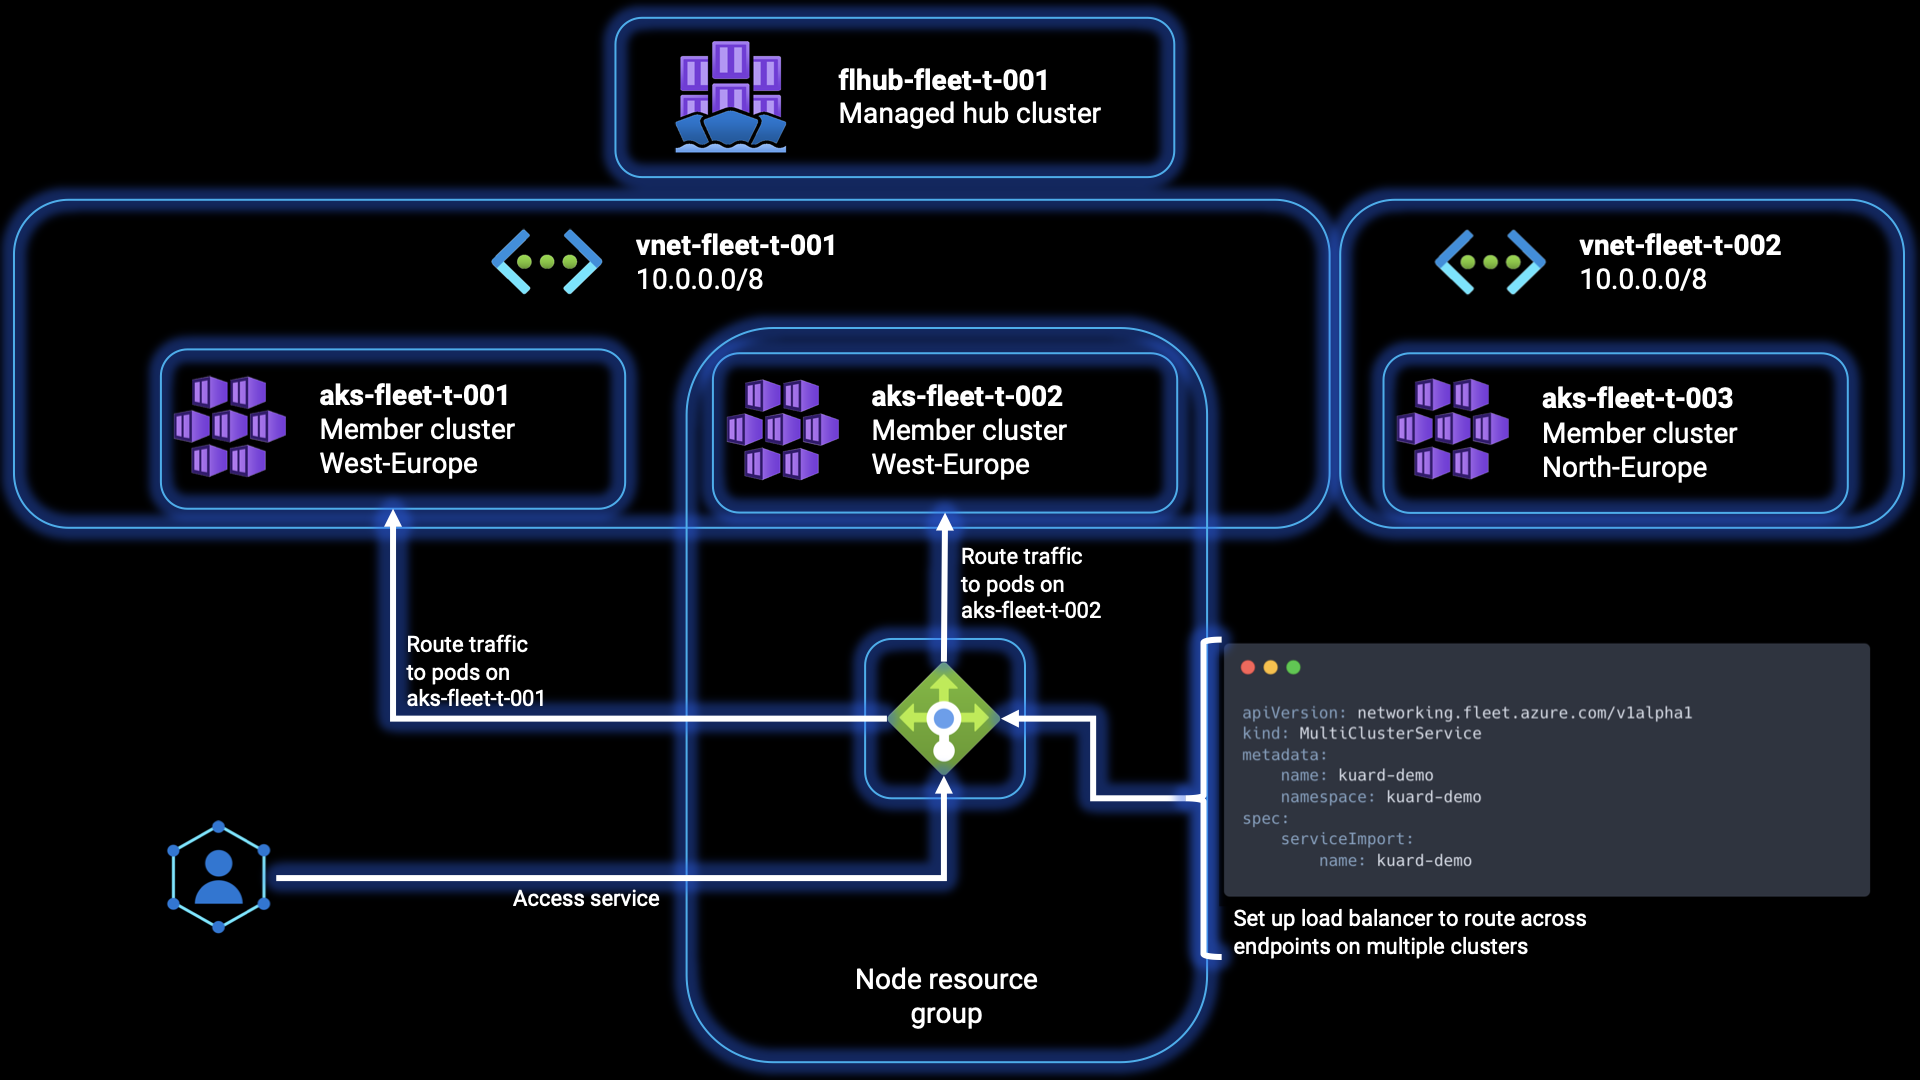
Once an application has been deployed on multiple clusters, you might have the need to configure load balancing for incoming traffic across the application endpoints on these member clusters. In the following steps, we will go through the process of setting up layer 4 load balancing for workloads that are deployed across the member clusters of a fleet.
As mentioned earlier in this article, it is necessary for the target clusters to use Azure CNI networking to enable multi-cluster load balancing. The propagation of the ServiceExport resource from the fleet cluster to a member cluster can be accomplished through Kubernetes resource propagation, which we’ll be doing in the following steps. After, we’ll set up layer 4 multi-cluster load balancing, by creating a MultiClusterService custom resource. This specifies the intention to configure the Azure Load Balancer on the member cluster to balance incoming traffic across endpoints of the service deployed on multiple member clusters.
Step 30: If you haven’t already, run the following commands to set the environment variables adjusted to your specific situation. These are the same as in step 16. The SUBSCRIPTION_ID value should contain your subscriptionId from step 3, the GROUP value should contain your resource group name, and the FLEET value should contain your Azure Kubernetes Fleet hub resource name. The MEMBER_CLUSTER_# should contain the resource name of each of your AKS clusters:
export SUBSCRIPTION_ID=<subscriptionId>
export GROUP=<resourceGroupName>
export FLEET=<azureKubernetesFleetHubName>
export MEMBER_CLUSTER_1=<aksClusterMemberName1>
export MEMBER_CLUSTER_2=<aksClusterMemberName1>
export MEMBER_CLUSTER_3=<aksClusterMemberName1>
Step 31: If you haven’t already, run the commands below to retrieve the credentials for the Azure Kubernetes Fleet Manager and member clusters. These are the same as in step 17:
az fleet get-credentials --resource-group ${GROUP} --name ${FLEET} --file fleet
az aks get-credentials --resource-group ${GROUP} --name ${MEMBER_CLUSTER_1} --admin --file aks-member-1
az aks get-credentials --resource-group ${GROUP} --name ${MEMBER_CLUSTER_2} --admin --file aks-member-2
az aks get-credentials --resource-group ${GROUP} --name ${MEMBER_CLUSTER_3} --admin --file aks-member-3
These commands fetch and save the credentials required to authenticate and access the Azure Kubernetes Fleet Manager and member clusters.
Step 32: If you haven’t already, run the commands below to assign the “Azure Kubernetes Fleet Manager RBAC Cluster Admin” role to the current user for the Azure Kubernetes Fleet Manager resource. These are the same as in step 18:
export FLEET_ID=/subscriptions/${SUBSCRIPTION_ID}/resourceGroups/${GROUP}/providers/Microsoft.ContainerService/fleets/${FLEET}
export IDENTITY=$(az ad signed-in-user show --query "id" --output tsv)
export ROLE="Azure Kubernetes Fleet Manager RBAC Cluster Admin"
az role assignment create --role "${ROLE}" --assignee ${IDENTITY} --scope ${FLEET_ID}
These commands assign the necessary role to the user to manage the Azure Kubernetes Fleet Manager.
Step 33: We’ll be deploying a sample workload to familiarize ourselves with this feature. First, create a new namespace with the name “kuard-demo” namespace in the Azure Kubernetes Fleet Manager cluster:
KUBECONFIG=fleet kubectl create namespace kuard-demo
Step 34: Next, execute the following step to apply the Deployment, Service, and ServiceExport objects. The ServiceExport specification provided in the reference file enables the exporting of a service from member clusters to the Fleet resource. Once the service is successfully exported, both the service itself and its associated endpoints will be synchronized with the fleet cluster. This synchronization allows for the establishment of multi-cluster load balancing across these endpoints. Run the command below:
KUBECONFIG=fleet kubectl apply -f https://raw.githubusercontent.com/Azure/AKS/master/examples/fleet/kuard/kuard-export-service.yaml
Step 35: We’ll have to create a YAML file to define the desired configuration for the ClusterResourcePlacement object in Azure Kubernetes Fleet Manager, and specify that the “kuard-demo” Namespace resource should be propagated to specific clusters. In our case we will target the clusters in the westeurope region. Create a new file named crp-3.yaml in your code editor, and fill it with the content below:
Step 36: Apply the ClusterResourcePlacement YAML configuration file crp-3.yaml to specify the propagation rules, by running the following command:
KUBECONFIG=fleet kubectl apply -f crp-3.yaml
If you feel the need to validate the status of your ClusterResourcePlacement, or if the service was successfully exported to the member clusters, repeat step 29.
Step 37: To enable load balancing across the service endpoints in these clusters, you need to apply the MultiClusterService on one of the member clusters. This will configure the necessary settings to distribute incoming traffic effectively across the endpoints of the service. Run the command below to do so:
KUBECONFIG=aks-member-1 kubectl apply -f https://raw.githubusercontent.com/Azure/AKS/master/examples/fleet/kuard/kuard-mcs.yaml
Step 38: Verify the MultiClusterService is valid by running the following command, and copy the EXTERNAL-IP value from the output for the next step:
KUBECONFIG=aks-member-1 kubectl get multiclusterservice kuard --namespace kuard-demo
Step 39: Run the command below multiple times using the External IP address you’ve copied from the previous step:
curl <EXTERNAL-IP>:8080 | grep addrs
You’ll see that the IPs of the pods serving the request is changing and that these pods are from member clusters aks-member-1 and aks-member-2 from the westeurope region.
Congratulations, you’ve now succesfully configured load balancing for incoming traffic across the application endpoints on multiple member clusters.
Closing words
In this article, we delved into the power of Azure Kubernetes Fleet Manager and its impact on managing and scaling Kubernetes clusters at a large scale. We discovered the myriad challenges organizations face in cluster management, scalability, configuration consistency, application deployment, monitoring, and team collaboration.
By harnessing the capabilities of Azure Kubernetes Fleet Manager, administrators can simplify cluster operations, automate scaling, ensure configuration consistency, streamline application deployments, and gain valuable insights through monitoring. With Azure Kubernetes Fleet Manager, organizations can confidently tackle the complexities of large-scale Kubernetes deployments, optimising efficiency, and maintaining a robust and resilient infrastructure. Embracing this powerful tool, as soon as its out of its Public Preview phase, will be a big game changer for unlocking the full potential of Kubernetes cluster management in the Azure ecosystem.
To learn more about the topics that were covered in this blog article, refer to the links below:
- Azure Kubernetes Fleet Manager (preview) | Microsoft Learn
- Azure Kubernetes Fleet Manager Roadmap (Public)
- Overview of Azure Arc-enabled Kubernetes - Azure Arc | Microsoft Learn
- Configure Azure CNI networking in Azure Kubernetes Service (AKS) - Azure Kubernetes Service | Microsoft Learn
- Docs overview | hashicorp/azurerm | Terraform Registry
- Docs overview | Azure/azapi | Terraform Registry
- Supported Kubernetes versions in Azure Kubernetes Service (AKS). - Azure Kubernetes Service | Microsoft Learn
Thank you for taking the time to go through this post and making it to the end. Stay tuned because we’ll keep continuing providing more content on topics like these in the future.